


12
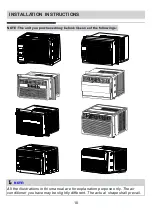
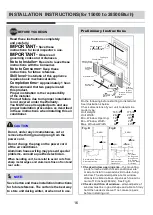
INSTALLATION INSTRUCTIONS
PREPARE THE WINDOW
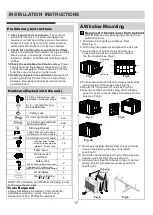
3/ 4 (or 1/
Screws
(7)
2 )
Lock Frame
(2)
Sash Lock
(1)
Mounting Hardware
Window sash
seal foam
(1)
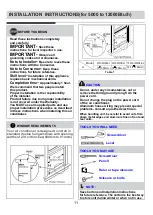
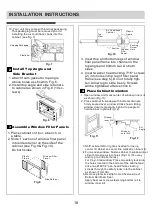
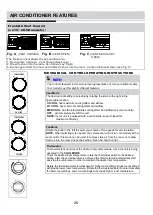
PREPARE AIR CONDITIONER
Lower sash must open sufficiently to allow a clear
vertical opening of 13 inches (330mm). Side louvers
and the rear of the AC must have clear air space to
allow enough airflow through the condenser, for heat
removal. The rear of the unit must be outdoors, not
inside a building or garage.
A: Remove the air conditioner from the carton and
place on a flat surface.
B: Remove top rail and
from the packaging material as shown in Fig. A.
R1 hardware (R1 hardware
and Weather stripping only for Energy star models)
Top Rail Hardware
3/8 Screws
(4)
Top Rail
(1)
Packaging
Fig.A
Top Rail
R1 hardware
(2)
R1 hardware(for
>
)
10000Btu/h models
only
R1 hardware
(for <
)
10000
Btu/h models
only
Fig.C
NOTE: The top rail hardware and the Fig.A,
Fig.B and Fig.C are not applicable to the units
more than 10000Btu/h. Before installing unit,
the top rail must be assembled on the unit (For
<10000Btu/h models only).
C: Align the hole in the top rail with those in the top
of the unit as shown in Fig.B
D: Secure the top rail to the unit with the 3/8 Screws
as shown in Fig.C.
For safety reasons, all four(4) screws MUST
be securely fastened.
NOTE:
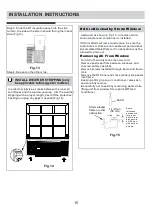
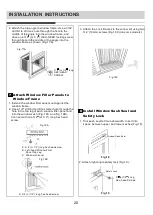
INSTALL THE ACCORDION PANELS
NOTE:
Top rail and Sliding Panels at each side are
offset to provide the proper pitch to the rear of (5/16 ).
This is
necessary for proper condensed water
utilization and drainage. If you are not using the Side
Panels for any reason, this pitch to the rear must be
maintained.
A.Place unit on floor, a bench or
a table. Hold the Accordion
Panel in one hand and gently
pull back the center to free the
open end. See Fig.1
Fig.1
Fig.B
Lock Frame
(2)
(For Wooden
windows)
(For Vinyl-Clad
windows)
(on some models)
(10 *3/4 *1/12 )
Weather stripping
(5)
Содержание MW06DRWBA1RCM
Страница 1: ...210 285 80g...


