background image


Care & Maintainence. 


Before any maintainence, please ensure unit is 
switched off: 


WARNING:


Servicing shall only be performed as recommended by 
the equipment manufacturer. 
 
Basic maintenance can be done by the consumer 
however any Repairs to this equipment requires skilled 
personnel competent in the use of flammable 
refrigerants.  
 

Please Contact MIDEA CUSTOMER & TECH 
SUPPORT on 1300 726 002 for further advice. 


Do not use any chemically treated cloth or duster to 
clean the unit. 
Do not use benzine, thinners, polishing powder or 
similar solvents for cleaning. These may cause 
the plastic surface to crack or deform. 
Never use water hotter than 40

O

C to clean 

the front panel (or air filters) as it could cause 
deformation or discoloration. 
 

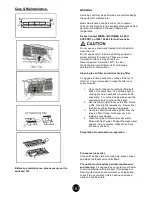
Cleaning the air filter and air freshening filter 

 
A clogged air filter reduces the cooling efficiency of 
this unit.  It is reccomended to clean the filter once 
every 2 weeks. 
 

1.  Open the front panel by carefully lifting both 

ends at the same time. At a certain angle, a 
clicking sound is heard and it becomes self-
supporting.  For some models please use the 
suspension bars to prop up the panel. 

2.  Use the tab provided to move the filter first up 

a little, then slightly towards you. Now extract 
the filter by gently drawing downwards. 

3.  Unclip the small air freshening filter from the 

large air filter. Clean it with vacuum, and 
replace it occasionally. 

4.  Clean the large air filter with soapy water. 

Rinse with fresh water. Shake off excess water 
and dry it in a cool place. (May shrink if put 
into sunny position) 


Preparation for extended non-operation 


Pre-season inspection 

If the unit has been idle for a long time, please 

check  


and clean 

the 

indoor unit and its filters.


The outdoor unit requires periodic maintenance 
and cleaning

. It is suggested you contact your dealer 

or service provider who will inspect for damaged or 
disconnected wires, check for water or oil leaks and 
check if the air outlets or inlets have been blocked 
while unit has been idle. 

Содержание MIS26

Страница 1: ...Inside you will find many helpful hints on how to use and maintain your air conditioner properly Just a little preventative care on your part can save you a great deal of time and money over the life...

Страница 2: ...E MAINTAINENCE Care Maintainence 9 Cleaning the unit 9 Cleaning the air filter and air freshening filter 9 Preparation for extended non operation 9 Pre season inspection 9 TROUBLESHOOTING TIPS Trouble...

Страница 3: ...e been given supervision or instruction concerning use of the appliance in a safe way and understand the hazards involved Children should not play with the appliance Cleaning and user maintenance shou...

Страница 4: ...er step onto the outdoor unit and never place anything on it Never use an unsteady or rusty base for the outdoor unit mounting Never install the air conditioner in places where combustible gas can be...

Страница 5: ...hen ECO function is activated the 88 in the display window illuminates gradually one by one as E C O Set temperature E in one second intervals TEMPERATURE MODE Cooling Operation Heating Operation Dryi...

Страница 6: ...e the remote controller to adjust the vertical air flow direction by pressing the Swing button The horizontal louver will start non stop up down swing The indoor unit displays on for a second then rev...

Страница 7: ...emperature is regulated while dehumidifying by The unit repeating turning on and off the cooling operation or fan only The fan speed is set to LOW HEATING OPERATION This air conditioner operates on th...

Страница 8: ...completely off Anto restart function After a power interruption such as a blackout the air conditioner stops but it restarts automatically and performs previous operation when the power supply return...

Страница 9: ...e every 2 weeks 1 Open the front panel by carefully lifting both ends at the same time At a certain angle a clicking sound is heard and it becomes self supporting For some models please use the suspen...

Страница 10: ...during operation or immediately after stopping the air conditioner a refrigerant flowing sound may be heard Squeaking sound normal expansion and contraction of plastic and metal parts caused by temper...

Страница 11: ...CE operation noise reduction is prioritized and the air conditioning performance may become lower Indicator lamps continue flashing The unit may stop operation or continue to run in a safety condition...

Страница 12: ...cooling and heating performance Pressing the Fan button MODE button ON OFF button or ECO button will cancel the Silent mode 4 FAN BUTTON Used to select the fan speed in four steps AUTO LOW MED HIGH F...

Страница 13: ...itioner will automatically clean and dry the Evaporator and keep it fresh for the next operation period Airborne bacteria use the moisture on the indoor Evaporator to grow Regular drying of the Evapor...

Страница 14: ...should be 24 O C or more If you feel uncomfortable due to insufficient cooling in this mode then just press the ECO button again to stop it 8 MODE BUTTON Press this button to modify the air condition...

Страница 15: ...tery display low battery detection Indicates LOCK feature is activated Displayed when in ECO mode operation Displayed when TIMER ON time is set Displayed when TIMER OFF time is set Shows set temperatu...

Страница 16: ...perature on the remote controller 2 When In the Auto mode you cannot change fan speeds as they are set automatically 3 If the Auto mode is not comfortable for you the desired mode can be selected manu...

Страница 17: ...play window To Set the Auto Off Time 1 Press the SET button until the Timer on indicator displays and flashes the last Auto off setting time and the signal h will be shown on the LCD display area Now...

Страница 18: ...lay area will show the temperature again The indicator remains on and this function is activated TIMER OFF Auto off operation The TIMER OFF feature is useful when you want the unit to turn off automat...

Страница 19: ...display 5 Wait for three seconds and the digital display area will show the temperature again The indicators remain on and this function is activated TIMER ON TIMER OFF Off Start Stop operation This...

Страница 20: ...oller 2 Remove the old batteries and insert the new batteries placing the and ends correctly 3 Re Install the cover back on NOTE When the batteries are removed the remote controller erases all program...

Отзывы: