


INSTALLATION LOCATION
Outdoor unit installation manual
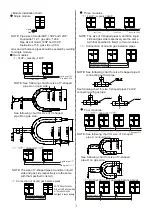
Outline
Name
1
2
Function
Qty.
90
elbow
Hole site for fork lift
Chassis
1
1
1
1
1
2
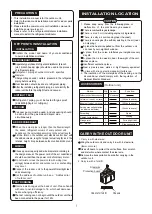
PRECAUTIONS
1. This installation manual is for the outdoor unit.
2. Refer to the indoor unit installation manual for indoor parts
installation.
3. Please read the power source unit installation manual to
install the power source unit .
4. Please refer to the refrigerant distributor installation
manual to install the refrigerant distributor.
KEY POINTS IN INSTALLATION
INSTALLATION
Confirm the model and name of your air conditioner
to avoid installation mistakes.
REFRIGERANT PIPING
Separately purchased refrigerant distributor (branch
joint, branch header pipe) should be used in the process
of refrigerant piping.
Charge nitrogen under certain pressure in the refrigerant
piping before welding.
Heat insulation should be done to refrigerant piping.
After the installing refrigerant piping, do not electrify the
indoor unit before the airtight test and vacuum.
Refrigerant piping should accord with specified
diameter.
AIRTIGHT TEST
Refrigerant piping must be tested for gas proof
2
[2.94MPa(30kg/cm ) nitrogen.]
VACUUM
Vacuum pump must be used, and vacuuming should
be done from the gas side and liquid side
simultaneously.
ADD REFRIGERANT
When the actual pipe is longer than the fiducial length,
the added refrigerant volume of every outdoor unit
depends on the calculating according to the actual length.
Fill the form on the outdoor unit electric control box with
the added volume, length of pipes (actual length) and the
relative height drop between outdoor unit and indoor unit.
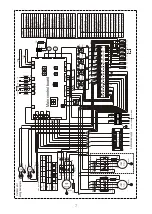
WIRING
Choose power capacity and wire diameter according to
the design manual. The power cord of the air conditioner
should be wider than the power cord of ordinary motor.
Connect the indoor unit to the power after airtight test
and vacuuming.
Do not twist or cross the power cord with wiring (low
voltage) between indoor and outdoor unit, or mishandling
may occur.
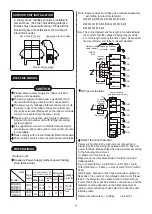
Set the address of outdoor unit, see
Address dial
of outdoor unit
TEST RUNNING
The test running can not begin until the outdoor unit has
been connected to the power for 12hr.
Remove six sponges at the back of unit. Please handle
with care to avoid damage to fin, which will decrease
heat exchanging efficiency.
1. Please keep away from the following place, or
malfunction of the machine may be caused:
2. The insulation of the metal parts of the building and the
air conditioner should comply with the regulation of
National Electric Standard.
CAUTION
There is combustible gas leakage.
There is much oil (including engine oil) ingredient.
There is salty air surrounding(near the coast)
There is caustic gas (the sulfide) existing in the air (near
a hotspring).
A place the heat air expelled out from the outdoor unit
can reach your neighbor's window.
A place that the noise interferes your neighbors every
day life.
A place that is too weak to bear the weight of the unit.
Uneven place.
Insufficient ventilation place.
Near a private power station or high frequency equipment.
A place with strong electromagnetic interference.
ACCESSORIES
(Outdoor unit)
Outdoor unit owner s manual
Indoor unit owner s manual
Service manual(guarantee
and bar code inside)
Screw bag
Straight screwdriver
(Given to users)
(Given to users)
(Given to users)
This manual
Spare
Dialling
For airtight test
Pipe connecting
Gauge joint
CARRY IN THE OUTDOOR UNIT
Sling the outdoor unit and carry it in with 4 steel wire
(
f
6mm or more)
Use soft board to protect the unit surface from scratch
and distortion where contact the steel wire.
Remove the transportation board after carrying in the
outdoor unit.
1. Carry in with steel wire:
2. Carry in with a fork lift
Protection board
Steel wire
Содержание MDV-D Series
Страница 12: ......


