background image


LUNA INVERTER SERIES

Service Manual 2012 

9ASI-A-1209 


Содержание 9ASI-A-1209

Страница 1: ...LUNA INVERTER SERIES Service Manual 2012 9ASI A 1209...

Страница 2: ...3 Pipe length and the elevation 17 6 4 Installation for the first time 18 6 5 Adding the refrigerant after running the system for many years 21 6 6 Re installation while the indoor unit need to be rep...

Страница 3: ...mble or repair the product there is risk of fire or electric shock Always ground the product There is risk of fire or electric shock Install the panel and the cover of control box securely There is ri...

Страница 4: ...y plug during operation There is risk of fire or electric shock Do not touch operation the product with wet hands Do not place a heater or other appliance near the power cable There is risk of fire an...

Страница 5: ...er supply plug or turn off the breaker There is risk of product damage or failure or unintended operation Take care to ensure that nobody could step on or fall onto the outdoor unit This could result...

Страница 6: ...or units Always insert the filter securely Clean the filter every two weeks or more often if necessary A dirty filter reduces the efficiency of the air conditioner and could cause product malfunction...

Страница 7: ...FN1 QRC4W 24k MS9A 24HRDN1 QRC4W MOF 24HFN1 QRC4W Filter Ionizer O Ionizer O Silver Ico Filter O Vitamin C Filter O 3M HAM Filter O Bio Filter O Golden Fin O killer of formaldehyde Compressor Crankcas...

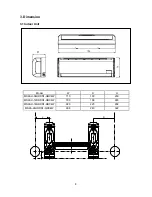
Страница 8: ...8 3 Dimension 3 1 Indoor Unit L R H Model W D H MS9AU 09HRDN1 QRC4W 710 190 250 MS9AU 12HRDN1 QRC4W 790 198 265 MS9AU 18HRDN1 QRC4W 920 223 292 MS9A 24HRDN1 QRC4W 998 240 322...

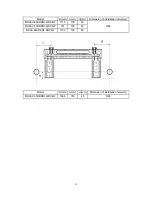
Страница 9: ...Dimension of installation hole mm MS9AU 09HRDN1 QRC4W 111 5 100 45 65 MS9AU 12HRDN1 QRC4W 151 100 45 MS9A 24HRDN1 QRC4W 118 5 100 45 Model R mm L mm H mm Dimension of installation hole mm MS9AU 18HRDN...

Страница 10: ...than 70cm More than 30cm More than 60cm Service space Fence or obstacles Model W D H W1 A B MOB 09HFN1 QRC4W 780 250 540 843 549 276 MOB 12HFN1 QRC4W 780 250 540 843 549 276 MOC 18HFN1 QRC4W 760 285 5...

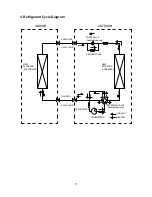
Страница 11: ...INDOOR OUTDOOR LIQUID SIDE GAS SIDE HEAT EXCHANGE EVAPORATOR HEAT EXCHANGE CONDENSER COMPRESSOR 2 WAY VALVE 3 WAY VALVE CHECK VALVE Heating Model only CAPILIARY TUBE REVERSING VALVE Heating Model onl...

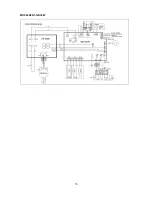
Страница 12: ...12 5 Wiring Diagram 5 1 Indoor Unit MS9AU 09HRDN1 QRC4W MS9AU 12HRDN1 QRC4W MS9AU 18HRDN1 QRC4W...

Страница 13: ...13 MS9A 24HRDN1 QRC4W...

Страница 14: ...14 5 2 Outdoor Unit MOB 09HFN1 QRC4W MOB 12HFN1 QRC4W MOC 18HFN1 QRC4W...

Страница 15: ...15 MOF 24HFN1 QRC4W...

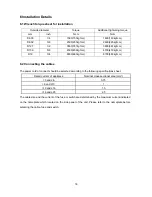
Страница 16: ...4 6500 663kgf cm 6700 683kgf cm 6 2 Connecting the cables The power cord of connect should be selected according to the following specifications sheet Rated current of appliance Nominal cross section...

Страница 17: ...MOB 09HFN1 QRC 4W 3 8 9 52 1 4 6 35 5 8 20 20 MS9AU 12HRDN1 QRC4W MOB 12HFN1 QRC 4W 5 8 20 20 MS9AU 18HRDN1 QRC4W MOC 18HFN1 QRC 4W 1 2 12 7 1 4 6 35 5 10 25 20 MS9A 24HRDN1 QRC4W MOF 24HFN1 QRC4 W 5...

Страница 18: ...t brush to check for leakage of the connecting points of the piping If bubbles come out the pipes have leakage 1 Air purging with vacuum pump 1 Completely tighten the flare nuts of the indoor and outd...

Страница 19: ...indicator is a little higher than the atmosphere pressure Then remove the charge hose from the 3 way valve 8 Fully open the 2 way valve and 3 way valve and securely tighten the cap of the 3 way valve...

Страница 20: ...rant if the pipe length 5m Procedure 1 Connect the charge hose to the charging cylinder open the 2 way valve and the 3 way valve Connect the charge hose which you disconnected from the vacuum pump to...

Страница 21: ...nnect the charge hose to the 3 way service port open the 2 way valve and the 3 way valve Connect the charge hose to the valve at the bottom of the cylinder If the refrigerant is R410A make the cylinde...

Страница 22: ...e the indoor unit need to be repaired 1 Collecting the refrigerant into the outdoor unit Procedure 1 Confirm that both the 2 way and 3 way valves are set to the opened position Remove the valve stem c...

Страница 23: ...y the refrigerant Procedure 1 Confirm that both the 2 way and 3 way valves are set to the closed position 2 Connect the charge set and a charging cylinder to the service port of the 3 way valve Leave...

Страница 24: ...tighten the service port cap to a torque 18N m Be sure to check the gas leakage 6 7 Re installation while the outdoor unit need to be repaired 1 Evacuation for the whole system Procedure 1 Confirm th...

Страница 25: ...le and record the weight 4 Open the valves Low side on the charge set and charge the system with liquid refrigerant If the system cannot be charge with the specified amount of refrigerant or can be ch...

Страница 26: ...26 Use torque wrench to tighten the service port cap to a torque of 18N m Be sure to check for gas leakage...

Страница 27: ...e above conditions certain safety protection features may come into operation and cause the unit to operate abnormally 2 The room relative humidity should be less than 80 If the air conditioner operat...

Страница 28: ...n lamp Lights up during Timer operation DEFROST indication lamp For cooling heating models only Lights up when the air conditioner starts defrosting automatically or when the warm air control feature...

Страница 29: ...ow 300RPM for certain time the unit will stop and the LED will display the failure 8 3 5 Inverter module protection The Inverter module has a protection function about current voltage and temperature...

Страница 30: ...tion in heating mode T1 Run supposed T1 26 high fan speed Run supposed T1 26 high fan speed T2 Refer to table 1 Refer to table 2 T3 Run with compressor frequency not higher than F14 3 minutes defrosti...

Страница 31: ...31 continuous 4 seconds and this situation happens 3 times the display area will show EC and AC will turn off...

Страница 32: ...unction is disabled and no setting temperature is displayed 3 Indoor fan can be set to high med low auto 4 The louver operates same as in cooling mode 5 Auto fan For MS9A 24HRDN1 QRC4W 27 5 27 High Lo...

Страница 33: ...T4FREMAX6 Fmax T4FREMAX7 Meanwhile the maximum frequency is limited by the indoor fan speed Indoor fan speed Maximum frequency High speed turbo function No limit Silent mode Fixed at F3 If users swit...

Страница 34: ...e frequency to 3 grade higher until to FREMAX B E Increase the frequency to 2 grade higher until to FREMAX F G Increase the frequency to 1 grade higher until to FREMAXd H Keep the current frequency I...

Страница 35: ...ooling While A B C means different fan speed of outdoor unit 8 4 2 3 Indoor fan running rules In cooling mode indoor fan runs all the time and the speed can be selected as high medium low auto and sil...

Страница 36: ...then runs at F1 If T3 54 the compressor will keep running at the current frequency T3 52 the compressor will not limit the frequency and resume to the former frequency T3 60 for 5 seconds the compress...

Страница 37: ...its to the following rule Fmax T4FREHEATMAX1 34 T4 Off 33 28 27 25 24 22 21 19 18 16 17 15 14 12 11 6 5 Fmax T4FREHEATMAX2 Fmax T4FREHEATMAX3 Fmax T4FREHEATMAX4 Fmax T4FREHEATMAX5 Fmax T4FREHEATMAX6 F...

Страница 38: ...the compressor running frequency will be controlled as below 5 0 4 5 3 5 3 0 2 5 2 0 1 5 T1 Ts T 1 0 I G F E D C B A 0 5 4 0 H J While the zones of A B C are corresponding to different compressor runn...

Страница 39: ...rules 21 19 A C 18 16 D 15 13 12 10 B E Heating 8 4 3 3 Indoor fan running rules In heating mode indoor fan can be selected as high medium low auto and silent The anti cold wind function is preferent...

Страница 40: ...rced to run 127 seconds with breeze During this period the anti cold wind is disabled Auto fan action in heating mode For MS9A 24HRDN1 QRC4W 2 5 T1 Ts 2 0 High Low 1 0 Medium 1 5 For other models 1 0...

Страница 41: ...0 2 If the compressor cumulate running time is up to 35 minutes and T3 TCDI2 T3 T30SUBT3TWO T30 3 If the compressor cumulate running time is up to 29 minutes and T3 TCDI3 for 3 minutes 4 If the compre...

Страница 42: ...Outdoor fan Indoor fan Indoor fan breeze 10s xx 10s no longer than 10m 30s FrequencyF16 10s Frequency F3 xx 60 For MS9AU 18HRDN1 QRC4W MS9A 24HRDN1 QRC4W Compressor on off on on on off off off 4 way v...

Страница 43: ...ling heating or fan only mode according to T T T1 Ts T T1 Ts Running mode T 1 Cooling 1 T 1 Fan only T 1 Heating Indoor fan will run at auto fan of the relevant mode The louver operates same as in rel...

Страница 44: ...the button once again within 5 seconds the machine will turn into forced cooling mode In forced auto forced cooling or any other operation mode pressing touch button will turn off the machine 8 4 6 2...

Страница 45: ...re decreases 1 be higher than 17 every one hour 2 hours later the setting temperature stops rising and indoor fan is fixed as low speed Anti cold wind function has the priority 8 4 8 3 Timer setting i...

Страница 46: ...ating operation the preset temperature of the air conditioner can be as lower as 8 which keeps the room temperature steady at 8 and prevents household things freezing when the house is unoccupied for...

Страница 47: ...porator coil temperature sensor open circuit or short circuit EC Refrigerant leakage detection F1 Outdoor ambient temperature sensor open circuit or short circuit F2 Condenser coil temperature sensor...

Страница 48: ...48 9 2 Diagnosis and Solution 9 2 1 EEPROM parameter error diagnosis and solution E0...

Страница 49: ...49 9 2 2 Indoor unit and outdoor unit communication protection error diagnosis and solution E1...

Страница 50: ...50 9 2 3 Zero crossing detection error diagnosis and solution E2 9 2 4 Indoor fan speed has been out of control diagnosis and solution E3...

Страница 51: ...51 9 2 5 Open circuit or short circuit of temperature sensor diagnosis and solution E4 E5 F1 F2 F3...

Страница 52: ...Does the problem remain again No Is there any leakage Especially the connection parts such as the gas valve and the liquid valve No Shut off the power supply and turn it on 5 seconds later Is it still...

Страница 53: ...53 9 2 7 Outdoor fan speed has been out of control diagnosis and solution F5...

Страница 54: ...uity check Check if the IPM terminal resistance values are uniform Replace the module PCB No Check if the IPM installed correctly Yes Correct the installation tighten the screws and apply silicon grea...

Страница 55: ...i f a l l t h e connections are good Disconnect the unit with power supply and try to restart the unit when power supply gets normal No Yes No Correct the connections Yes Check if the voltage between...

Страница 56: ...TAGE CAUTION Connect discharge resistance approx 100 40W or soldering iron plug between terminals of the electrolytic capacitor on the contrary side of the outdoor PCB Note The picture above is only f...

Страница 57: ...of each winding by using the multi meter Table 1 Some frequently used R T data for T1 T2 T3 and T4 sensor Temperature 5 10 15 20 25 30 40 50 60 Resistance Value K 26 9 20 7 16 1 12 6 10 8 5 2 3 5 2 4...

Отзывы: