6
English
Deutsch
Fran
ç
ais
Italiano
Nederlands
Espa
ñ
ol
1. Unpack scanner
Open your scanner package and check the
components as stated in your packing list. Install the
software first, then the hardware. Before proceeding
any further, check that you have the items listed on
the packing list. If any item is missing, contact
Microtek.
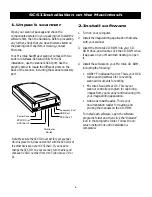
Your Microtek ScanMaker scanner comes with two
built-in interfaces: SCSI and USB. For SCSI
installation, use the scanner’s SCSI port. See the
graphic below to locate the different ports on the
back of the scanner, including the scanner accessory
port.
SCSI Installation on the Macintosh
2. Install software
1. Turn on your computer.
2. Install the image-editing application that came
with your scanner.
3. Insert the Microtek CD-ROM into your CD-
ROM drive, and double-click the CD-ROM when
it appears on your Macintosh desktop to open
it.
4. Install the software on your Microtek CD-ROM,
including the following:
•
ABBYY FineReader Sprint
. This is your OCR
text-scanning software for converting
scanned documents for editing.
•
Microtek ScanWizard 5.
This is your
scanner controller program for capturing
images from your scanner and delivering it to
your image-editing application.
•
Adobe Acrobat Reader
. This is your
documentation reader for reading and
printing the manuals on the CD-ROM.
To install each software, open the software
program's folder and then click the “Installer”
icon in that program's folder. Follow the on-
screen instructions until installation is
completed.
Note: Make sure the SCSI ID number for your scanner,
which is preset to 6, does not conflict with the SCSI IDs of
the other devices on your SCSI chain. If you need to
change the SCSI ID on your scanner, turn the dial and
choose a SCSI ID number from 0 to 5 (do not use 7, 8 or
9).
Accessory Port
USB Port
SCSI Port 2
Terminator
Switch
SCSI ID Dial
Power Cord
SCSI Port 1


