Microtek ArtixScanDI 6240S Скачать руководство пользователя страница 11

ArtixScan DI 6240S/6250S/6260S & ArtixScan TS 630S User's Manual          11
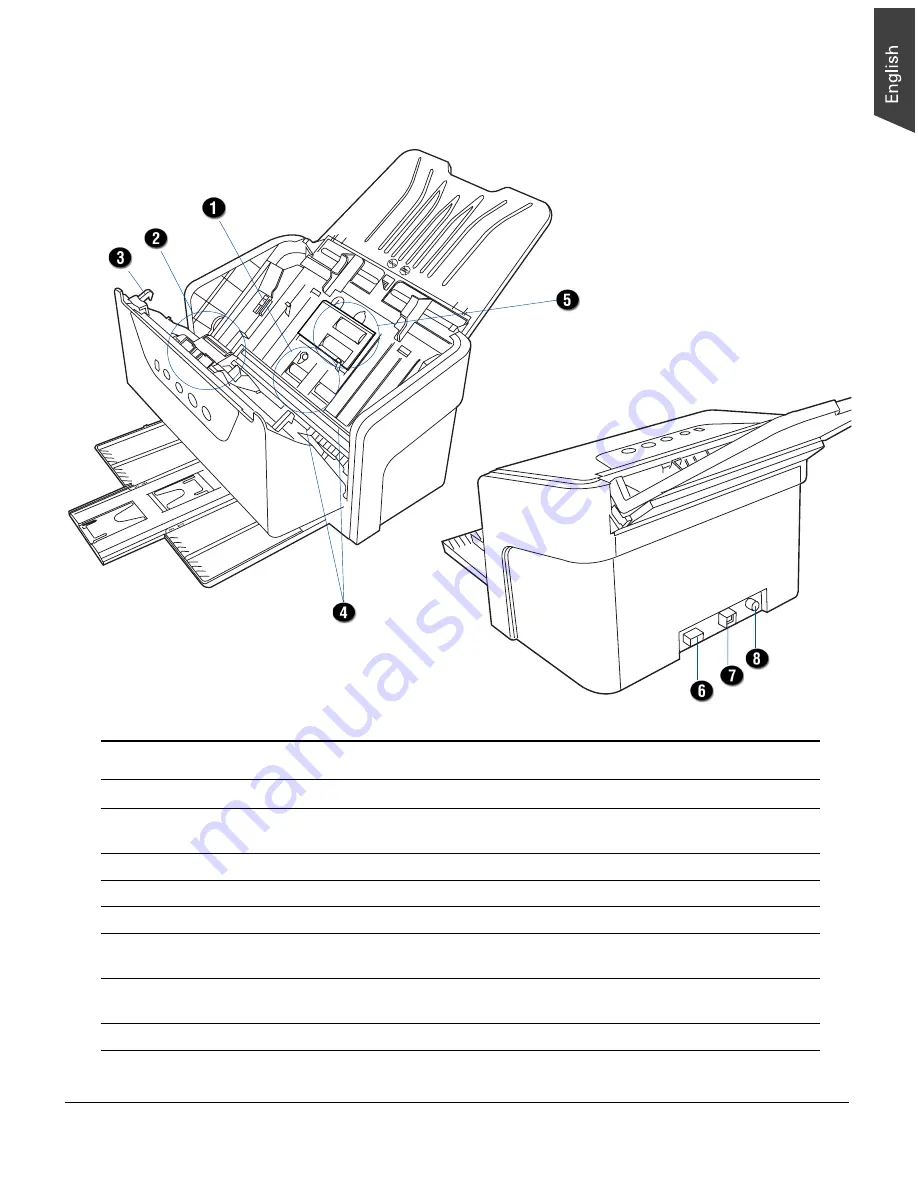
Open/Back View

No.

Names of Parts

Functions of Parts

1

Output Rollers

Used to eject documents after scanning.

2

Separation Roller Assembly

Used to separate each sheet of documents when a

stack of documents are fed into the feeder.

3

Release button

Lifts up to open the scanner cover.

4

Glass Surfaces

The places where the CCD cartridges are stored.

5

Feed Roller Assembly

Used to feed documents into the feeder.

6

Hi-Speed USB Port (2)

Connects the Hi-Speed USB (USB 2.0) cable to another

flatbed scanner.

7

Hi-Speed USB Port (1)

Connects the Hi-Seed USB (USB 2.0) cable to the

computer.

8

Power Connector

Connects the scanner to the power adapter.

Содержание ArtixScanDI 6240S

Страница 1: ...www microtek com Document Imaging Scanner ArtixScanDI 6240S ArtixScanDI 6250S ArtixScanDI 6260S ArtixScanTS 630S User s Manual...

Страница 2: ...red trademarks are the property of their respective holders Specifications software and hardware bundles are subject to change without notice Not responsible for typographical errors Disclaimer The co...

Страница 3: ...the equipment off and on the user is encouraged to try to correct the interference by one or more of the following measures Reorient or relocate the receiving antenna Increase the separation between t...

Страница 4: ...e point where it exits from the outlet When the scanner is left unattended and unused for long periods of time unplug it from the wall outlet Moving and Storing the Scanner Do not place the scanner on...

Страница 5: ...13 Step 3 Opening Feed Tray Output Tray 14 Step 4 Connecting the Scanner 16 To the Power Adapter 16 To the Hi Speed USB Cable 16 Connecting to an External USB Device 18 Positioning Documents 19 To Loa...

Страница 6: ...Cleaning the Rollers 42 Cleaning the Sensors 43 Cleaning the Recesses of the Roller Cover 44 Maintenance 45 Replacing the Separation Roller Assembly 45 Replacing the Feed Roller Assembly 47 Appendix 5...

Страница 7: ...apers through the feeder Chic and Easy to access programmable function button The scanner is equipped with one Select One Scan Stop and one Favorite buttons located on the top of the scanner used to a...

Страница 8: ...at includes multi image elements Remove Blank Page With this feature blank pages are automatically detected and removed by the software when scanning a stack of documents This function is quite helpfu...

Страница 9: ...m requirements CD ROM DVD ROM drive for installing software Color display with 24 bit color output capability 1 GB RAM or more 2 GB is recommended Intel Core2 Duo Processor at 2 1 GHz PC or higher wit...

Страница 10: ...ed to keep a stack of the output documents with different sizes neatly in the Document Output Tray 7 Button Panel Power Button Turns the scanner on or off Select Button Toggles through the numbers of...

Страница 11: ...a stack of documents are fed into the feeder 3 Release button Lifts up to open the scanner cover 4 Glass Surfaces The places where the CCD cartridges are stored 5 Feed Roller Assembly Used to feed doc...

Страница 12: ...acking your scanner package follow the steps in order for a quick and easy installation process Step 1 Unpacking Package Contents After unpacking your scanner package please check for the major compon...

Страница 13: ...ce the Microtek Software CD DVD ScanPotter into a drive and double click the ScanPotter installer icon to install ScanPotter 3 Install the remaining software components then restart your computer at t...

Страница 14: ...st level which can be opened Before After 2 Along the tracks of the two sides of the Document Feed Tray slide the feed tray down until the supporters of the tray touch the bottom edge of the tracks 3...

Страница 15: ...er Stabilizer Bring down the Document Output Tray from the top towards the direction as shown in the graph Document Output Tray Then locate the Paper Stabilizer located at the bottom of the scanner co...

Страница 16: ...dapter to the back of the scanner 2 Plug one end of the power cord into the power adapter and plug the other end of the power cord into a wall outlet or other power source To the Hi Speed USB Cable 3...

Страница 17: ...l 17 5 Press and hold the Power button until the orange LED lights on Once the scanner is powered on the green LED will be lighted up and the 7 segment LED display SSD will also be activated as well T...

Страница 18: ...section to connect your scanner first 2 Connect an external USB device to your scanner 3 Turn on your computer The system will start to locate your external USB device When the external USB device is...

Страница 19: ...Document Feed Tray 2 Align the top edges of the papers neatly 3 Load the stack of papers onto the Document Feed Tray with the side to be scanned facing down and the top edge facing toward the feeder P...

Страница 20: ...e stack of originals with the center of the Document Feed Tray by sliding the two Guide Arms toward the stacked papers if needed 5 Pull out the Output Tray Extender to carry the longer paper if needed...

Страница 21: ...aper Stopper 1 or 2 depending on the length of the paper 3 Take out one piece of paper from the Be sure the stopper is lightly against the edge of the paper Load the paper inside the space between the...

Страница 22: ...to scan documents with mixed paper sizes To open it bring it down gently from the top towards the direction as shown in the graph Paper Stabilizer NOTE If the papers to be scanned are too thin please...

Страница 23: ...Guide Arms toward the center of the feed tray and free up the enough space to put the card inside 2 Load and center the card into the Document Feed Tray with the front side facing up and the top edge...

Страница 24: ...S 6250S 6260S Max 8 85 x 118 225 mm x 3000 mm Min 2 75 x 3 149 70 mm x 80 mm ArtixScan TS 630S Max 8 85 x 25 225 mm x 635 mm Min 2 75 x 3 149 70 mm x 80 mm Paper weight 8 to 32 lbs 30 08 to 120 32 g m...

Страница 25: ...ls in the feed tray for it will damage the originals when performing the feeding process Before using the ScanWizard DI make sure that your anti virus software program has been turned off Otherwise th...

Страница 26: ...corrects the distorted image for proper alignment 5 Click the Preview button to perform a preliminary view of the entire image When done a preview image appears in the Preview window Do not forget to...

Страница 27: ...requirements 8 Click the OK button to close the Scan Setup interface and return to the Main interface of ScanWizard DI 9 In the Main interface click the File Format menu button to select a file forma...

Страница 28: ...ArtixScanTS 630S User s Manual AP control panel Main interface TWAIN driver control panel Scan Setup interface File Location menu box Click on a thumbnail image to enlarge it in the Image View Window...

Страница 29: ...face of ScanWizard DI 6 In the Main interface click the File Format menu button to select a file format for the scanned images 7 In the Main interface click the File Name menu button and then select B...

Страница 30: ...ArtixScanTS 630S User s Manual AP control panel Main interface TWAIN driver control panel Scan Setup interface File Location menu box Click on a thumbnail image to enlarge it in the Image View Window...

Страница 31: ...the arrow icon next to the Scan mode button and then select Card Scan 4 Click the File Format menu button to select a file format for the scanned images 5 Click the File Name menu button to specify a...

Страница 32: ...g Adobe PhotoShop 3 Select the Microtek ScanWizard DI TWAIN driver in the Import options from the File menu When succeeded the ScanWizard DI TWAIN driver interface appears on the screen 4 In the inter...

Страница 33: ...ed images into text files that can be edited in any common word processing applications e g Word Excel PowerPoint 1 Check the box next to the images or use the selection tools All and Invert to select...

Страница 34: ...he system allows you to save the scanned image files to a single file when OCR is complete Compression This menu box lets you select a file format which supports file compression feature The available...

Страница 35: ...e box next to the images or use the selection tools All and Invert to select the image files you want to send out by E mail in the Thumbnail View window Selection tools E Mail button Thumbnail View wi...

Страница 36: ...printer into a convenient copy station 1 Check the box next to the images or use the selection tools All and Invert to select the image files you want to make a copy in the Thumbnail View window Sele...

Страница 37: ...Select Scan Stop and Favorite used to automate a number of customized and predefined operations such as scanning to a file sending an image to your printer or e mail account scanning for OCR etc Custo...

Страница 38: ...on Settings interface 1 Look for the Scanner icon at the right corner of Toolbar on your Windows desktop Scanner icon Click Settings to enable the Scanner Button Settings interface 2 Move your mouse o...

Страница 39: ...ction button c Make your selection among the Function radio buttons below to define your selected button The four functions provided are Scan To Captures images that can be automatically saved as file...

Страница 40: ...You can use it as a hot key to store one set of operational parameters used most frequently How the Scanner Buttons Works When you finish customizing the function buttons follow the steps below to pe...

Страница 41: ...up the Release button in the direction as shown in the graph to open the scanner cover 2 When the scanner cover is opened you can find two scanner glass surfaces locating at the inner sides the scanne...

Страница 42: ...er Feed Rollers Output Rollers 2 When the scanner cover is opened you can find several groups of rollers locating at the inner sides of the scanner Then clean the rollers with a lint free cloth or a s...

Страница 43: ...ction as shown in the graph to open the scanner cover 2 When the scanner cover is opened you can find four sets of sensors Ultrasonic Double feed sensors I O sensors and Tray sensors locating at the i...

Страница 44: ...ion as shown in the graph to open the scanner cover 2 When the scanner cover is opened you can find two recesses at the top of the roller cover Then clean the levers with a lint free cloth or a swab m...

Страница 45: ...low the procedure below for replacement of the Separation Roller and Feed Roller Assembly Replacing the Separation Roller 1 Lift up the Release button in the direction as shown in the graph to open th...

Страница 46: ...ke note that two flanges on the roller are designed in different sizes The left flange is wider than the right one Make sure that you have put them at the correct side before inserting them into the s...

Страница 47: ...ction as shown in the graph to open the scanner cover Locate the Feed Roller Assembly at the inner side of the scanner 2 Pull down the roller cover with your finger to open the roller cover After the...

Страница 48: ...ully from its compartment 4 Insert the new roller into its compartment a Mount the roller with a white cap at the right of the roller into the mounting socket at the right side of the compartment b Th...

Страница 49: ...at the bottom 6 After done push the roller cover up until you hear a click NOTE The recommended replacement point for your Feed Roller Assembly is after scanning approximately 100 000 scans through t...

Страница 50: ...r cover 3 Close the scanner cover You should hear a click sound when the scanner cover returns to its original position NOTE Do not take out a jammed paper by force from the scanner when the scanner c...

Страница 51: ...button and close the ScanWizard DI or ScanPotter Control Panel Disconnect the Hi Speed USB cable from the back of your computer and refer to the installation instructions in this document 3 After cli...

Страница 52: ...jam or roller failure Click OK first then open the scanner cover as illustrated in the pervious section Fixing Paper Jams If the problem is occurring from a paper jam follow the procedures laid out i...

Страница 53: ...1 Fold the A3 size document at the point you want 2 Open the sheath and then insert the document into the sheath with the side to be scanned as the first image facing down Position the top end of the...

Страница 54: ...evice in the Scan Source drop down menu 3 Follow the procedures described in previous scanning scenarios of this manual to specify your scanning requirements 4 Click the Setup button next to the Combi...

Страница 55: ...8 5 x 118 216 mm x 3000 mm Min 1 x 1 25 4 mm x 25 4 mm Paper Weight Thickness 8 to 32 lbs 30 08 to 120 32 g m Up to 1 3 mm 0 05 of card Paper Size Max 8 85 x 118 225 mm x 3000 mm Min 2 75 x 3 149 70...

Страница 56: ...x 8 5 x 118 216 mm x 3000 mm Min 1 x 1 25 4 mm x 25 4 mm Paper Weight Thickness 8 to 32 lbs 30 08 to 120 32 g m Up to 1 3 mm 0 05 of card Paper Size Max 8 85 x 118 225 mm x 3000 mm Min 2 75 x 3 149 70...

Страница 57: ...ax 8 5 x 118 216 mm x 3000 mm Min 1 x 1 25 4 mm x 25 4 mm Paper Weight Thickness 8 to 32 lbs 30 08 to 120 32 g m Up to 1 3 mm 0 05 of card Paper Size Max 8 85 x 118 225 mm x 3000 mm Min 2 75 x 3 149 7...

Страница 58: ...216 mm x 635 mm Min 1 x 1 25 4 mm x 25 4 mm Paper Weight Thickness 8 to 32 lbs 30 08 to 120 32 g m Up to 1 3 mm 0 05 of card Paper Size Max 8 85 x 25 225 mm x 635 mm Min 2 75 x 3 149 70 mm x 80 mm Fe...

Страница 59: ...ArtixScan DI 6240S 6250S 6260S ArtixScan TS 630S User s Manual 59...

Отзывы: