background image

HawkEye™ 1600T

System Components

2

Rev. 1G, Dec 2008

HawkEye™ 1600T Smart Camera Guide

2-11

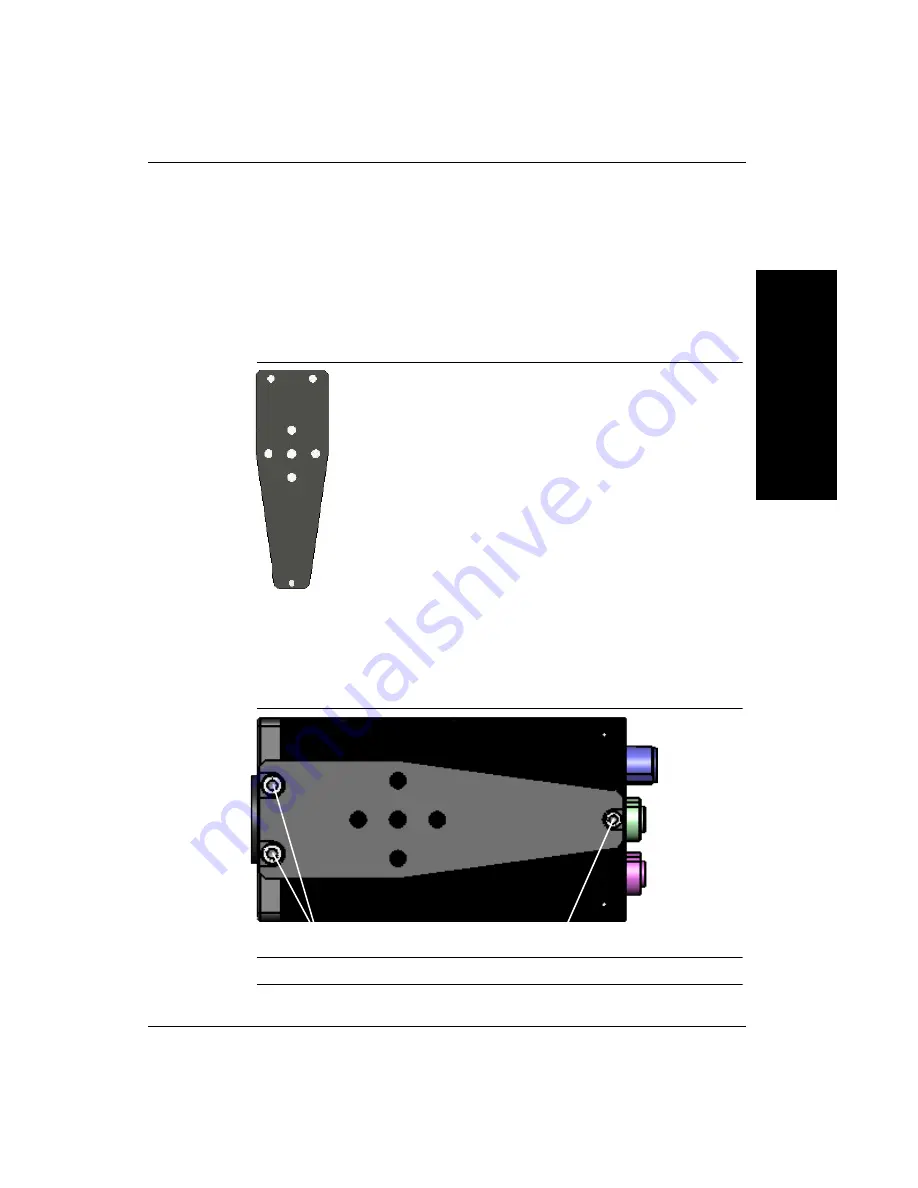
Mounting Using Accessory Mounting Block

You can mount the HawkEye™ 1600T using the accessory mounting block (see 
Figure 2–6). The backward compatible mounting block positions a HawkEye™ 
1600T in the same position as a HawkEye™ 1600 for optical alignment.

FIGURE 2–6.

Accessory Mounting Blocks

Location for Backward Compatible Mounting Block

Figure 2–7 shows the screw hole locations for the backward compatible 
mounting block.

FIGURE 2–7.

Location for Backward Compatible Mounting Block

Caution: Using longer screws may damage the HawkEye™ 1600T.

Part Number - 98-HT00-0CM2

M3 x .5 x 6 Screw

M4 x .7 x 10 Screws

Содержание HawkEye 1600T

Страница 1: ...HawkEye 1600T Smart Camera Guide EM 40247 1G Rev 1G Dec 2008...

Страница 2: ...214 Fax 65 6846 4641 Microscan Limited Warranty Statement and Exclusions What Is Covered Microscan Systems Inc warrants to the original purchaser that products manufactured by it will be free from def...

Страница 3: ...rd party for any special incidental or consequential damages including without limitation indirect special punitive or exemplary damages for loss of business loss of profits business interruption or l...

Страница 4: ......

Страница 5: ...s and Benefits 1 3 Applications 1 4 Package Contents 1 4 HawkEye 1600T Smart Camera Models 1 5 Effective Frame Per Second Pipeline Operation Formulas 1 6 Triggering Rules for Single Channel Devices 1...

Страница 6: ...Accessory Mounting Block 2 11 Location for Backward Compatible Mounting Block 2 11 Field I O Wiring Examples 2 12 Input Opto Wiring 2 12 Output Opto Wiring 2 13 External Strobe Sensor 2 16 Power Requ...

Страница 7: ...APPENDIX D Setting Up Network Communications D 1 HawkEye 1600T Connection Matrix D 3 HawkEye Boot Parameters D 4 Changing Network Parameters D 4 APPENDIX E Updating Firmware on 1600T Cameras E 1 Updat...

Страница 8: ...Contents viii HawkEye 1600T Smart Camera Guide Rev 1G Dec 2008...

Страница 9: ...l contains detailed information about the HawkEye 1600T camera family Manual Conventions The following typographical conventions are used throughout this manual Items emphasizing important information...

Страница 10: ...Preface x HawkEye 1600T Smart Camera Guide Rev 1G Dec 2008...

Страница 11: ...Rev 1G Dec 2008 HawkEye 1600T Smart Camera Guide 1 1 1 Introduction 1 CHAPTER 1 Introduction FIGURE 1 1 HawkEye 1610T Smart Camera...

Страница 12: ...x and bar code reading optical character recognition OCR image processing image analysis and feature extraction flaw detection object location calibrated dimensional measurements and various custom pr...

Страница 13: ...for Acquisition modes including Exposure 64 usec to 58 8 msec Analog gain 0 1 to 63 0 Offset 255 to 255 HawkEye 1600T I O 1 trigger 1 strobe output 3 opto isolated outputs 4 additional opto isolated g...

Страница 14: ...ation Inspection Gauging Part location orientation detection Alignment guidance Automatic ID Data Matrix bar code OCR Package Contents Before you install Visionscape software and mount wire and connec...

Страница 15: ...tions Number Model Resolution GMV 0HT16 0CM0G HE 1610TS Standard Resolution FullScan 648x494 PartialScan Half 648x227 Quarter 648x81 Binning 324x242 GMV 1HT16 0CM0G HE 1610TH High Resolution FullScan...

Страница 16: ...en in PowerStrobe with 1msec Integration time and Job in full pipeline meaning that the Job tools idle processing time i e less than IT VFT 0 5 above Full Pipeline AVT Avp Processing Time IDT Inspecti...

Страница 17: ...an external trigger or a PLC TABLE 1 2 HawkEye 1600T Camera Modes Ranges FPS Model Mode Exposure Range usec EFPS Power Strobe FPS Notes HE1610TS HE1610TIS Standard Full 64 50000 55 60 648x494 Progress...

Страница 18: ...e allowing much larger applications to be developed for the device The HawkEye 1600T with extended memory will begin shipping in early 2009 TABLE 1 3 Triggering Rules Job Structure Snapshot Triggers B...

Страница 19: ...The maximum Non Volatile Memory area for Jobs is 16MB for the HawkEye 1600T 32 128 and 6MB for the HawkEye 1600T 16 64 This includes the Job plus any support files if used in the avp IntelliFind mode...

Страница 20: ...splays a dialog that shows the File Size of the avp and other statistics about the Job FIGURE 1 2 File Size of Job Determine support file sizes by adding up the file sizes of the models fonts perl scr...

Страница 21: ...here are no user serviceable parts inside Basic Components Table 2 1 lists the HawkEye 1600T hardware components TABLE 2 1 HawkEye 1600T Hardware Components Number Component Description Cameras GMV 0H...

Страница 22: ...Serial and Auxilary I O M12 8 to pigtail Length 10m 98 HT00 0CD2 HETSC 020 Cable Serial and M12 8 to DB9 Length 2m 98 HT00 0CL5 HETLC 050 Cable Light M5 4 to pigtail Length 5m Adapters 98 HT00 0LM1 0...

Страница 23: ...49 Controls IO on the camera i e Physical and Virtual IO and receives IO change notification events back to the client Pic and Live Acquire Port TCP 49050 Takes pictures and goes to Live Video Camera...

Страница 24: ...from the connection Serial TCP Ports TCP 49211 49212 49213 49214 Send Formatted Output Strings serially over TCP as programmed in the avp by the Formatted Output Step Camera Login Command Port UDP 494...

Страница 25: ...Front Panel Figure 2 1 shows the front C Mount Lens threads for the HawkEye 1600T FIGURE 2 1 Front Panel Double quotation mark Backslash ooo ASCII character in octal notation xhhh ASCII character in...

Страница 26: ...of the rear panel FIGURE 2 2 Rear Panel Layout X1 Power Primary I O M12 A coded plug X2 External Light Power Strobe only M5 socket X3 Secondary I O Serial M12 A coded socket X4 Industrial Ethernet M1...

Страница 27: ...portant Label Information Each HawkEye 1600T Smart Camera has its own label which contains important information about that Smart Camera MODEL NUMBER CATALOG NUMBER The model number for your HawkEye 1...

Страница 28: ...The LEDs illuminate before the test is executed and remain in that pattern until the next test is run or an error condition is detected and displayed Error Codes In the event of an error being detecte...

Страница 29: ...ower supply Mounting Using Front Block Note Do not insulate the mounting block The mounting block of the HawkEye is part of the heat dissipation system and metal to metal contact is required for effec...

Страница 30: ...aution Using screws that are too long for the threaded holes may damage the HawkEye 1600T The accessory mounting blocks use 10mm machine screws Mounting Using Standard Mounting Block You can mount the...

Страница 31: ...g block positions a HawkEye 1600T in the same position as a HawkEye 1600 for optical alignment FIGURE 2 6 Accessory Mounting Blocks Location for Backward Compatible Mounting Block Figure 2 7 shows the...

Страница 32: ...e input opto wiring for non isolated NPN and PNP sources FIGURE 2 9 GPIO Input Opto Wiring NPN and PNP Note 1 GPIO OUT COM typically connected to ground Note 2 GPIO OUT COM typically connected to Volt...

Страница 33: ...N COM typically connected to ground Note 2 GPIO IN COM typically connected to Voltage Figure 2 11 shows the output opto wiring for isolated relay and PLC inputs FIGURE 2 11 Output Opto Wiring Relay an...

Страница 34: ...to Wiring Relay and PLC Inputs 1 GPIO IN COM typically connected to ground Caution The maximum current that can pass through the optoisolators is 50 mA Non isolation setup can cause damage to the Hawk...

Страница 35: ...uide 2 15 FIGURE 2 13 HawkEye 1600T I O Simplified Circuit Diagram IN A IN B OUT 1 OUT COM GPIO IN COM opto input Rin Ron opto output OUT 2 Ron OUT 3 Ron GPIO 1 Ron opto output GPIO OUT COM Rin GPIO 2...

Страница 36: ...re is a large variation in process speed considerable variation in location of the part within the Field of View FOV may result The FOV specified for the HawkEye 1600T should be large enough to cover...

Страница 37: ...600T Smart Camera Guide 3 1 3 Optics Lighting 3 CHAPTER 3 Optics Lighting This chapter contains information specific to the Optics and Lighting options for the HawkEye 1600T Smart Camera FIGURE 3 1 Ha...

Страница 38: ...m 98 92800574 Lens 25mm 98 92800575 Lens 35mm 98 92800576 Lens 50mm 98 92800577 Lens 75mm TABLE 3 2 Working Distance and Fields of View1 Lens Focal Length Extension mm 8 mm 12 mm 16 mm 25 mm 35 mm 50...

Страница 39: ...ighting Connector Optics Lighting 3 Rev 1G Dec 2008 HawkEye 1600T Smart Camera Guide 3 3 Lighting Connector For complete information about the Light Port Connector see Light Port Connector on page A 5...

Страница 40: ...Chapter 3 Optics Lighting 3 4 HawkEye 1600T Smart Camera Guide Rev 1G Dec 2008...

Страница 41: ...ion about the HawkEye 1600T connectors Power Primary I O Connector on page A 1 Serial Secondary I O Connector on page A 3 Ethernet Connector on page A 4 Light Port Connector on page A 5 QuickSet Switc...

Страница 42: ...r Mating Cable Supplier Part Number Description Microscan 98 HT00 0CP0 Connector Type M12 8 Pin A Coded Female Cable 10M TABLE A 2 Power Primary I O Connector Signals Pin Short Designation Direction F...

Страница 43: ...wire for Out1 Out2 and Out3 Opto Isolated outputs 5 Total output current for all opto outputs must not exceed 150ma Serial Secondary I O Connector Figure A 2 shows the pinout of the Serial and Seconda...

Страница 44: ...ignal RS 232 4 Serial communication Receive signal RS 232 5 Common wire for General Purpose I O opto isolated outputs 6 Common wire for General Purpose I O opto isolated inputs Ethernet Connector Figu...

Страница 45: ...connector signals Light Port Connector Figure A 4 shows the pinout of the Light Port connector TABLE A 5 Ethernet Connector Mating Cable Supplier Part Number Description Microscan 98 HT00 0CE0 98 HT0...

Страница 46: ...ent sourcing pulse 20ma short circuit current TABLE A 7 Light Port Connector Mating Cable Supplier Part Number Description Microscan 98 HT00 0CL5 Connector Type M5 4 Pin Male Cable 5M TABLE A 8 Light...

Страница 47: ...and access screw FIGURE A 5 QuicSet Switch Access Screw S1 Rear View The QuicSet switch is located beneath the access screw as shown at location S1 in Figure A 5 To access the QuicSet Switch remove t...

Страница 48: ...Appendix A Connector Pinouts A 8 HawkEye 1600T Smart Camera Guide Rev 1G Dec 2008...

Страница 49: ...O Cable The HETPC 100 Power and Primary I O cable is a single ended shielded cable with an M12 x 8 Pin A Coded male connector on one end Figure B 1 shows the wiring for the HETPC 100 Power and Primary...

Страница 50: ...Opto 2 Out Brown Out2 3 Opto 3 Out Green Out3 4 Camera Power Yellow Fused 24V 1 Amp max 5 Opto Out common Grey Output Common 6 Opto In B Pink Trigger in B 7 Opto In A Blue Trigger in A 8 Sensor Power...

Страница 51: ...l Secondary I O Cable Signals M12 Pin Signal Name Wire Color Description 1 GPIO 3 White General Purpose I O 3 2 GPIO 4 Brown General Purpose I O 4 3 Td Green RS 232 Transmit 4 Rd Yellow RS 232 Receive...

Страница 52: ...bles HETLC 050 Lighting Control Cable The Lighting Control cable is a single ended cable with an M5 x 4 Pin A Coded male connector on one end Figure B 5 shows the HETLC 050 Lighting Control cable TABL...

Страница 53: ...6 HETLC 050 Lighting Control Cable Signals M5 Pin Signal Name Wire Color Description 1 Light_Out Brown Light Output 2 Light_Rtn White Light Output Return 3 Strobe_Out Blue Strobe Output 4 Strobe_Rtn B...

Страница 54: ...Appendix B Cable Specifications B 6 HawkEye 1600T Smart Camera Guide Rev 1G Dec 2008...

Страница 55: ...ts 24 volts 250ma Nominal not including external lighting Lighting Support for various external lighting options Lens Type C Mount Communications Ethernet RS232 Baud rates from 1200bps to 115 2 Kbps I...

Страница 56: ...256 grey levels 8 bits per pixel Electronic Shutter 64 s 50ms 86 s 50ms Operating Temperature 0 C to 50 C 32 F to 122 F Storage Temperature 20 C to 70 C 4 F to 158 F Compliance CE FCC RoHS Certificat...

Страница 57: ...Dimensions Specifications C Rev 1G Dec 2008 HawkEye 1600T Smart Camera Guide C 3 Dimensions FIGURE C 1 HawkEye 1610T Dimensions...

Страница 58: ...10T Lens Protector Dimensions TABLE C 2 Lens Protector Part Numbers Descriptions Catalog Part Descriptions 98 HT00 0TA1 Lens Protection Housing with Glass screen IP65 Rated 98 HT00 0TA2 HELTA 050 Lens...

Страница 59: ...Dimensions Specifications C Rev 1G Dec 2008 HawkEye 1600T Smart Camera Guide C 5 FIGURE C 3 Standard Mounting Block Dimensions FIGURE C 4 Backward Compatible Mounting Block Dimensions...

Страница 60: ...Appendix C Specifications C 6 HawkEye 1600T Smart Camera Guide Rev 1G Dec 2008 FIGURE C 5 Spectral Sensitivity Characteristics VGA Note Excludes lens characteristics and light source characteristics...

Страница 61: ...Dimensions Specifications C Rev 1G Dec 2008 HawkEye 1600T Smart Camera Guide C 7 FIGURE C 6 Spectral Sensitivity Characteristics XGA Note Excludes lens characteristics and light source characteristics...

Страница 62: ...Appendix C Specifications C 8 HawkEye 1600T Smart Camera Guide Rev 1G Dec 2008...

Страница 63: ...nitially setting up the camera it should not be used when deployed In a production environment all networked components should use static IP addresses to prevent communication issues related to DHCP r...

Страница 64: ...0T Smart Camera Guide Rev 1G Dec 2008 2 Select DHCP Obtain an IP address automatically or Static IP Use the following address and fill in a logical address and network mask as shown in Figure D 1 Also...

Страница 65: ...g this method HawkEye 1600T Connection Matrix Table D 1 describes the various options such that the Camera and PC can communicate fully over TCP IP TABLE D 1 IP Addresses Camera Host PC DHCP on LAN Ac...

Страница 66: ...n parameters must be set to 115200 No Parity 8 1 No Flow Control Changing Network Parameters To change network parameters 1 Start a HyperTerminal session with the communication parameters set to 11520...

Страница 67: ...a Guide D 5 4 For each parameter that is displayed simply type in new information to change the parameter or press the Return key to display the next parameter Eventually you ll see the message Save p...

Страница 68: ...Appendix D Setting Up Network Communications D 6 HawkEye 1600T Smart Camera Guide Rev 1G Dec 2008...

Страница 69: ...ng the Firmware with the Bootloader on page E 3 Updating the Firmware with Smart Camera Update Note Do not cycle power on the Smart Camera during this procedure Use the following procedure to update t...

Страница 70: ...ion 4 Enter the user name default is hawkeye and password default is vision for the Smart Camera 5 Click Update Firmware You see the progress of the Update procedure as a set of stages and progress ba...

Страница 71: ...application in Non Volatile memory which is not erased by the Smart Camera Update utility to update the firmware Use the following procedure to update the firmware on your HawkEye 1600T Smart Camera...

Страница 72: ...3 e1 12 34 1 Modify User Parameters 2 Reset User Account 3 Exit to Application 4 Type adv and press the Enter key The advanced menu is displayed Advanced Options Menu Diag Monitor V 1 01 00 dm Display...

Страница 73: ...ck Browse and navigate to C Vscape 370_xx AcuitySmartCam 8 Highlight filename SEC 9 Click Open 10 In the Protocol drop down menu select Xmodem After you click Open your screen should look similar to o...

Страница 74: ...Firmware on 1600T Cameras E 6 HawkEye 1600T Smart Camera Guide Rev 1G Dec 2008 FIGURE E 5 Xmodem File Send in Progress When the file transfer terminates you will see a screen similar to the one displ...

Страница 75: ...n menu 13 Type 3 and press the Enter key to exit the main menu You re finished You can exit HyperTerminal Main Menu Items Modify User Parameters This utility allows you to change network configuration...

Страница 76: ...ate for this field DHCP The value for DHCP value is either a 0 zero or 1 one MAC Address You cannot change the MAC Address since this is set in the factory Reset User Account Each HawkEye Smart Camera...

Страница 77: ...de in binary form Table E 1 describes the Mode Status LED power on sequence and error codes TABLE E 1 Mode Status LED Power On Sequence Error Codes Mode Fail Pass Trig Test Performed Data Line Test Ad...

Страница 78: ...Appendix E Updating Firmware on 1600T Cameras E 10 HawkEye 1600T Smart Camera Guide Rev 1G Dec 2008...

Страница 79: ...9 L Layout front panel HawkEye 1610 2 5 rear panel 2 6 LEDs mode 2 7 status 2 7 M Mode LEDs 2 7 N Non Volatile Memory job storage in 1 9 O Output Opto Wiring 2 13 P Power Supply wiring 2 16 Q QuicSet...

Отзывы: