30
/
4
)
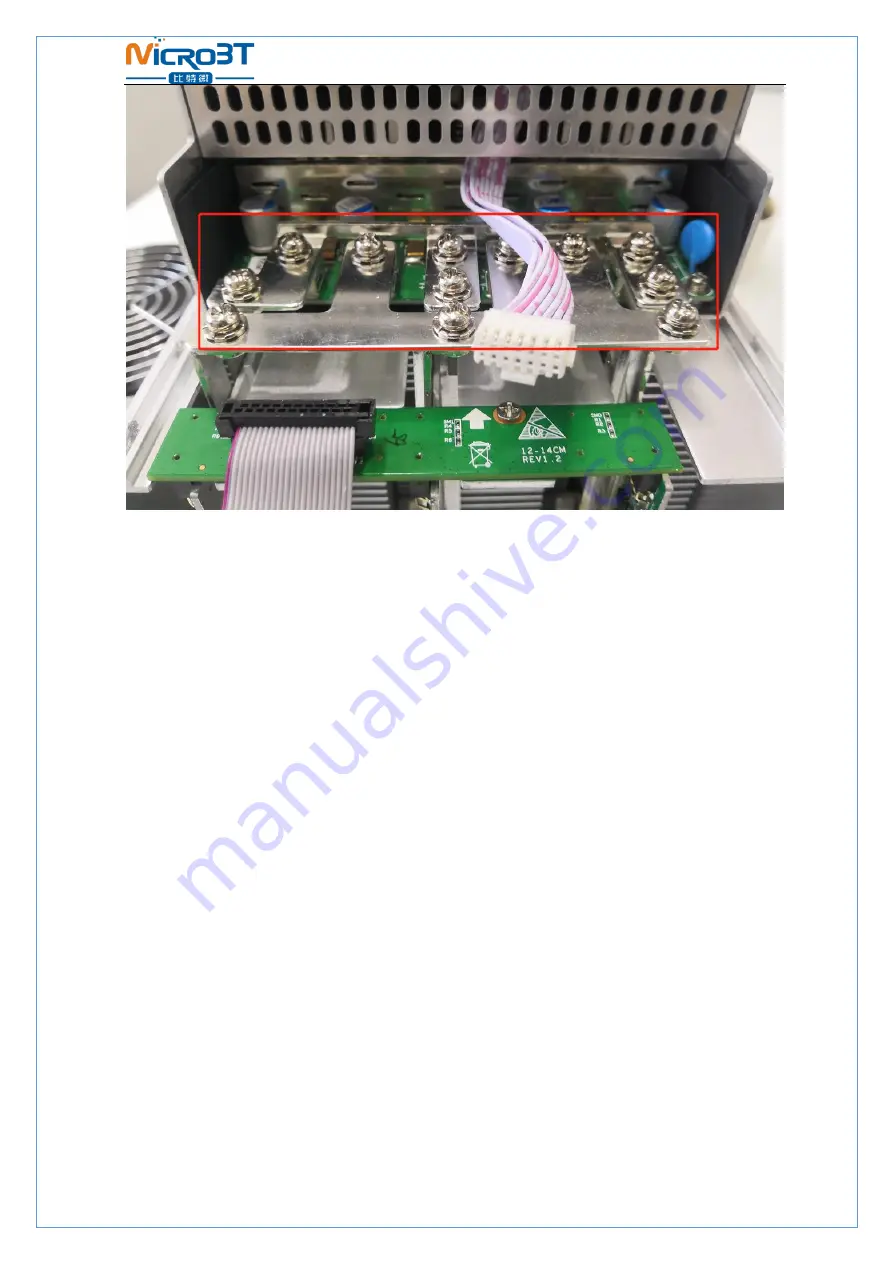
After the copper row is installed, the control board and the fan are installed, and
the hash board is installed.
Страница 1: ...1 30 WhatsMiner M30S Operation Guide Shenzhen MicroBT Electronics Technology Co Ltd...
Страница 2: ...5 1 Query the dynamic IP address obtained by the miner 11 5 1 1 Run WhatsMinerTools software 11 5 1 2 Check the IP Address Reported by the Miner 12 5 2 Configuration Pool Worker Data and NTP Server A...
Страница 3: ...iner Connection Notes Check over the miner s power supply control wire adapter board control wire and fan control wire to make sure connections are correct Damage of the control board hash board trans...
Страница 4: ...e power control wire is 14pin and the card slot is inserted as below Correct Connection Incorrect Connection 2 1 2 Adapter Board Control Wire Connection Notes The adapter board control wire is 22pin a...
Страница 5: ...5 30 Incorrect Connection...
Страница 6: ...card slot is inserted as below Correct Connection Incorrect Connection 2 1 4 Hash Board and Adapter Board Connection Notes The socket of the adapter board and the pin of the hash board must be install...
Страница 7: ...7 30 Correct Connection Incorrect Connection...
Страница 8: ...e copper busbar cannot be connected incorrectly and the screw washers of the fixed copper bar must be aligned in parallel with the edge of the copper bar Otherwise the machine may short circuit when t...
Страница 9: ...ctly forbidden to use the data cable the power supply control wire or the fan wire as a load bearing handle of the miner Lifting the machine and power supply via its cables will result in damage to th...
Страница 10: ...ves the factory 3 2 Miner Network Environment The miner defaults to DHCP to obtain dynamic IP Therefore the mine network must be configured with a DHCP server or the router can enable DHCP to dynamica...
Страница 11: ...to the edge of the copper bar the fixed screws must be tightened Otherwise the power board may burn out For the control board and power supply hardware damage caused by copper stripping is not covere...
Страница 12: ...es the yellow light of the network port is always on and the green light is blinking Press the IPFOUND function button long button highlighted on the miner control panel for more than 5s the two LEDs...
Страница 13: ...machine IPFOUND button cannot be queried 4 If the computer and the miner machine are on the same network segment and the DHCP service is enabled in the network after the mining machine IPFOUND button...
Страница 14: ...the mine pool address mine worker name and after modifying click Save Apply in the lower right corner to save the modified configuration After the configuration of the mining pool is modified the modi...
Страница 15: ...4 Restart the control board and check whether the configuration modification takes effect If you do not choose to restart CGMiner after the configuration is modified and saved you can also restart th...
Страница 16: ...gging in select System System Configuration in the interface to enter the CGMiner configuration page 2 In the CGMiner configuration interface add or modify the NTP server address The miner has been co...
Страница 17: ...ynamic IP in the browser and log in to the mine interface with the admin user and the default password admin 2 After logging in to the machine in the miner interface select Configuration Interfaces to...
Страница 18: ...e use the newly set static IP address to log in to the mining machine otherwise the page will display as loading until the loading fails 6 Miner Operation Status Check After the mine is connected to t...
Страница 19: ...rpm the mining machine will run at a reduced frequency and the power will be lower than the normal operation It is necessary to do a good job of ventilation and cooling measures in the operating envir...
Страница 20: ...and firmware upgrade of the mining machine For details please refer to the Whats Miner WhatsMinerTool Operation Guide 8 Miner Disassembly and Installation 8 1 Control Panel Disassembly and Installati...
Страница 21: ...nplug the power control cable and the adapter board control cable connected to the control panel as shown 3 Remove the four screws fixed on the bracket and take out the control panel from the bracket...
Страница 22: ...the control board bracket as shown in the figure 2 Insert the power control cable and the adapter board control cable into the corresponding slots on the control board and then fix the bracket to the...
Страница 23: ...er supply on the chassis then remove the six screws that secure the copper bars on the power supply Unplug the fan cable on the power supply 2 After the above operation is completed gently pull out th...
Страница 24: ...rol cable on the control panel remove the power supply and remove the power supply 8 2 2 Power Supply Installation 1 First plug the control cable of the power supply into the corresponding slot on the...
Страница 25: ...t circuiting the power supply or the power board as shown below 3 Finally tighten the screws of the four fixed power supplies on the chassis and the power supply is installed as shown below 8 3 Hash B...
Страница 26: ...26 30 2 Remove the adapter plate and the copper bar fixed to the control panel as shown 3 Extract the faulty hash board outward as shown...
Страница 27: ...27 30 4 After taking out the hash board record the serial number above or use WeChat scan to scan the power board serial number and provide it to the relevant after sales technician as shown...
Страница 28: ...ard into the hash board slot and sequentially enters the chassis as shown in the figure 2 After installing the hash board into the chassis first install the adapter board The socket of the adapter boa...
Страница 29: ...oles of the copper bar cannot be connected incorrectly and the screw pads of the fixed copper bar must be aligned with the edge of the copper bar otherwise it may be possible to power on and the machi...
Страница 30: ...30 30 4 After the copper row is installed the control board and the fan are installed and the hash board is installed...