


MACHINE PREPARATION
13.
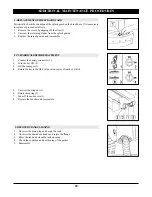
SOLUTION WATER
Before filling the solution tank confirm the solution hose, located in the lower section of
the machine beneath the operator, is securely attached.
WARNING!:
ALWAYS USE LOW FOAMING DETERGENT. Adding
antifoam liquid into the recovery tank before cleaning will also help
prevent foaming.
NEVER USE PURE ACID.
11
Open the cover and fill the solution tank with clean water at a temperature not more than
50
°
C/122
°
F. Add the proper concentration of liquid detergent by following the manu-
facturer instructions. Excess foam in the recovery tank can damage the vacuum motor,
so use only the minimum amount of detergent necessary. Reassemble the cover.
Содержание ScrubMaster 30R
Страница 24: ...NOTES 23...


