


Model 390
Page 15
MAINTENANCE, LUBRICATION & ADJUSTMENTS
WARNING
DISCONNECT PTO DRIVE SHAFT AND HYDRAULIC
HOSES BEFORE CLEANING, ADJUSTING OR SER-
VICING THIS MACHINE. FAILURE TO HEED MAY
RESULT IN SERIOUS PERSONAL INJURY OR
DEATH.
DANGER
IT IS NOT SAFE TO CLEAN OR SERVICE THE
SPREADER WITH POWER OPERATING. PTO DRIVE
AND HYDRAULICS MUST BE DISCONNECTED.
WHEELS:
Check after first hour of towing and pe-
riodically thereafter. The wheel studs should be torqued
to 170 foot pounds, in a crisscross manner.
TIRE PRESSURE:
22.5x8.25, recommended pressure 45-60 psi max.
W14Cx16.1, recommended pressure 36 psi max.
425-65R, recommended pressure 45-90 psi max.
WARNING
NEVER INFLATE BEYOND RIM OR TIRE MAN-
UFACTURER’S APPROVED PSI RATING. WHILE IN-
FLATING, STAY OUT OF THE TRAJECTORY &
STAND CLEAR OF TIRE/WHEEL ASSEMBLY. A TIRE
BLOW OUT OR RIM/WHEEL FAILURE CAN CAUSE
SERIOUS INJURY OR DEATH.
CLEANING AND STORAGE
Before storing this spreader for an extended period of
time, perform the following:
1. Allow the spreader to completely clean out the last
load.
2. Hose off all manure from the spreader, particularly
getting the end gate and spread pan mechanisms
clean. The water can be drained into your manure stor-
age pit or if the optional gate is left closed, the water
can be taken to the field and spread.
3. If pressure washing spreader, be careful not to
wash directly on or close to bearing seals. The high
pressure can destroy the seal and force water into the
bearing causing it to rust and fail. Avoid pressure wash-
ing painted areas of the spreader too close with washer
as the pressure can strip paint on scratched areas
caused from scraping clean.
4. Manure is acidic and should not be left on painted
areas for a long time because it will lift paint from metal.
Unpainted metal will corrode causing holes to rust
through metal guards or even fall off the machine. If
this should happen, guards must be replaced immedi-
ately.
WARNING
DO NOT OPERATE SPREADER WITH ANY GUARD
OPEN OR MISSING. ROTATING PARTS CAN DIS-
MEMBER OR KILL.
5. After cleaning, lube the spreader to exclude mois-
ture from bearings and prevent condensation from
forming during storage. Apply oil to roller chain drives.
6. This is a good time to inspect all adjustments and
check for parts that need repair or replacement. Per-
forming these tasks now will guarantee that the
spreader is ready for use at the beginning of the next
season.
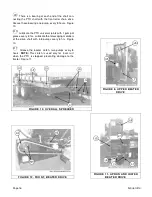
LUBRICATION
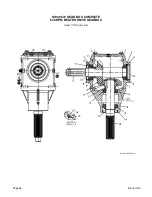
Maintain oil level in the apron drive gear reducer
at the check level plug, located at rear drive. When re-
quired, refill with SAE 85-140 Moly Fortified gear lube
or Synthetic SAE 70-90 gear lube. Figure 11.
Maintain oil level in the beater drive gear reducer
at the check level plug. When required, refill with SAE
85-140 Moly Fortified gear lube or Synthetic SAE 70-90
gear lube. Figure 11.
Grease the two upper bearings on the apron drive
gear reducer, four pumps every 8 hours. Figure 11.
Grease the front bearing on the side drive shaft,
one pump every 8 hours. Figure 12.
Grease three bearings on the side drive shaft,
one pump every 8 hours. Figure 10.
Grease bearing at both ends of the top beater,
one pump every 8 hours. Figure 9 and Figure 11.
Grease the bearing on the left end of the lower
beater, one pump every 8 hours. Figure 9.
Grease the bearing on the right end of the rear
apron drive shaft, right behind the apron drive gearbox,
five pumps every 8 hours. Figure 11.
L1
L2
L3
L4
L5
L6
L7
L8
Содержание 390 Tandem
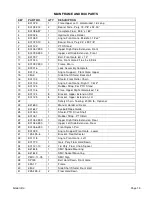
Страница 18: ...Page 18 Model 390 REPAIR PARTS MAIN FRAME AND BOX PARTS...
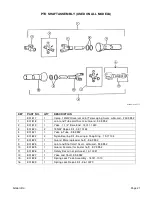
Страница 22: ...Page 22 Model 390 FRONT AND SIDE DRIVE SHAFT AND RELATED PARTS...
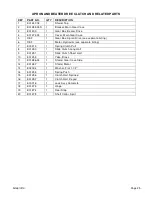
Страница 24: ...Page 24 Model 390 APRON AND BEATER DRIVE CLUTCH AND RELATED PARTS RearHydDrive 300 tif...
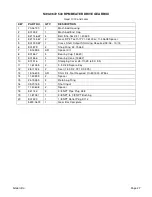
Страница 26: ...Page 26 Model 390 5490 0672 GEAR BOX COMPLETE 540 RPM BEATER DRIVE GEARBOX Used 11 13 and Later...
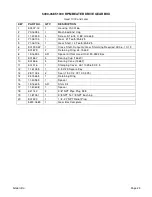
Страница 28: ...Page 28 Model 390 5490 0685 GEAR BOX COMPLETE 1000 RPM BEATER DRIVE GEARBOX Used 11 13 and Later...
Страница 30: ...Page 30 Model 390 E01300W GEAR BOX COMPLETE 540 RPM BEATER DRIVE GEARBOX Used 03 06 10 13 Last Serial No 18T13...
Страница 34: ...Page 34 Model 390 HYDRAULIC SYSTEM PARTS HydraulicParts 390 tif...
Страница 36: ...Page 36 Model 390 END GATE HYDRAULIC PIPING FOR OPTIONAL END GATE HydEndGatesParts 300 350 390 tif...
Страница 38: ...Page 38 Model 390 APRON DRIVE GEAR BOX HO382 GearboxParts 390 tif...
Страница 40: ...Page 40 Model 390 APRON DRIVE HYDRAULIC MOTOR HydMotorOpt 300 tif...
Страница 42: ...Page 42 Model 390 APRON AND RELATED PARTS ApronParts 390 tif...
Страница 44: ...Page 44 Model 390 BEATERS AND RELATED PARTS...
Страница 50: ...Page 50 Model 390 This Page Intentionally Blank...
Страница 51: ...Model 390 Page 51 This Page Intentionally Blank...


