Metos IND-10P-3500 Скачать руководство пользователя страница 22

19.3.2015

Metos Eco Kitchen

8

 |

•  The induction cooker should be cleaned, maintained and serviced on a regular basis to keep it in good 

condition and extend its service life.

•  There is high voltage inside the cooker. It can only be opened by authorized servicing personnel.
•  To avoid misuse, all discarded electrical devices must be disposed of safely and properly by the user.
•  There is a small area at the bottom center of the wok/pan that heats slowly. To ensure that oil is evenly 

heated, stir the oil in the wok/pan.

7.4.  Unauthorized Change and Part Replacement

Do not make any change to the induction cooker. If the induction cooker needs to be changed, please 

contact the manufacturer. For safety’s sake, please use parts and components certified by the manufac-

turer. Use of any uncertified parts and components will void all the commitments and warranties of the 

manufacturer.

8.  Cleaning & Maintenance

Clean the glass-ceramic panel surface in the same way as to glass. Do not use corrosive or grinding 

cleaners such as grill spray, detergent powder, deruster, polishing powder or coarse sponge to clean the 

panel. 

To prevent scalding, do not clean the panel when the surface is hot. 

Stains and removing method
•  Slightly soiled, without burning remnant

: Wipe clean with a wet cloth, without using cleaning agent.

•  Sticky substance:

 Scrape with a wooden scrapper and then wipe clean with a wet cloth.

•  Scale formed by spilled boiling water

 Clean with vinegar or special cleaning agent.

•  Sugar, sugary food, plastic and aluminum foil:

 Remove with a with a razor blade while the stain is 

warm, then clean with a cleaning agent.  Caution! Avoid scalding. If stain is not removed in time, tiny 

holes may form on the surface of the glass-ceramic panel.

Other maintenance and servicing work than cleaning and maintenance should be conducted by desig-

nated service providers. 

Important: Avoid leakage of liquid into the induction cooker. Do not flush 

with water nor clean with steam cleaner. 

9.  Regular Servicing

To keep the induction cooker in good condition and extend its service life, it should be cleaned, main-

tained and serviced on a regular basis.

The filter of the induction cooker must be cleaned at least once every three months.

The induction cooker must be checked by authorized technical personnel at least once a year. 

Danger! Do not open the induction cooker. There is high voltage inside! 
The induction cooker can be opened by authorized personnel only. 

10.  Waste Disposal

To avoid misuse, all discarded electrical devices must be disposed of properly and safely by the user. 

Do not use uncertified or discarded induction cookers.

Our products are made of regular materials. No battery is used inside the products.


STOP

STOP

The crossed-out wheeled bin means that within the European Union the product 

must be taken to separate collection at the product end-of life. 

This applies to your device but also to any enhancements marked with this sym-

bol. Do not dispose of these products as unsorted municipal waste.

Содержание IND-10P-3500

Страница 1: ...RS Eco Kitchen MG4000043 MG4000044 MG4000045 MG4000046 MG4000235 MG4000250 K nn s valmistajan alkuper isest materiaalista Asennus ja k ytt ohjeet vers ttning av tillverkarens originaldokumentation Ins...

Страница 2: ...Paloturvallisuus 4 4 3 S hk liit nn n vaatimukset 4 5 Vianetsint 4 6 Asennus ja k ytt ohjeet 6 6 1 Asennus 6 6 2 K ytt ohjeet 6 7 Turvallisuus 7 7 1 Seuraukset turvaohjeiden huomiota j tt misest 7 7 2...

Страница 3: ...t ja ohjaus Hyv turvallisuus moninkertaisten turvatarkistusten ja toimintojen ansiosta Korkea hy tysuhde s st aikaa ja energiaa Kompaktin kokoinen ja kevyt 3 Tekniset tiedot S hk liit nt IND 10P 3500...

Страница 4: ...kemist ett laitteen arvokilvess mainittu liit nt j nnite vastaa asennuspaikan j n nitett S hk liit nt on oltava voimassa olevien kansallisten ja paikallisten s d sten mukainen Laitteen s hk kaapeli on...

Страница 5: ...anturivirhe Kutsu huolto EA 10 S hk liit nn n j nnite on alle 340V Tarkista s hk liit nt Kutsu huolto Varattu EC 12 K min ylikuumeneminen Kutsu huolto ED 13 K min l mp tila anturivirhe Kutsu huolto Va...

Страница 6: ...et Kutsu huolto 6 Asennus ja k ytt ohjeet 6 1 Asennus Pura pakkaus ja varmista ett kaikki osat ovat mukana ja ehj t Sijoita laite asennuspaikalle huomioi ilmanvaihtoseikkoja Liit laitteen sy tt kaapel...

Страница 7: ...il n jolla on syd mentahdistin on kysytt v l k rilt n onko turvallista olla induktiolieden ress vai ei l laita alumiinifoliota tai muoviastioita on keraamisen tason keittovy hykkeelle l my sk n k yt k...

Страница 8: ...rat kuumalta keittoalueelta esimerkiksi partater n avulla Tahrojen poistamisen j lkeen puhdista puhdistusaineella Jos keittotaso jossa on sokeria muovia tai alumiinifoliota viilenee keraa miseen tasoo...

Страница 9: ...t 4 4 3 Krav p elanslutningen 4 5 Fels kning 4 6 Bruks och installationsanvisningar 6 6 1 Installation 6 6 2 Bruksanvisningar 6 7 S kerhetsf reskrifter 7 7 1 F ljderna av att inte uppm rksamma s kerhe...

Страница 10: ...effektkontroll och styrning Maximal s kerhet tack vare m ngfaldig funktion av s kerhet och kontroll H g verkningsgrad sparar tid och energi Kompakt storlek och l g vikt 3 Tekniska data Elanslutning I...

Страница 11: ...av icke br nnbart material 4 3 Krav p elanslutningen F rs kra f re anslutning till eln tet att elanslutningen p installationsplatsen verensst mmer med de v rden som anges p apparatens typskylt Elansl...

Страница 12: ...rvice EA 10 Matningssp nningen r l gre n 340V Granska elmatningen Kalla p service Reserverad EC 12 Spolen verhettad Kalla p service ED 13 Fel i spolens temp givare Kalla p service Reserverad EF 15 ver...

Страница 13: ...h installationsanvisningar 6 1 Installation Packa upp apparaten och f rs kra att alla delar r med och i skick Placera apparaten p installationsplatsen beakta luftcirkulationen Anslut matarkabeln till...

Страница 14: ...bt n r de st lls p en p kopplad induktionsplatta b r inga andra f rem l konservburkar aluminiumfolie bestick smycken klockor osv placeras p induktions spisen Personer med en pacemaker b r fr ga sin l...

Страница 15: ...n eller aluminiumfolien fr n det varma kokomr det med tex ett rakblad Efter att fl ckarna avl gsnats reng r med reng ringsmedel Om v rmeomr det med socker plast eller aluminiumfoliefl ckar svalnar uta...

Страница 16: ...4 4 3 Requirements on Electrical Connection 4 5 Troubleshooting 4 6 Installation and Operating Instructions 6 6 1 Installation 6 6 2 Operating Instructions 6 7 Safety Instructions 7 7 1 Risks of Negli...

Страница 17: ...shock performance sleek aesthetic design for easy cleaning Modularized design Electronic circuit with automatic monitor control and multiple safety protection High efficiency and large power to save...

Страница 18: ...he rating on the nameplate of the product The electrical connection must comply with existing national and local regulations The electrical cable of the product must be connected to the power supply w...

Страница 19: ...age Ensure proper wiring Consult professional personnel Reserve EC 12 Over temperature of coils the generator stops working Consult professional personnel ED 13 Error of Coil temperature sen sor Consu...

Страница 20: ...personnel 6 Installation and Operating Instructions 6 1 Installation Open the package and make sure that the appearance of the unit is in good condition Place the unit at the installation place Pay at...

Страница 21: ...d up quickly Do not wear watches and rings as these objects can be heated up when in close proximity to the hob surface People with heart pacemakers should consult with the manufacturer or physician b...

Страница 22: ...rmed by spilled boiling water Clean with vinegar or special cleaning agent Sugar sugary food plastic and aluminum foil Remove with a with a razor blade while the stain is warm then clean with a cleani...

Страница 23: ...122 122 121 171 172 161 Black 162 Red 171 Black 172 Red 131 132 133 134 P2 PAN PE RT Temperature Sensor LED ADJ Electric Diagram IND 10PS 13WS 3500 L N RSH1232S24N27 24V AB1224MB Y01 24V 132 131 RP Sw...

Страница 24: ...19 3 2015 Metos Eco Kitchen 10 4 Diagram 1 Internal Wiring Diagram Kytkent kaavio Kopplingsschema Wiring diagram 5 kW...

Страница 25: ...4 5 P2 PAN P3 COMM ADJ LED 1 2 3 4 1 2 3 4 P1 DISPLAY P6 L Coils RT Temperature Sensor RT Temperature Sensor FAN PE 3 2 1 LED RP Switch Assembly 3 2 1 LED RP Switch Assembly N L3 L1 L2 INDUC Qingdao...

Страница 26: ...Control Board PE P9 P9 X1 P9 P9 X1 FAN H4 H5 H4 H5 P5 P2 P3 FAN FAN P2 P3 P5 3 2 1 LED RP Switch Assembly 3 2 1 LED RP Switch Assembly INDUC Qingdao Commercial IND 10PP 5000 2 1 2 3 4 1 2 3 4 COMM 1...

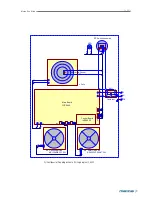
Страница 27: ...13 19 3 2015 Metos Eco Kitchen Liesi Spiis Range 3 5 kW Liesi Spiis Range 5 kW...

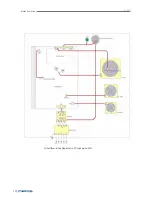
Страница 28: ...19 3 2015 Metos Eco Kitchen 14 Wok 3 5 kW Wok 5 kW...

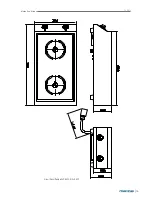
Страница 29: ...15 19 3 2015 Metos Eco Kitchen Liesi Spiis Range 2x3 5 kW 2x5 kW...

Страница 30: ...19 3 2015 Metos Eco Kitchen 16...

Страница 31: ...17 19 3 2015 Metos Eco Kitchen...

Страница 32: ......

Отзывы: