19
Maintaining the intake valve
Maintaining the pressure valve
Removing the shaft and pull rod
Replacing the O-ring on the pump rod
'LVDVVHPEOLQJWKHVKXWRႇYDOYH
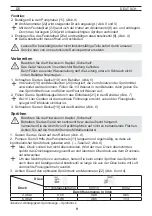
1. Press the catch [25] out of the notch. Screw the cylinder [27] out of the tank.
)LJ
&OHDQDQGLIUHTXLUHGUHSODFHWKHYDOYHGLVF>@
)LJ
+
:KHQUHSODFLQJWKHYDOYHGLVFLQVHUWWKHQHZYDOYHGLVF>@DQGSUHVVDQGWXUQLW
LQWRWKHRSHQLQJXVLQJDZRRGHQREMHFWHJKDPPHUVKDIW)LJ
+
7RVHDOWKHWDQNHQVXUHWKDWWKH2ULQJ>@LVFRUUHFWO\SRVLWLRQHG)LJ
+
7RSUHYHQWGDPDJHWRWKHGLDSKUDJP>@FDUHIXOO\LQVHUWWKHF\OLQGHU>@)LJ
6FUHZLQWKHF\OLQGHU>@XQWLOWKHFDWFK>@HQJDJHVLQWKH¿UVWWRRWKRIWKHQRWFK
)LJ
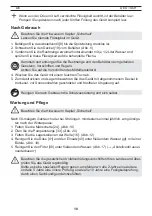
1. Press the catch [25] out of the notch. Screw the cylinder [27] out of the tank.
)LJV
DQG
2. Remove the pressure vessel [34]:
D 5HPRYHWKH¿[LQJ>@DQGFDS>@
)LJ
b) Remove the U-bolt [32].
)LJ
c) Pull the pressure vessel [34] half out of the tank.
)LJ
G 8VLQJWKH¿OOLQJVWUDLQHU>@XQVFUHZWKHSUHVVXUHYDOYHVFUHZ>@
)LJ
&OHDQDQGLIUHTXLUHGUHSODFHWKHSUHVVXUHYDOYHGLVF>@
)LJ
&OHDQDQGLIUHTXLUHGUHSODFHWKHGLDSKUDJP>@
)LJ
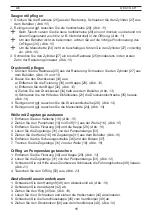
1. Remove the retaining clip [18].
)LJ
2. Pull the pump lever [10] and handle [11] out of the shaft [16].
)LJ
5HPRYHWKH¿[LQJ>@DQGWKHFDS>@
)LJ
4. Detach the pull rod [31] from the pump rod [33].
5. Pull the shaft [16] and pull rod [31] out of the tank.
)LJ
6. Remove the lock washer [36] and the bolt [37].
7. Separate the pull rod [31] from the shaft [16].
)LJ
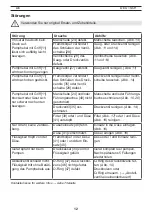
5HPRYHWKH¿[LQJ>@DQGFDS>@
)LJ
2. Detach the pull rod [31] from the pump rod [33].
)LJ
8VLQJDVSDUNSOXJZUHQFKXQVFUHZWKHJXLGHEXVK>@
)LJ
4. Replace the O-ring [50].
)LJ
8QVFUHZWKHKDQGJULS>@IURPWKHVKXWRႇYDOYH
)LJ
2. Unscrew the adapter [42].
3XOORႇWKHULQJ>@
)LJ
4. Loosen the 4 screws and pull the half shells [44] apart.
5. Unscrew the locking cap [45] from the valve body [48].
6. Pull the pressure bolt [46] out of the valve body [48].
)LJ
EN
ENGLISH
7393400_RS12_-RS18_16spr.indd 19
06.11.2020 12:17:20
Содержание 3558BM
Страница 135: ...134...

