MES SQA-iO Скачать руководство пользователя страница 13


Service Manual Version 18

7

.5.1


AUGUST 3, 2021   SQA-iO Service Manual                     

13


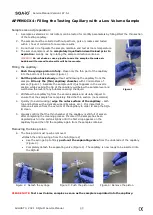
APPENDIX 4: Filling the Testing Capillary with a Low Volume Sample 

Sample size and preparation: 

1.


A sample as small as 10 microliters can be tested for motility parameters by filling ONLY the thin section 
of the testing capillary.  

2.


The sample must be collected without partners, gels or creams and tested 
within 1 hour of collection for accurate results. 

3.


Do not heat or refrigerate the sample, maintain and test at room temperature 

4.


The semen sample must be 

completely liquefied and well mixed prior to 

aspiration:  

Gently mix by rotating the sample collection container. 

WARNING:

 Do not shake or use a pipette to mix the sample otherwise air 

bubbles will form and test results will be inaccurate.


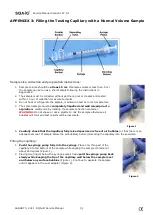
Filling the capillary: 

1.


Push the syringe piston in fully

. Place only the thin part of the capillary 

into the bottom of the sample (Figure 1). 

2.


Pull the piston back slowly

 without withdrawing the capillary from the 

sample. 

Fill only the (thin) capillary chamber

 with 10 microliters of 

semen (Figure 1).  Aspirate the sample until it just appears in the cuvette 
section while keeping the tip of the capillary well below the sample level and 
well below the level of any bubbles covering the liquid.  

3.


Withdraw the capillary tip from the semen sample and visually inspect to 
ensure that the sample has completely filled the thin section (no meniscus). 
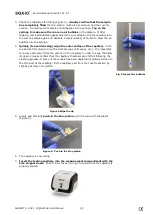
4.


Quickly (to avoid wicking) 

wipe the outer surface of the capillary

 - both 

top and bottom with a delicate wipe (Kimwipes, etc.). It is important to 
remove all semen from the exterior of the capillary in order to keep the SQA-
iO clean.  

5.


Visually confirm that the thin chamber of the capillary is still full of semen 
after completing the cleaning process. If some of the sample has been 
depleted push-in the piston slightly until the first drop appears on the 
capillary tip and then fill the capillary again from the sample container. 


Figure 1 

Removing the blue piston: 

6.


The blue piston must now be removed: 


Detach the entire syringe from the hub (Figure 2)  


Use the syringe tip to firmly 

push-out the separating valve 

from the underside of the capillary 

(Figure 3).  


Completely detach the separating valve (Figure 4). The capillary is now ready to be inserted into 
the SQA-iO 


     Figure 2:  Detach the syringe             Figure 3: Push the piston out        Figure 4: Remove the piston      
 

PLEASE NOTE:

 Test Low Volume samples as soon as the sample is aspirated into the capillary.


Содержание SQA-iO

Страница 1: ...Service Manual Version 187 5 1 AUGUST 3 2021 SQA iO Service Manual 1 Service Manual Version 187 5 1 Catalog IO ML 01678 00 Rev August 2021...

Страница 2: ...t 4 USB Port 5 Testing Capillary 5 Maintenance Schedule 5 Testing and Operting Requirements 6 Operating Temperature Humidity Altitude 6 SECTION III Quality Control Internal QC 6 Printing the Service R...

Страница 3: ...ple is withdrawn into an SQA capillary disposable delivery system inserted into the SQA iO where key parameters are collected and sample test results are processed utilizing proprietary technology and...

Страница 4: ...s to extract the required clinical semen parameters Analog to Digital Converter Semen parameters extraction algorithms Self Test and QC KeyPad Microcontroller Operational Monitor 1 2 3 4 Concentration...

Страница 5: ...ng Capillary Sample delivery system Normal sample Requires approximately 0 5cc of semen Short samples Requires approximately 20 l Single use design for testing semen in a biologically safe manner Moti...

Страница 6: ...sing linearly to 50 humidity at 38 C Operates in a wide range of ambient temperatures 15 38 C however the system is calibrated to measure semen samples at room temperature 20 25 C 68 77 F Intended for...

Страница 7: ...nge Instructions for printing the SQA iO SERVICE parameters to prepare for technical support If a Self Test failure occurs the related status icon in the SQA iO HOME SCREEN will turn red Click on the...

Страница 8: ...f the optics you will feel a shelf in the back top section of the chamber Fig 2 and 3 CLEANING STEP 2 1 Use a Fibrous material cleaning paddle Fig 4 supplied in your TEST KIT Moisten with only ONE dro...

Страница 9: ...icon indicating a failure Observe the normal range value 1 Clean the test chamber using ONLY MES cleaning kit 2 Remove and reconnect USB cable 3 Reboot the device If problem persists refer to MES cust...

Страница 10: ...de passed the self test Amplitude failed the self test Suggestion Clean the device ZERO LEVEL 500 525 Zero Level passed the self test Zero Level failed the self test Suggestion Clean the SQA iO Mainta...

Страница 11: ...ting the sample collection container WARNING Do not shake or use a pipette to mix the sample otherwise air bubbles will form and test results will be inaccurate Figure 1 5 Carefully check that the liq...

Страница 12: ...ary both top and bottom Figure 4 with a delicate wipe Kimwipes etc It is important to remove all semen from the exterior of the capillary in order to keep the SQA iO clean Visually confirm that the ca...

Страница 13: ...section while keeping the tip of the capillary well below the sample level and well below the level of any bubbles covering the liquid 3 Withdraw the capillary tip from the semen sample and visually i...

Отзывы: