8
4.0 FEEDER SET-UP
4.1 Initial
Start-up
a. The feeder should arrive at your plant fully adjusted and ready to
use. Set the feeder in its production position and level the feeder
via the four adjustable feet. Make sure the motor controller is in
the STOP position and the potentiometer is set to “0” ZERO.
Then, connect power to the motor controller. Place the motor
controller in the START position and slowly increase the
potentiometer until the auger starts turning. Confirm that the auger
rotates counter-clockwise when viewing rotation from the end of
the auger protruding through the rear of the gear reducer. If
rotation is incorrect, reverse the power leads. Refer to the
electrical connection for any connection or voltage requirements.
b. If the auger rubs the spout, remove the auger (remember- left hand
threads) and inspect for straightness. The auger should be straight
within 1/32”. Straighten as required. If the auger is straight and
the auger still rubs the spout, the gear reducer mounting lugs must
be adjusted to align the auger to the centerline of the spout.
Note: A helix type auger can droop from gravity even though
straight when placed on a reference table. It is acceptable for this
type auger to rub the spout when no powder is being fed. Once
powder is fed through the auger, the rubbing will stop.
c. The motor controller is factory adjusted and ready to run. A
separate manual is enclosed for the motor controller if adjustments
or maintenance are required.
4.2 Setting the Current Limits
The Merrick XTRA DC drive has a CURRENT LIMITER feature to
help protect the auger and gear reducer from damage. Use the
following procedure to adjust.
a. Run a hopper full of feed material and discharge via the auger until
the material is just above the material conditioning helix
(overwind). Refill the feeder and place an amp meter on one leg of
the power lead to the DC drive. Start the feeder and read the
amperage draw when the feeder starts and during material
discharge. Record the maximum amperage. Now, adjust the
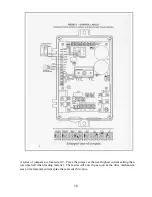
current limit in accordance with Figure 1 – Control Layout.
Содержание 100 VOLUMERIK Series
Страница 2: ...2 ...


