


11
5.0 FEEDER MAINTENANCE
a. The Series 100 requires virtually no maintenance. Only the lubricant in the
gear reducer must be changed at the manufacturer’s recommended interval.
Motor brushes should be checked periodically, but brush life should be greatly
extended due to the use of a PWM rated motor and PWM motor controller.
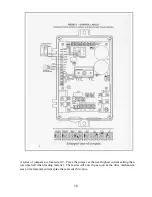
b. A complete bill of materials and assembly drawing are enclosed for identifying
components for replacement.
c. When maintenance is required, the MOTOR MUST BE ELECTRICALLY
LOCKED OUT BEFORE WORKING ON THE FEEDER. To disassemble the
feeder, remove the four knobs supporting the SPOUT and remove the spout and
gasket. Remove the AUGER by turning it clockwise (left hand thread). This is
all the disassembly required for cleaning. If further disassembly is required, the
next step is to remove the OVERWIND STUB. The STUB is held in place by
two set screws and key way at the end of the reducer quill. Loosen the set
screws and pull the STUB out of the reducer quill. Next remove the four screws
holding the gear reducer in place and remove the reducer. This will expose the
seal packing gland. The SEAL is captivated by a round retaining plate secured
with three nuts. Remove the nuts and RETAINING PLATE and the
compression WASHER and the SEALS (packing) will be exposed for removal.
d. When reassembling the feeder, reverse the procedure. Since construction is all
stainless, it is necessary to guard against galling. Before reassembling the
STUB, coat the shaft with Never-Sieze before inserting into the reducer quill.
Likewise, apply Never-Sieze to the threads on the end of the STUB before
attaching the AUGER.
e. Once the gear reducer has been removed and re-installed, alignment may be
necessary. The AUGER is aligned to the centerline of the SPOUT by adjusting
four hex stand-offs supporting the gear reducer. The reducer is aligned when
the AUGER turns freely without rubbing the SPOUT.
File: 100vol.doc
Содержание 100 VOLUMERIK Series
Страница 2: ...2 ...


