background image

P 5

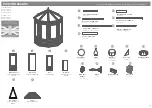
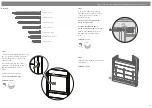
Please retain product label and instructions for future reference


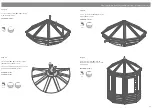
Step 8


Fix the bunk floor support 

(No. 11)

 as 

shown with 1x70mm screw.

1x70mm screws.  

Pre drill 

hole

70mm 

screw

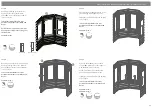
Step 9


Once the Shelf is fitted and fixed into 

position, the remaining panels can be 

fixed in place.

Secure each panel to each other with 

12x60mm screws.

Each panel has a top and bottom. The 

panels will not align if not arranged as 

shown  below.

12x60mm screws.  

Pre drill 

hole

60mm 

screw

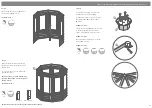
Step 10


For the Roof assembly, construct the 

framing away from the building.

Use 4x50mm screws to secure the Roof 

Metal Plate 

(No. 27)

 to the Roof Boss 

(No. 25). 

4x50mm screws.

Fix the Roof rafters 

(No. 13)

 one at a time 

to the Boss/Metal plate assembly as 

shown with 1x40mm screws per rafter.

8x40mm screws.

Once all rafters are attached, secure the  

with 1x60mm screw.

8x60mm screws.


Pre drill 

hole

40mm 

screw

50mm 

screw

60mm 

screw

4

27

25

13

Panel top

Panel bottom

*Windows panels are interchangeable with the Door panel*

Содержание 04OCTGH0606-V3

Страница 1: ... conditions For the duration of heavy or extended periods of rain swelling of the wood panels may occur Warping of the wood may also occur during excessive dry spells due to an interior moisture loss Unfortunately these processes cannot be avoided but can be helped It is suggested that the outdoor building is sprayed with water during extended periods of warm sunshine and sheltered as much as poss...

Страница 2: ...tructions for future reference Before assembly please make sure you have a suitable base ready to erect your building MADE IN GREAT BRITAIN PI 07 0113 Hinge Buttermere roof trim 4318 1120mm Roof Trim 1120mm x8 S1295 757mm Fascia 757mm x8 F4444 573mm Shelf Support 573mm Corner Trim 1794mm Buttermere corner trim 4318 1107mm F4444 1800mm Shelf Support 1800mm F4444 1100mm BIRDMOUTH Rafters 1060mm x8 F...

Страница 3: ...the Block No 21 with 2x30mm screws as shown 4x Window block per window Screw into the Window first 84x30mm screws Pre drill hole 30mm screw Step 2 To fix the Door No 3 into the Door panel No 2 Lay the Door panel flat on the ground and place the Door within the doorway The door can be hung from either side to suit your needs It is important that the door is placed central in the space provided Fix ...

Страница 4: ...be able to be positioned until the roof is fitted and fixed 9x60mm screws Pre drill hole 60mm screw Step 6 The Shelf support No 12 is fixed to the panel framing with 2x60mm screws Fitting the shelf will allow for the building to be aligned The panels will still be able to be positioned until the roof is fitted and fixed 2x60mm screws Pre drill hole 60mm screw Step 7 Place the Shelf No 6 onto the S...

Страница 5: ...align if not arranged as shown below 12x60mm screws Pre drill hole 60mm screw Step 10 For the Roof assembly construct the framing away from the building Use 4x50mm screws to secure the Roof Metal Plate No 27 to the Roof Boss No 25 4x50mm screws Fix the Roof rafters No 13 one at a time to the Boss Metal plate assembly as shown with 1x40mm screws per rafter 8x40mm screws Once all rafters are attache...

Страница 6: ... to screw into panel framing Pre drilling is essential to avoid splitting 16x40mm screws Pre drill hole 40mm screw Step 13 Place the Roof panel No 5 onto the building and align the short edge so it is parallel to the door panel The tip of the panel must not protrude further than the Roof Boss Secure the Roof with 9x50mm screws Pre drilling is essential to avoid splitting 9x50mm screws Pre drill ho...

Страница 7: ...he Roof plate No 14 with 1x50mm screw Fix the assembled Finial Roof plate to the building using 4x40mm screws 4x40mm screws 1x50mm screws Pre drill hole 40mm screw 50mm screw 15 14 Step 19 Fix each Corner Trim No 9 with 4x30mm screws making sure to screw into framing 32x30mm screws Pre drill hole 30mm screw Step 18 Secure each Fascia No 10 as shown with 3x30mm screws 24x30mm screws Pre drill hole ...

Страница 8: ...drill hole first to avoid splitting On the inside of the door opening fix the ply triangle door stop No 17 to the bottom left corner using 3x20mm screws 7x20mm Screws Pre drill hole 20mm screw AFTER TREATMENT score around protective cover on glazing and carefuly peel covering back It is ESSENTIAL that you apply wood treatment immediately after the building has been assembled 17 ...

Отзывы: