1
1
12
P 4
For assistance please contact customer care on: 01636 880514
Mercia Garden Products Limited,
Sutton On Trent,
Newark,
Nottinghamshire,
NG23 6QN
www.merciagardenproducts.co.uk
Please retain product label and instructions for future reference
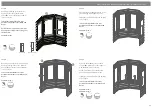
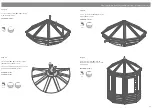
Step 4
Roughly positioning the Panels at 45
degrees, fix the side of the Window
panels
(No. 1)
together using 3x60mm
screws as shown.
*The panels will still be able to be
positioned until the roof is fitted and
fixed.*
Each panel has a top and bottom. The
panels will not align if not arranged as
shown below.
3x60mm screws.
Pre drill
hole
60mm
screw
Step 5
Repeating the method shown previously,
fix the remaining sides of two Window
panels
(No. 1)
together using 3x60mm
screws as shown.
*The panels will still be able to be
positioned until the roof is fitted and
fixed.*
9x60mm screws.
Pre drill
hole
60mm
screw
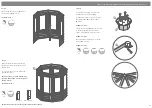
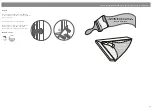
Step 6
The Shelf support
(No. 12)
is fixed to the
panel framing with 2x60mm screws.
Fitting the shelf will allow for the building
to be aligned.
*The panels will still be able to be
positioned until the roof is fitted and
fixed.*
2x60mm screws.
Pre drill
hole
60mm
screw
Step 7
Place the Shelf
(No. 6)
onto the Shelf
support
(No. 12)
and fix to the support
with 4x30mm screws as shown.
Fix the Shelf framing into the Window
panel framing with 8x40mm screws.
Fitting the shelf will allow for the building
to be aligned.
*The panels will still be able to be
positioned until the roof is fitted and
fixed.*
4x30mm screws.
8x40mm screws.
Pre drill
hole
40mm
screw
30mm
screw
1
Panel top
Panel bottom
1


