


P 8
Step 1
5
5
10 x 40mm screws
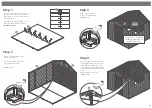
Place floor on firm and level base, ensure
base has suitable drainage free from areas
where water can collect. (See front page on
base requirements).
Attach the floors using 10 x 40mm screws
17
17
17
17
17
Do not secure the building to the
floor until the roof is fitted. Fix the
panels onto the floor using 50mm
screws in alignment with the floor
joists
Fix the corners with 50mm screws
as shown in diagram.
Position the panels so there is equal spacing
between the floor and cladding on all 4 sides
Step 2
3
2
3x50mm Screws
Pre drill
hole
50mm
screw
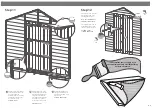
Step 3
9x50mm Screws
Fix the corners with 50mm
screws as shown in diagram.
1
Pre drill
hole
50mm
screw
Use part 3 for a no window
building and part 4 for a
windowed building
4 or 3
Step 4
8x20mm Screws
Place the ridge bar in between the door
and back gables. Ensure the top corners
of the ridge bar sit flush with the top
points of the door gable. Fix the ridge bar
to the gable using one L bracket for each
end.
Fix with 4x20mm screws each
16
20
20mm
screw
Pre drill
hole