


P 5
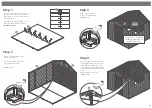
Fit the Cover Trims to the front
and back of the building as
shown in the illustration using
30mm screws. Trim the length
of the cover trims to the
required size before fitting if
necessary.
Pre drill to avoid splitting.
12x30mm Screws
10
Step 8
10
10
10
30mm
screw
Pre drill
hole
Step 9
16x40mm Screws
Attach the faiscas to the roof
leaving a slight overhang at the
top.
Fit the fascias to the roof over
the felt and secure in place with
40mm screws as shown.
Pre drill to avoid splitting.
40mm
screw
Pre drill
hole
18
18
8
8
8
8
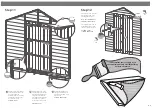
Step 10
23
24
Side View
Place the
plastic window
cill onto the
Window Panel
in the same
way as shown
on both
diagrams to the
left.
Fit the styrene sheets on top of
the window cill.
When positioning the styrene
sheets ensure there is an equal
distance between them and at
either side of the windows.
Fix the window strips to the two
pieces of framing that sit
alongside the outside edges of
the window with 3x30mm
screws for each strip.
Attach the three window strips
at either side of the windows
using 3x30mm screws each.
Make sure the screws enter the
framing in the window panel
and not the styrene.
9x30mm Screws
For the no window version go to step 11
9
9
9
9
9
9
30mm
screw
Pre drill
hole
6x30mm Screws
30mm
screw
Pre drill
hole
9
9