


P 11
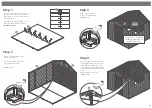
Step 11
b
c
Use 4x30mm Screws to fix
each beading strip onto the
door gable. Ensure that the
screw is parallel with the
door frame when fixing the
strip to the door gable as
shown in the close up view.
Attach the turn button to
the top and bottom door
blocks with 1x30mm screw
for each one.
First line up the door blocks
at the top and bottom of the
doors. Then fix with
2x30mm screws by screwing
through the outside of the
door into the block.
8x30mm Screws
2x30mm Black Screws
4x30mm Screws
b
c
a
13
19
14
a
13
30mm
screw
30mm
screw
12
11
19
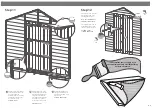
Step 12
It is ESSENTIAL that you apply wood
treatment immediately after the building
has been assembled.
AFTER TREATMENT:
score around protective
cover on glazing and
carefuly peel
covering back
Use 5x20mm screw to fix the
door strips to the master
door (Right door panel)
Use 1x30mm black screw to
fix the turn button onto the
slave door (left door panel)
5x20mm Screws
1x 30mm Black Screw
20mm
screw
Pre drill
hole
Pre drill
hole
30mm
screw