background image

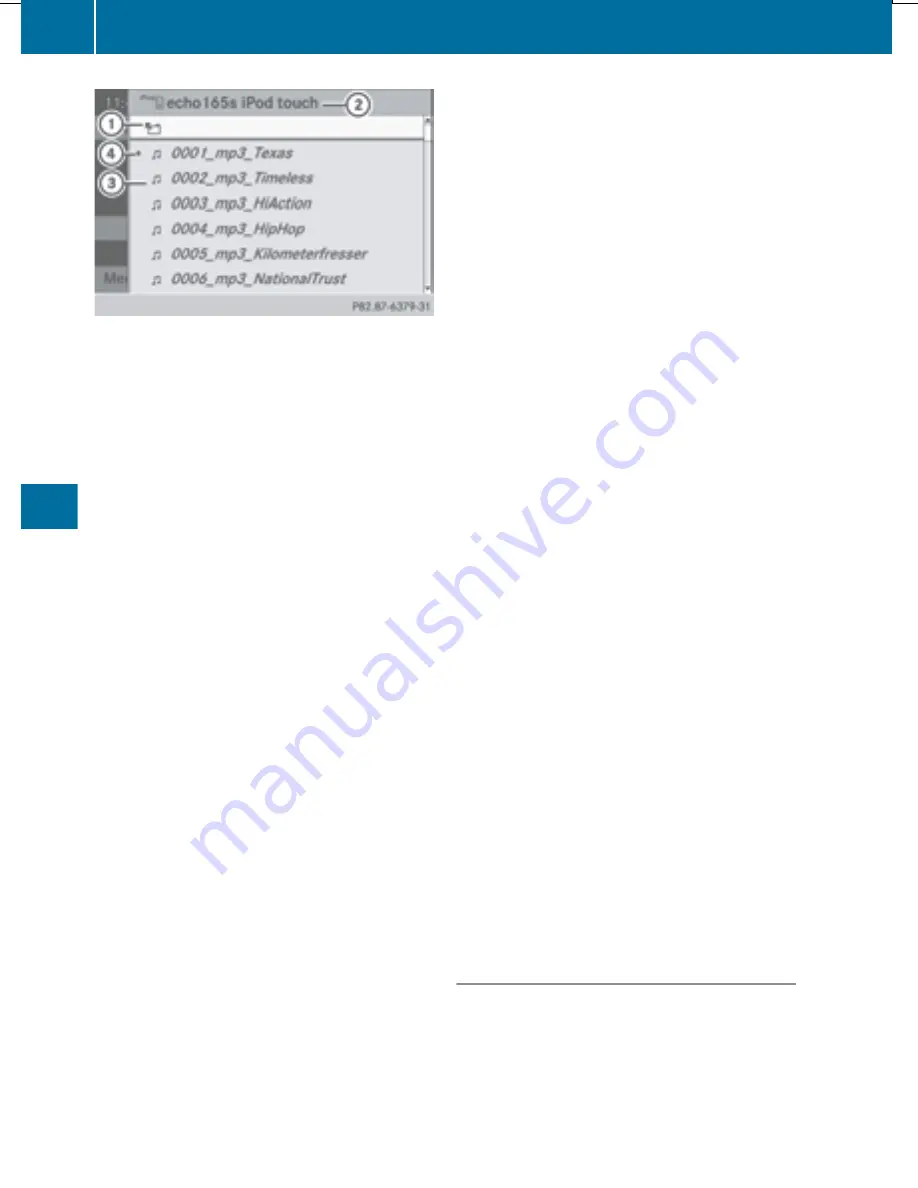
Example: current track list

:

Symbol for next folder up

;

Device icon and device name

=

Track symbol

?

Current title

X

Select 

Current Tracklist

 by turning

cVd

 the COMAND controller and press

W

 to confirm.

The content of the current track list
appears.

X

Select the track by turning 

cVd

 the

COMAND controller and press 

W

 to

confirm.
The track is played.

X

To switch to the next folder up: slide

XV

 the COMAND controller.

or

X

Press the 

%

 back button.

Playing back the content of a category or

folder

X

Select the category or folder by turning

cVd

 the COMAND controller.

X

Press 

W

 the COMAND controller for longer

than two seconds.
The content of the category or folder
selected is played in accordance with the
playback option (

Y

 page 450) selected.

Alphabetical track selection
iPod

®

, iPhone

®

 and MP3 player

This function is available for alphabetically
sorted categories and folders. This function

is not available for albums or playlists, for
example.

X

Select a category, e.g. 

Artists

, by turning

cVd

 the COMAND controller and press

W

 to confirm.

The available artists are displayed.

X

Press the corresponding number key once
or repeatedly to select the initial letter of
the desired artist. For example, to select an
artist whose name begins with C, press the

l

 number key three times.

The available letters are listed at the lower
edge of the display.
After a message, the first entry in the list
which matches the letter entered is
highlighted.

i

If no corresponding entry exists, the last

entry corresponding to a previous letter is
highlighted instead.

i

iPods and MP3 players: the quality of the

search results is highly dependent on the
version and language variant of the
software used to populate the device.
iTunes is a well-known media program, for
example.
If different sorting rules are defined (e.g. in
iTunes

®

), the search is canceled without

any result.

Additional selection functions

R

Keyword Search

Selecting keyword search allows you to
search through all categories on the
connected device for keywords.

i

More on 

Keyword Search

 under music

search, selecting a category (

Y

 page 433).

Playback options

X

To select a playback option: select

Media Interface

 in the basic display by

sliding 

V

Æ

 and turning 

cVd

 the COMAND

controller and press 

W

 to confirm.

The options list appears. The 

#

 dot

indicates the option selected.

450

Audio

COMAND

Содержание SL 550 BlueEFFICIENCY

Страница 1: ...SL Operator s Manual...

Страница 2: ...red trademark of Gracenote Inc RZAGATSurvey and related brands are registered trademarks of ZagatSurvey LLC In this Operator s Manual you will find the following symbols G WARNING Warning notes draw y...

Страница 3: ...may differ according to Rmodel Rorder Rcountry variant Ravailability Mercedes Benz therefore reserves the right to introduce changes in the following areas Rdesign Requipment Rtechnical features There...

Страница 4: ......

Страница 5: ...wheel and mirrors 95 Lights and windshield wipers 107 Climate control 121 Driving and parking 133 On board computer and displays 203 COMAND 267 Stowage and features 473 Maintenance and care 495 Roadsi...

Страница 6: ...otes 186 Active partition USB devices only Selecting 430 ADAPTIVE BRAKE 63 Adaptive Damping System Function notes 178 Adaptive Highbeam Assist Display message 238 Function notes 114 Switching on off o...

Страница 7: ...options 430 Safety notes 421 Setting the audio format 430 Stop function 426 Audio format setting Audio DVD 430 Video DVD 458 Audio menu on board computer 211 Authorized Mercedes Benz Center see Qualif...

Страница 8: ...onnecting an audio device 442 Searching for a mobile phone 359 Settings 292 Telephone basic menu 363 Telephony 358 Telephony notes 357 Bluetooth audio basic display 443 Bottle holder 479 Brake Assist...

Страница 9: ...drive 421 Removing single DVD drive 421 CD mode Playback options 430 CD player CD changer on board computer 212 Central locking Automatic locking on board computer 218 Locking unlocking SmartKey 68 Ch...

Страница 10: ...ay Cleaning 504 Cleaning instructions 272 Driving conditions menu AMG vehicles 183 Driving conditions menu except AMG vehicles 180 Setting 289 Switching on off 272 Combination switch 112 Compass funct...

Страница 11: ...nation entry 339 Storing during route guidance 339 Destination memory navigation Deleting an entry 341 Entering saving your home address 304 Previous destinations 341 Diagnostics connection 31 Dialing...

Страница 12: ...tant safety information 57 Overview 57 PRE SAFE Brake 63 STEER CONTROL 65 Driving systems Active Blind Spot Assist 195 Active Body Control AMG vehicles 181 Active Body Control except AMG vehicles 179...

Страница 13: ...starting 516 Starting problems 142 Starting the engine with the SmartKey 137 Starting with KEYLESS GO 137 Switching off 154 Tow starting vehicle 520 Engine electronics Problem malfunction 142 Engine...

Страница 14: ...e current consumption 209 Displaying the range 209 Driving tips 157 Fuel gauge 205 Grade gasoline 561 Important safety notes 561 Premium grade unleaded gasoline 561 Problem malfunction 154 Refueling 1...

Страница 15: ...osing 497 Display message 251 Opening 496 Hydroplaning 161 I Ignition lock see Key positions Immobilizer 65 Incident traffic report 333 Indicator lamps see Warning and indicator lamps Indicators see T...

Страница 16: ...hts Activating deactivating the interior lighting delayed switch off 218 Active light function 113 Automatic headlamp mode 110 Cornering light function 113 Driving abroad 108 Fog lamps 111 Hazard warn...

Страница 17: ...ocess 353 Matte finish cleaning instructions 502 mbrace Call priority 489 Display message 230 Downloading destinations COMAND 489 Downloading routes 492 Emergency call 487 Geo fencing 493 Important sa...

Страница 18: ...ifunction display Function notes 208 Permanent display 216 Multifunction steering wheel Adjusting the volume 277 Operating the on board computer 206 Multisession CD 431 Music files Recording 437 MUSIC...

Страница 19: ...pant Classification System OCS Faults 47 Operation 43 System self test 46 Occupant safety Children in the vehicle 54 Important safety notes 36 OCS Faults 47 Operation 43 System self test 46 Odometer s...

Страница 20: ...ing 318 Selecting as the destination 319 Settings 316 Visual information 317 Phone book Adding a number to an address book entry 371 Calling up 368 Creating a new entry 370 Deleting an entry 370 Enter...

Страница 21: ...auge 205 Important safety notes 152 Refueling process 153 see Fuel Remote control Programming garage door opener 482 Reporting safety defects 32 Reserve fuel tank see Fuel Reserve fuel Display message...

Страница 22: ...rgency Tensioning Devices 53 Fastening 51 Important safety guidelines 49 Releasing 52 Safety guidelines 38 Seat belt guide 99 Switching belt adjustment on off on board computer 219 Warning lamp 256 Wa...

Страница 23: ...forecast 463 Switching on off 462 Weather map 465 SmartKey Changing the battery 71 Changing the programming 70 Checking the battery 71 Convenience opening feature 84 Display message 253 Door central...

Страница 24: ...er console rear 476 Umbrella holder 475 Stowage well beneath the trunk floor 478 Summer tires 528 Sun visor 479 Supplemental Restraint System see SRS Supplemental Restraint System Surround lighting on...

Страница 25: ...ter 212 Number from the phone book 213 Operating options 357 Overview 357 Overview of functions 366 Reception and transmission volume 364 Redialing 213 Rejecting accepting a waiting call 367 Rejecting...

Страница 26: ...546 Labeling overview 541 Load bearing index definition 547 Load index 544 Load index definition 546 Maximum loaded vehicle weight definition 546 Maximum load on a tire definition 546 Maximum permissi...

Страница 27: ...from outside 79 Opening closing from outside HANDS FREE ACCESS 80 Opening closing manually from outside 78 Overview 77 Trunk lid Display message 251 Opening closing 77 Opening dimensions 565 Power cl...

Страница 28: ...laying conditions 453 Safety notes 453 Selecting 456 Selecting a film title 456 Selecting a scene chapter 456 Setting the audio format 458 Setting the language 458 Setting the picture 453 Showing hidi...

Страница 29: ...g changing 547 Mounting a new wheel 551 Mounting a wheel 548 Overview 526 Removing a wheel 551 Storing 548 Tightening torque 552 Wheel size tire size 552 Windows see Side windows Wind screen Electrica...

Страница 30: ...warning notices in this manual Disregarding them may lead to damage to the vehicle or personal injury Vehicle damage resulting from the disregard of the instructions is not covered by the Mercedes Be...

Страница 31: ...et describes all the necessary maintenance work which should be done at regular intervals Always have the Service and Warranty Booklet with you when you bring the vehicle to an authorized Mercedes Ben...

Страница 32: ...safety of your vehicle Contact an authorized Mercedes Benz Center for repairs or modifications to electronic components Other improper work or modifications on the vehicle could also have a negative...

Страница 33: ...battery may discharge The diagnostics connection is only intended for the connection of diagnostic equipment at a qualified specialist workshop Connecting equipment to the diagnostics connection can f...

Страница 34: ...become involved in individual problems between you your dealer or Mercedes Benz USA LLC To contact NHTSA you may call the Vehicle Safety Hotline toll free at 1 888 327 4236 TTY 1 800 424 9153 go to h...

Страница 35: ...d conditions for redistribution Redistributions and use in source and binary forms with or without modification are permitted provided that the following conditions are met 1 Redistribution of source...

Страница 36: ...LIABILITY OR TORT INCLUDING NEGLIGENCE OR OTHERWISE ARISING IN ANY WAY OUT OF THE USE OF THIS SOFTWARE EVEN IF ADVISED OF THE POSSIBILITY OF SUCH DAMAGE 34 Introduction...

Страница 37: ...Useful information 36 Panic alarm 36 Occupant safety 36 Child restraint systems 54 Driving safety systems 57 Theft deterrent locking system 65 35 Safety...

Страница 38: ...ification to this device could void the user s authority to operate the equipment The product label with FCC ID and IC certification number can be found in the battery case of the SmartKey i Canada on...

Страница 39: ...detected a malfunction if the 6 SRS indicator lamp Rdoes not light up at all Rdoes not go out after approximately four seconds after the engine is started Rlights up after the engine is started or whi...

Страница 40: ...ar SRS components and wiring RKeep area between air bags and occupants free of objects e g packages purses umbrellas etc RAir bag system components will be hot after an air bag has inflated Do not tou...

Страница 41: ...s 25 cm You should be able to accomplish this by adjusting the seat and steering wheel If you have any difficulties please contact a qualified specialist workshop Rdo not lean your head or chest close...

Страница 42: ...o have any malfunctioning air bags repaired This will help to make sure the air bags continue to perform their protective function for the vehicle occupants in the event of a crash Front air bags Driv...

Страница 43: ...d The knee bags operate at best in conjunction with correctly positioned and fastened seat belts Knee bags provide increased protection for the driver and front passenger against the risk of Rknee inj...

Страница 44: ...ront passenger side will deploy if the front passenger seat belt is fastened regardless of whether the front passenger seat is occupied or not Head bags Example head bag on the front passenger side He...

Страница 45: ...s in the front passenger seat have the front passenger reposition himself or herself in the seat until the 4 PASSENGER AIR BAG OFF indicator lamp goes out In the event of a collision the air bag contr...

Страница 46: ...e secured correctly in a suitable infant or child restraint system or booster seat suitable for the size and weight of the child The infant or child restraint must be properly secured with the vehicle...

Страница 47: ...In order to ensure correct operation of the air bag system and OCS Rsit with the seat belt fastened correctly and in a position that is as upright as possible with your back against the backrest Rwhil...

Страница 48: ...PASSENGER AIR BAG OFF indicator lamp does not illuminate the system is not functioning Consult an authorized Mercedes Benz Center before seating a child on the front passenger seat G WARNING Never pla...

Страница 49: ...cal adult Rhas been determined by the system not to be a child The OCS is malfunctioning X Have the OCS checked as soon as possible at a qualified specialist workshop X Observe the additional messages...

Страница 50: ...icles with a multicontour seat or active multicontour seat the air pressure in the side bolsters of the seat cushion and backrest is increased Rif the vehicle skids the side windows are closed almost...

Страница 51: ...straint cushion forwards in the direction of arrow X Push the NECK PRO head restraint cushion down in the direction of arrow as far as it will go X Firmly push the NECK PRO head restraint cushion back...

Страница 52: ...vinces Even where this is not required by law all vehicle occupants should correctly fasten their seat belts before starting the journey i See Children in the vehicle Y page 54 for further information...

Страница 53: ...el dashboard or on the seat Always keep both feet on the floor in front of the seat RWhen using a seat belt to secure infant restraints toddler restraints or children in booster seats always follow th...

Страница 54: ...and the seat belt Do not hold on to the seat belt tightly while it is adjusting You can switch the seat belt adjustment on and off in the on board computer Y page 219 The seat belt adjustment is an i...

Страница 55: ...nz Center If the front passenger seat is not occupied do not engage the seat belt tongue in the buckle on the front passenger seat Otherwise the Emergency Tensioning Device could be triggered in the e...

Страница 56: ...NGER AIR BAG OFF indicator lamp is illuminated indicating that the front passenger front air bag is deactivated Should the 4 PASSENGER AIR BAG OFF indicator lamp not illuminate or go out while a rearw...

Страница 57: ...be burned on these parts G WARNING Do not carry heavy or hard objects in the passenger compartment unless they are firmly secured in place Unsecured or improperly positioned cargo increases a child s...

Страница 58: ...aint systems Securing rings for a LATCH type ISOFIX child restraint system are installed to the front passenger seat Secure child restraint systems without a LATCH type ISOFIX child seat securing syst...

Страница 59: ...Y page 63 RPRE SAFE Brake Y page 63 RSTEER CONTROL Y page 65 Important safety notes If you fail to adapt your driving style or become distracted the driving safety systems can neither reduce the risk...

Страница 60: ...ng BAS operates in emergency braking situations If you depress the brake pedal quickly BAS automatically boosts the braking force thus shortening the stopping distance The brakes will function as usua...

Страница 61: ...PLUS may not intervene in all critical situations There is a risk of an accident Always pay careful attention to the traffic situation and be ready to brake Following damage to the front end of the ve...

Страница 62: ...NG If you deactivate ESP ESP no longer stabilizes the vehicle There is an increased risk of skidding and an accident Only deactivate ESP in the situations described in the following Avoid spinning the...

Страница 63: ...situations Rwhen using snow chains Rin deep snow Ron sand or gravel If SPORT handling mode is activated and one or more wheels start to spin the ESP warning lamp in the instrument cluster flashes ESP...

Страница 64: ...rmly and ESP intervenes RPRE SAFE Brake is no longer available it is also not activated if you brake firmly and ESP intervenes RESP still provides support when you brake firmly Rengine torque is no lo...

Страница 65: ...Brake intervention in a non critical driving situation at any time by Rdepressing the accelerator pedal further Ractivating kickdown Rreleasing the brake pedal The braking action of PRE SAFE Brake is...

Страница 66: ...sion you must apply the brakes yourself X To activate deactivate activate or deactivate PRE SAFE Brake in the on board computer Y page 214 When PRE SAFE Brake is activated the symbol appears in multif...

Страница 67: ...SmartKey When leaving the vehicle always take the SmartKey with you and lock the vehicle The engine can be started by anyone with a valid SmartKey that is left inside the vehicle i The immobilizer is...

Страница 68: ...off even if you close the open door that has triggered it for example i If the alarm stays on for more than 30 seconds the Tele Aid system initiates a call to the Customer Assistance Center automatic...

Страница 69: ...Useful information 68 SmartKey 68 Doors 74 Trunk 77 Side windows 83 Roof 86 67 Opening closing...

Страница 70: ...as the seat adjustment steering wheel adjustment or memory function If children open a door they could cause severe or even fatal injury to other persons if they get out of the vehicle they could inju...

Страница 71: ...S GO RBear in mind that the engine can be started by any of the vehicle occupants if there is a KEYLESS GO key in the vehicle Locking and unlocking centrally You can start lock or unlock the vehicle u...

Страница 72: ...he front passenger door handle X To lock centrally touch the outer sensor surface on one of the door handles X To restore the factory settings press and hold down the and buttons simultaneously for ap...

Страница 73: ...s replaced at a qualified specialist workshop Checking the battery X Press the or button The battery is working properly if battery check lamp lights up briefly The battery is discharged if battery ch...

Страница 74: ...ree cloth to do so X Make sure that the surface of the battery is free from lint grease and all other forms of contamination X Insert the front tabs of battery compartment cover into the housing and t...

Страница 75: ...werful source of radio waves X Lock unlock the vehicle using the remote control function of the SmartKey Point the tip of the SmartKey at the driver s door handle from close range and press the or but...

Страница 76: ...nt system and do not give them access to an unlocked vehicle A child s unsupervised access to a vehicle could result in an accident and or serious personal injury They could Rinjure themselves on vehi...

Страница 77: ...g the vehicle from the inside You can centrally lock or unlock the vehicle from the inside For example you can unlock the front passenger door from the inside or lock the vehicle before you pull away...

Страница 78: ...prevent personal injury never activate the closing assist mechanism by tampering with the door or trunk lid latch G WARNING Only drive with the doors closed Otherwise one or more of the doors could o...

Страница 79: ...cal key clockwise as far as it will go to position 1 X Turn the mechanical key back and remove it X Make sure that the doors and the trunk lid are locked X Insert the mechanical key into the SmartKey...

Страница 80: ...ing dimensions of the trunk lid can be found in the Vehicle data section Y page 565 i To make loading easier the stowed roof can be raised with the loading aid after the trunk lid has been opened The...

Страница 81: ...e found in the Vehicle data section Y page 565 Opening You can open the trunk lid automatically using the SmartKey or the handle in the trunk lid X Press and hold the F button on the SmartKey until th...

Страница 82: ...g procedure has been stopped Rmake a kicking movement with your leg under the bumper once again and the trunk lid will open If the trunk lid opening procedure has been stopped Rmake a kicking movement...

Страница 83: ...tes G WARNING Maintain sight of the area around the rear of the vehicle while operating the trunk lid with the door mounted switch Monitor the closing procedure carefully to make sure no one is in dan...

Страница 84: ...the mechanical key clockwise from position 1 to position 2 X Remove the mechanical key X Insert the mechanical key into the SmartKey Unlocking the trunk mechanical key The trunk lid swings upwards wh...

Страница 85: ...d with automatic operation and the anti entrapment feature If in automatic mode a front door window encounters an obstruction that blocks its path the anti entrapment feature will stop the door window...

Страница 86: ...X Pull the respective switch and hold it The corresponding rear side window will continue to close until you release the switch Opening and closing all side windows Using the switch on the center con...

Страница 87: ...lose all side windows simultaneously The KEYLESS GO key must be outside the vehicle All the doors must be closed X Touch recessed sensor surface on the door handle until the side windows are fully clo...

Страница 88: ...ntil the side window has closed The side window is closed with increased force If a side window is obstructed again during closing and reopens again slightly X Immediately after the window blocks pull...

Страница 89: ...e sure that the roof and rear window are clean and dry before opening the roof Otherwise water or dirt could enter the vehicle interior or trunk Opening and closing using the roof switch Important saf...

Страница 90: ...sing X Close the trunk partition Y page 89 X Close the trunk lid Y page 77 X Vehicles without KEYLESS GO point the tip of the SmartKey at the door handle on the driver s door X Vehicles with KEYLESS G...

Страница 91: ...r behind the roll bars Rnot allow the cargo to push the trunk partition upwards Make sure the trunk separator is completely closed Otherwise the roof can be blocked when it is opened or closed The tru...

Страница 92: ...catch lever on the passenger side trunk partition is unlocked X Pull trunk partition by handle in the direction of the arrow X Hook trunk partition into fastening eyelets in the side panels X Pull ne...

Страница 93: ...page 87 X Press the mark on cover and push in the direction of the arrow X Repeat the procedure with cover The rear brackets for wind screen are visible Wind screen Pin A Front brackets for wind scre...

Страница 94: ...Extending and retracting X Open the roof Y page 86 X Open the cover in the lower center console The switch for the electrical wind screen is under the cover X To extend press button X To retract pres...

Страница 95: ...e electrical components of MAGIC SKY CONTROL are protected by a paneling behind the overhead control panel The MAGIC SKY CONTROL control unit is marked with a yellow warning sticker that warns you of...

Страница 96: ...78 The on board voltage is too low X Leave the engine running The roof has been opened and closed several times in a row The roof drive has been automatically deactivated You can open and close the ro...

Страница 97: ...Useful information 96 Correcting the driver s seat posi tion 96 Seats 97 Steering wheel 101 Mirrors 103 Memory function 105 95 Seats steering wheel and mirrors...

Страница 98: ...k whether the head restraint is adjusted properly When doing so make sure that you have adjusted the head restraint so that the back of your head is supported at eye level by the center of the head re...

Страница 99: ...must be adjusted so that you can correctly fasten your seat belt Observe the following points Radjust the seat backrest until your arms are slightly angled when holding the steering wheel Radjust the...

Страница 100: ...nt passenger seat from the driver s seat G WARNING When adjusting the front passenger seat make sure the seat if occupied is as far from the front passenger front air bag as possible Otherwise the pas...

Страница 101: ...e sure that nobody can become trapped when moving the seat If there is a risk of someone becoming trapped press the button again or press the seat adjustment switch on the door Never place hands under...

Страница 102: ...To switch off press button repeatedly until all the indicator lamps go out i If the battery voltage is too low the seat heating may switch off Problems with the seat heating The seat heating has swit...

Страница 103: ...ck X To activate press button Three red indicator lamps in the button light up The blower starts up after a preheating phase of seven seconds X Press button repeatedly until the desired heating level...

Страница 104: ...219 Position of the steering wheel when the EASY ENTRY EXIT feature is active The steering wheel swings upwards when you Rremove the SmartKey from the ignition lock Ropen the driver s door and KEYLES...

Страница 105: ...ss adjustment button up down to the right or to the left The exterior mirror must be set to a position that provides you with a good overview of traffic conditions The convex exterior mirrors provide...

Страница 106: ...the transmission to another position the exterior mirror on the front passenger side returns to the driving position Using the memory button You can position the front passenger side exterior mirror i...

Страница 107: ...01 and the exterior mirrors Y page 103 X Press memory button M and one of the storage position buttons 1 2 or 3 within three seconds The settings are stored in the selected preset position A tone soun...

Страница 108: ...106...

Страница 109: ...Useful information 108 Exterior lighting 108 Interior lighting 115 Replacing bulbs 116 Windshield wipers 118 107 Lights and windshield wipers...

Страница 110: ...e before driving in these countries Conversion to asymmetrical low beam after returning Have the headlamps converted back to asymmetrical low beam headlamps at a qualified specialist workshop as soon...

Страница 111: ...with front fog lamps X To switch on turn the light switch to T Daytime running lamps Daytime running lamps in Canada 1W Left hand standing lamps 2X Right hand standing lamps 3T Parking lamps license p...

Страница 112: ...headlamps are switched on the L indicator lamp in the instrument cluster lights up If the engine is running and you turn the light switch to L the manual settings take precedence over the daytime run...

Страница 113: ...ck to position 2 or start the engine X Turn the light switch to L or X Press the N button The green N indicator lamp in the instrument cluster lights up X To switch off the front fog lamps press the N...

Страница 114: ...ne X Turn the light switch to L or X Press the combination switch beyond the pressure point in the direction of arrow In the position the high beam headlamps are only switched on when it is dark and t...

Страница 115: ...ounting is resumed from 0 Cornering light function The cornering light function improves the illumination of the road over a wide angle in the direction you are turning enabling better visibility in t...

Страница 116: ...their own may be recognized too late or not at all The automatic high beam headlamps will then not be deactivated or it will be activated in spite of preceding or oncoming road users This could endang...

Страница 117: ...re driving at speeds below approximately 30 mph 45km h or other road users have been detected or the roads are adequately lit The high beam headlamps are switched off automatically The K indicator lam...

Страница 118: ...lighting The interior lighting is activated automatically if the vehicle is involved in an accident X To switch off the crash responsive emergency lighting press the hazard warning lamp button or X Lo...

Страница 119: ...fe of the bulbs Always use a lint free cloth or only touch the base of the bulb when installing Only use bulbs of the correct type If the new bulb still does not light up consult a qualified specialis...

Страница 120: ...sor due to optical influences and the windshield becoming dirty in dry weather conditions the windshield wipers may be activated inadvertently This could then damage the windshield wiper blades or scr...

Страница 121: ...em away from the windshield By doing so you will avoid damage to the hood Changing the windshield wiper blades Moving the wiper arm to a vertical position On vehicles without KEYLESS GO X Turn the Sma...

Страница 122: ...ndshield Problems with the windshield wipers The windshield wipers are obstructed X For safety reasons you should remove the SmartKey from the ignition lock or X Switch off the engine using the Start...

Страница 123: ...Useful information 122 Overview of climate control sys tems 122 Operating the climate control sys tems 125 Setting the air vents 131 121 Climate control...

Страница 124: ...ter will reduce the air volume to the interior and the windows could fog up impairing visibility and endangering you and others Have a clogged filter replaced as soon as possible at a qualified specia...

Страница 125: ...vates cooling with air dehumidification Y page 125 B Switches the rear window defroster on off Y page 129 C Switches the ZONE function on off Y page 128 D Sets the temperature right Y page 127 E Switc...

Страница 126: ...e use of automatic climate control The following contains instructions and recommendations to enable you to get the most out of your automatic climate control RActivate climate control using the and b...

Страница 127: ...on are set to automatic mode or X Press the button The indicator lamp in the button goes out The previously selected settings come into effect again X To switch off press the button The indicator lamp...

Страница 128: ...rature of the dispensed air the airflow and the air distribution Automatic mode will achieve optimal operation if cooling with air dehumidification is also activated If desired cooling with air dehumi...

Страница 129: ...air through the center and side air vents O Directs air through the footwell air vents S Directs air through the center side and footwell vents Directs air through the defroster vents b Directs air t...

Страница 130: ...button lights up The climate control system switches to the following functions Rcooling with air dehumidification on Rhigh airflow depending on the outside temperature Rhigh temperature depending on...

Страница 131: ...pears in the display i You should only select this setting until the windshield is clear again Rear window defroster Activating deactivating G WARNING Clear all windows of ice or snow before setting o...

Страница 132: ...Air recirculation mode deactivates automatically Rafter approximately five minutes at outside temperatures below approximately 41 5 Rafter approximately five minutes if cooling with air dehumidificati...

Страница 133: ...hood and in the engine compartment on the front passenger side free of blockages such as ice snow or leaves Rnever cover the air vents or air intake grilles in the vehicle interior i You can move the...

Страница 134: ...RF setting the vents G WARNING When operating the climate control the air that enters the passenger compartment through the air vents can be very hot or very cold depending on the set temperature This...

Страница 135: ...Useful information 134 Breaking in notes 134 Driving 134 Automatic transmission 143 Refueling 152 Parking 154 Driving tips 156 Driving systems 162 133 Driving and parking...

Страница 136: ...can increase the engine speed gradually and bring the vehicle up to full speed Additional breaking in notes for AMG vehicles Rdo not drive faster than 85 mph 140 km h for the first 1 000 miles 1 500...

Страница 137: ...emperatures below 68 20 the maximum engine speed is restricted in order to protect the engine To protect the engine and maintain smooth engine operation avoid driving at full throttle when the engine...

Страница 138: ...n into ignition lock the system needs approximately two seconds recognition time You can then use Start Stop button Start Stop button USA only Canada only Activating power supply X If Start Stop butto...

Страница 139: ...ission to position P The transmission position display in the multifunction display shows P i You can also start the engine when the transmission is in position N X Turn the SmartKey to position 3 in...

Страница 140: ...g temperature more quickly Hill start assist G WARNING Never leave the vehicle when it is being held by hill start assist After approximately one second hill start assist will no longer brake your veh...

Страница 141: ...he ECO start stop function ECO button Deactivating except for AMG vehicles X Press button Indicator lamp and the symbol in the multifunction display go out Activating except for AMG vehicles X Press b...

Страница 142: ...g the brakes during the automatic stop phase When you depress the accelerator pedal the engine starts automatically and the braking effect of the HOLD function is deactivated Depress the accelerator p...

Страница 143: ...Shifting the transmission to position P does not start the engine Driving 141 Driving and parking Z...

Страница 144: ...Consult a qualified specialist workshop The engine does not start You cannot hear the starter motor The on board voltage is too low because the battery is too weak or discharged X Jump start the vehi...

Страница 145: ...tral position N if the engine speed is higher than idle speed If your foot is not firmly on the brake pedal the vehicle could accelerate quickly forward or in reverse You could lose control of the veh...

Страница 146: ...ging reverse gear R Only shift the automatic transmission to R when the vehicle is stationary X When the vehicle is stationary depress the brake pedal X Push the selector lever forwards past the first...

Страница 147: ...r lever back past the first point of resistance i If the vehicle is braked to a standstill when in transmission position D Y page 138 and the brake pedal continues to be depressed the ECO start stop f...

Страница 148: ...o R when the vehicle is stationary A Neutral Do not shift the transmission to N while driving Otherwise the automatic transmission could be damaged No power is transmitted from the engine to the drive...

Страница 149: ...vehicle G WARNING When working on the vehicle engage the parking brake and shift the automatic transmission into park position P Otherwise the vehicle could roll away which could result in an acciden...

Страница 150: ...engine is started i RS cannot be selected during normal driving For further information on RACE START see Y page 177 AMG button SETUP You can save and call up the following presettings with the AMG b...

Страница 151: ...position D it is possible to restrict or derestrict the shift range The set shift range appears in the multifunction display The automatic transmission shifts only as far as the selected gear Driving...

Страница 152: ...program M you can change gear using the steering wheel paddle shifters if the transmission is in position D The selected gear appears in the multifunction display X Press the program selector button...

Страница 153: ...erate or pull away again Kickdown You can also use kickdown for maximum acceleration in manual drive program M X Depress the accelerator pedal beyond the pressure point The transmission shifts to a lo...

Страница 154: ...ver allow sparks flames or smoking materials near gasoline Turn off the engine before refueling Whenever you are around gasoline avoid inhaling fumes and any skin or clothing contact Direct skin conta...

Страница 155: ...ns slightly X Open the fuel filler flap fully X Turn the fuel filler flap counter clockwise and remove it X Insert the fuel filler cap into the holder bracket on the inside of filler flap X Completely...

Страница 156: ...such as grass hay or leaves could be ignited by the hot exhaust system and cause a vehicle fire Unintended vehicle movement can cause serious personal injury or damage to the vehicle or the vehicle d...

Страница 157: ...en unattended in the vehicle or with access to an unlocked vehicle Children could release the parking brake and or shift the automatic transmission out of park position P either of which could result...

Страница 158: ...ctric parking brake handle is depressed the greater the braking force During braking Ra warning tone sounds Rthe Please Release Parking Brake message appears Rthe red F USA only or Canada only indicat...

Страница 159: ...take drugs and drive or allow anyone to drive who has been drinking or taking drugs Pedals G WARNING Make sure absolutely no objects are obstructing the pedals range of movement Keep the driver s foo...

Страница 160: ...hat you do not endanger other road users when you apply the brakes Downhill gradients On long steep gradients you must reduce the load on the brakes In order to use engine braking effect restrict the...

Страница 161: ...e condition messages in the multifunction display Especially for high performance driving it is important to maintain and have the brake system checked regularly The AMG brake systems are designed for...

Страница 162: ...brake system has only been subject to moderate loads you should test the functionality of your brakes at regular intervals To do so press firmly on the brake pedal when driving at a high speed This im...

Страница 163: ...ngine s air suction nozzles and this can cause engine damage Winter driving Important safety notes G WARNING If the vehicle becomes trapped in snow ensure that snow is kept away from the exhaust pipe...

Страница 164: ...n should only be operated if the driver is fully aware of the previously set speed and wishes to resume this particular preset speed G WARNING The cruise control brakes automatically so that the set s...

Страница 165: ...again if prevailing road conditions and legal speed limits permit Possible acceleration or deceleration differences arising from returning to the preset speed could cause an accident and or serious in...

Страница 166: ...an 20 mph 30 km h RESP intervenes or you deactivate ESP Ryou shift the transmission to position N while driving If cruise control is deactivated you will hear a warning tone You will see the Cruise co...

Страница 167: ...se sight and distance conditions Do not use the DISTRONIC PLUS during conditions of fog heavy rain snow or sleet G WARNING The DISTRONIC PLUS cannot take weather conditions into account Switch off the...

Страница 168: ...d a collision you must apply the brakes yourself DISTRONIC PLUS brakes the vehicle just enough to restore the preset speed or the preset distance to the vehicle in front G WARNING If you do not receiv...

Страница 169: ...any warranties and is not permitted Do not tamper with alter or use the device in any non approved way Any unauthorized modification to this device could void the user s authority to operate the equi...

Страница 170: ...n the multifunction display you can also activate DISTRONIC PLUS when driving at speeds below 20 mph 30km h If the vehicle in front is no longer detected and displayed for example because it has chang...

Страница 171: ...wards you or press it up or down or X Accelerate briefly Your vehicle pulls away and adapts its speed to that of the vehicle in front If there is no vehicle in front DISTRONIC PLUS operates in the sam...

Страница 172: ...t and approximately four seconds after the freeway exit Afterwards the vehicle accelerates back to the set speed you specified Stopping G WARNING Never get out of the vehicle when DISTRONIC PLUS is ac...

Страница 173: ...tor pedal DISTRONIC PLUS is activated The first time it is activated the current speed is stored Otherwise it sets the vehicle cruise speed to the previously stored value Setting a speed G WARNING Kee...

Страница 174: ...keeps to the vehicle in front dependent on vehicle speed You can see this distance in the multifunction display Y page 172 Make sure that you maintain a sufficiently safe distance from the vehicle in...

Страница 175: ...le to a standstill Cruise control lever There are several ways to deactivate DISTRONIC PLUS X Briefly press the cruise control lever forwards or X Brake unless the vehicle is stationary When you deact...

Страница 176: ...accelerate to the previously selected speed The DISTRONIC PLUS regulates only the distance between your vehicle and those directly ahead of it It may not register stationary objects in the road e g R...

Страница 177: ...hicles DISTRONIC PLUS may mistakenly detect vehicles that are crossing your lane Activating DISTRONIC PLUS at traffic lights with crossing traffic for example could cause your vehicle to pull away uni...

Страница 178: ...or your seat belt is fastened Rthe electric parking brake is released Rthe transmission is in position D R or N RDISTRONIC PLUS is deactivated Activating the HOLD function X Make sure that the activat...

Страница 179: ...brake pedal with your left foot and keep it depressed X Turn the drive program selector clockwise Y page 147 until the RS lamp lights up The multifunction display shows the RACE START Confirm Paddle U...

Страница 180: ...is running or that it has been switched off by the ECO start stop function X If indicator lamp is not lit press button Indicator lamp lights up You have selected the suspension for a sporty driving st...

Страница 181: ...ght Select the Normal setting for normal road surfaces and Raised for driving with snow chains or on particularly poor road surfaces Your selection remains stored even if you remove the SmartKey from...

Страница 182: ...dicator lamp is not lit press button Indicator lamp lights up You have selected the suspension for a sporty driving style The ABC Active Body Control SPORT message appears in the multifunction display...

Страница 183: ...limbs e g hands and feet could become trapped Notes In order to reduce fuel consumption and improve the driving dynamics the vehicle is lowered as its speed increases With the SPORT suspension tuning...

Страница 184: ...lly controlled ABC suspension system features improved driving dynamics and ride comfort The ABC suspension system is tuned individually to each wheel and depends on Rthe road surface condition e g bu...

Страница 185: ...It is not intended to nor does it replace the need for extreme care The responsibility during parking and other critical maneuvers always remains with the driver G WARNING Make sure no persons or ani...

Страница 186: ...ch or damage them Y page 504 Front sensors Center approximately 40in approximately 100cm Corners approximately 24in approximately 60cm Rear sensors Center approximately 48in approximately 120cm Corner...

Страница 187: ...or the vehicle is rolling backwards Rear and front areas activated P No areas activated One or more segments light up as the vehicle approaches an obstacle depending on the vehicle s distance from th...

Страница 188: ...king aids and may not detect all obstacles They do not relieve you of the responsibility of paying attention You are always responsible for safety and must continue to pay attention to your immediate...

Страница 189: ...iveways unsuitable surfaces etc Active Parking Assist measures the parking space as you drive past it Any later changes to the parking space are not taken into account For instance this may be the cas...

Страница 190: ...X To cancel the procedure press the button on the multifunction steering wheel or pull away or X To park using Active Parking Assist press the a button on the multifunction steering wheel The Park As...

Страница 191: ...r be changed too early the parking procedure will be canceled A sensible parking position can no longer be achieved from this position Exiting a parking space G WARNING Active Parking Assist does not...

Страница 192: ...is switched off and Active Parking Assist is immediately canceled The Park Assist canceled message appears in the multifunction display Active Parking Assist is canceled automatically if Rparking usi...

Страница 193: ...of rear view camera messages in the COMAND display Activating deactivating the rear view camera X To activate make sure that the SmartKey is in position 2 in the ignition lock X Make sure that the fu...

Страница 194: ...t 1 0m from the rear of the vehicle B Vehicle center axle marker assistance C Bumper D Red guide line at a distance of approximately 10 in 0 25m from the rear of the vehicle The guide lines are shown...

Страница 195: ...p until you reach the end position Red guide line is then at the end of the parking space The vehicle is almost parallel in the parking space Reverse perpendicular parking with the steering wheel at a...

Страница 196: ...tial dangers or to react slower Therefore make sure to be rested before and during your trip Take rests early enough and regularly especially during long trips Failure to do so could cause you to reco...

Страница 197: ...sessing your tiredness again if Ryou switch off the engine Ryou take off your seat belt and open the driver s door e g for a change of drivers or to take a break Active Driving Assistance package Gene...

Страница 198: ...g display in the exterior mirrors draws your attention to vehicles detected in the monitored area If you then switch on the corresponding turn signal to change lanes you will also receive an optical a...

Страница 199: ...er work properly Indicator and warning display G WARNING Active Blind Spot Assist is not active at speeds below 20 mph 30km h The indicator lamps in the exterior mirrors are yellow Vehicles in the mon...

Страница 200: ...steer slightly in the opposite direction or accelerate You are responsible for driving at appropriate speeds braking in good time and steering correctly Always adapt your driving style to suit the pre...

Страница 201: ...ered for instance by a sticker in the vicinity of the camera Rthe lane markings are worn away dark or covered up e g by dirt or snow Rthe distance to the vehicle in front is too small and the lane mar...

Страница 202: ...ssist does not detect road and traffic conditions Always make sure that there is sufficient distance to the side for other traffic or obstacles In rare cases unclear markings or particular structures...

Страница 203: ...lerate A lane correcting brake application is interrupted automatically if Ra driving safety system intervenes e g ESP PRE SAFE Brake or Active Blind Spot Assist Rlane markings can no longer be recogn...

Страница 204: ...202...

Страница 205: ...Useful information 204 Important safety notes 204 Displays and operation 205 Menus and submenus 208 Display messages 223 Warning and indicator lamps 255 203 On board computer and displays...

Страница 206: ...de temperature Rwarning indicator lamps Rmalfunction warning messages Rfailure of any systems Driving characteristics may be impaired If you must continue to drive do so with added caution Contact an...

Страница 207: ...h is set to T or L the brightness is dependent upon the brightness of the ambient light i The light sensor in the instrument cluster automatically controls the brightness of the multifunction display...

Страница 208: ...temperatures just above the freezing point do not guarantee that the road surface is free of ice The road may still be icy especially in wooded areas or on bridges The outside temperature display is i...

Страница 209: ...one menu starts rapid scrolling if the phone book is open a RConfirms a selection display message RIn the Tel telephone menu switches to the telephone book and starts dialing the selected number RIn t...

Страница 210: ...on Y page 138 Active Lane Keeping Assist Y page 199 HOLD function Y page 175 PRE SAFE Brake Y page 63 Menus and submenus Menu overview Press the or button on the steering wheel to call up the menu bar...

Страница 211: ...Reset trip computer is automatically reset if the value exceeds 9 999 hours or 99 999 miles Displaying the range and current fuel consumption Approximate range Current fuel consumption not for AMG veh...

Страница 212: ...on COMAND Y page 275 X Press the or button on the steering wheel to select the Navi menu Route guidance not active Direction of travel Current street Route guidance active No change of direction annou...

Страница 213: ...ea of the digital map off map position RNo Route no route could be calculated to the selected destination Audio menu Selecting a radio station Waveband Station frequency with memory position i Station...

Страница 214: ...onnected Video DVD operation Example CD DVD changer display Current DVD in the CD DVD changer Current scene X Switch on COMAND Y page 275 X Select DVD V Y page 454 X Press the or button on the steerin...

Страница 215: ...m the phone book X Press the or button on the steering wheel to select the Tel menu X Press the 9 or a button to call up the phone book X Press the 9 or button to select the desired name or X To begin...

Страница 216: ...DriveAssist menu X Press the 9 or button to select PRE SAFE Brake X Press a The current selection is displayed X To activate deactivate press a again When PRE SAFE Brake is activated the multifunctio...

Страница 217: ...s in the multifunction display when the ignition is on For further information about Active Lane Keeping Assist see Y page 199 Service menu In the Serv menu you have the following options Rcall up dis...

Страница 218: ...ed is displayed in mph Light submenu Setting the daytime running lamps i This function is not available in Canada X Press the or button on the steering wheel to select the Sett menu X Press the or 9 b...

Страница 219: ...n to confirm X Press the or 9 button to select the Surround Lighting function When the Surround Lighting function is activated the cone of light in the multifunction display is shown in red X Press th...

Страница 220: ...or further information on the automatic locking feature see Y page 76 Activating deactivating the acoustic locking verification signal If you switch on the Acoustic Lock function an acoustic signal so...

Страница 221: ...ress the or 9 button to select the Convenience submenu X Press the a button to confirm X Press or 9 to select the Easy Entry Exit function If the Easy Entry Exit function is activated the vehicle stee...

Страница 222: ...lectronic Stability Program mode and the SPORT handling mode X Press the or button on the steering wheel to select the AMG menu X Press the 9 button repeatedly until SETUP is displayed or X Briefly pr...

Страница 223: ...sition 2 or 3 and then press a to confirm Start timing is continued Resetting the current lap X Stop the RACETIMER X Press or to select Reset Lap X Press a to reset the lap time to 0 Deleting all laps...

Страница 224: ...ap length A Top speed during lap This function is only available if you have stored at least two laps and have stopped the RACETIMER X Press the or button on the steering wheel to select the AMG menu...

Страница 225: ...ith a high priority are shown in red You cannot hide display messages of the highest priority The multifunction display shows these messages continuously until the causes for the messages have been re...

Страница 226: ...in an emergency braking situation can increase If ESP is not operational ESP is unable to stabilize the vehicle There is an increased risk of skidding and an accident X Carefully drive a suitable dis...

Страница 227: ...and warning lamps light up in the instrument cluster ATTENTION ASSIST is deactivated The self diagnosis function might not be complete for example G WARNING The brake system continues to function norm...

Страница 228: ...le due to a malfunction BAS PLUS and PRE SAFE Brake may also have failed In addition the and warning lamps light up in the instrument cluster and a warning tone sounds G WARNING The brake system conti...

Страница 229: ...he electric parking brake handle for at least ten seconds X Shift the transmission to P X Consult a qualified specialist workshop The yellow warning lamp and the red F USA only Canada only indicator l...

Страница 230: ...ls towards the curb X Consult a qualified specialist workshop The yellow warning lamp lights up The red F USA only Canada only indicator lamp flashes for about ten seconds after the electric parking b...

Страница 231: ...flashes for about ten seconds after the electric parking brake has been applied or released It then goes out or remains lit The electric parking brake is malfunctioning e g because of overvoltage or...

Страница 232: ...f an accident X Pull over and stop the vehicle safely as soon as possible paying attention to road and traffic conditions Do not continue driving under any circumstances X Secure the vehicle against r...

Страница 233: ...possible paying attention to road and traffic conditions X Secure the vehicle against rolling away Y page 154 X Clean the DISTRONIC PLUS cover in the radiator grill Y page 504 X Clean the bumpers Y p...

Страница 234: ...d at the front on the left or right The 6 warning lamp also lights up in the instrument cluster G WARNING The air bags or Emergency Tensioning Devices may either be triggered unintentionally or in the...

Страница 235: ...ition off X Open the front passenger door X Remove the child and the child restraint system from the front passenger seat X Make sure that there are no objects on the seat adding to the weight The sys...

Страница 236: ...eat If additional forces are applied to the seat the system may interpret the occupant s weight as lower than it actually is G WARNING The front passenger front air bag and front passenger knee bag ma...

Страница 237: ...3 Lights i Display messages about LEDs This display message will only appear if all LEDs have failed Display messages Possible causes consequences and M Solutions b Check Left Cornering Light or Check...

Страница 238: ...X Check whether you are permitted to change the bulb yourself Y page 117 or X Visit a qualified specialist workshop b Check Left Brake LamporCheck Right Brake Lamp The left or right hand brake lamp is...

Страница 239: ...ive X Check whether you are permitted to change the bulb yourself Y page 117 or X Visit a qualified specialist workshop b Backup Light The backup lamp is defective X Check whether you are permitted to...

Страница 240: ...ld If the system detects that the camera is fully operational again the Adaptive Highbeam Assist Now Available message is displayed Adaptive Highbeam Assist is operational again Engine Display message...

Страница 241: ...and traffic conditions X Secure the vehicle against rolling away Y page 154 X Leave the vehicle and keep a safe distance from the vehicle until the engine has cooled down X Make sure that the air supp...

Страница 242: ...V belt is not damaged X Visit a qualified specialist workshop 4 Check Engine Oil At Next Refueling The engine oil level has dropped to the minimum level A warning tone also sounds X Check the oil lev...

Страница 243: ...eristics may be affected There is a risk of an accident X Do not drive at speeds above 50 mph 80 km h X Visit a qualified specialist workshop ABC Malfunction Stop Vehicle The vehicle level of the ABC...

Страница 244: ...Take a Break Based on certain criteria ATTENTION ASSIST has detected fatigue or a lack of concentration on the part of the driver A warning tone also sounds X If necessary take a break During long jou...

Страница 245: ...ative Active Lane Keeping Assist is defective X Visit a qualified specialist workshop Active Blind Spot Assist Currently Unavailable See Operator s Manual Active Blind Spot Assist is temporarily inope...

Страница 246: ...age 186 Park Assist Inoperative You have just carried out a large number of turning or parking maneuvers Active Parking Assist will become available again after approximately ten minutes Y page 186 X...

Страница 247: ...soon as possible paying attention to road and traffic conditions X Secure the vehicle against rolling away Y page 154 X Clean the DISTRONIC PLUS cover in the radiator trim and the bumper Y page 504 X...

Страница 248: ...d specialist workshop Cruise Control mph A condition for activating cruise control has not been fulfilled You have tried to store a speed below 20 mph 30 km h for example X If conditions permit drive...

Страница 249: ...spect the tires Y page 509 X Check the tire pressures and if necessary correct the tire pressure X Restart the tire pressure loss warning system when the tire pressure is correct Y page 533 Check Tire...

Страница 250: ...f an accident X Stop the vehicle without making any sudden steering or braking maneuvers Pay attention to the traffic conditions as you do so X Secure the vehicle against rolling away Y page 154 X If...

Страница 251: ...n be received from the wheel sensors The tire pressure monitor is temporarily malfunctioning X Drive on The tire pressure monitor restarts automatically as soon as the problem has been solved h Tire P...

Страница 252: ...ressure Y page 534 X If necessary correct the tire pressure h Correct Tire Pressure The tire pressure is too low in at least one of the tires or the tire pressure difference between the wheels is too...

Страница 253: ...without shifting the transmission from position D If transmission position R N or P is selected X Notify a qualified specialist workshop or breakdown service Only Shift to P when Vehicle is Stationary...

Страница 254: ...owage space under the armrest Y page 475 Phone No Service Your vehicle is outside the network provider s transmitter receiver range X Wait until the mobile phone operational readiness symbol appears i...

Страница 255: ...es consequences and M Solutions Key Does Not Belong to Vehicle You have put the wrong SmartKey in the ignition lock X Use the correct SmartKey Take Your Key from Ignition The SmartKey is in the igniti...

Страница 256: ...y Y page 154 X Operate the vehicle with the SmartKey in the ignition lock Key Not Detected white display message The KEYLESS GO key cannot be detected at present X Change the location of the key with...

Страница 257: ...257 ABS Y page 257 ESP Y page 259 ESP OFF Y page 259 M SPORT handling mode in AMG vehicles Y page 260 F USA Electric parking brake red Y page 257 Canada Electric parking brake red Y page 257 Electric...

Страница 258: ...seat belt warning lamp flashes and an intermittent audible warning sounds The driver or front passenger has not fastened their seat belt You are driving faster than 15 mph 25 km h or have briefly dri...

Страница 259: ...deactivated due to a malfunction BAS Brake Assist BAS PLUS ESP Electronic Stability Program PRE SAFE PRE SAFE Brake the HOLD function and hill start assist are therefore also deactivated for example...

Страница 260: ...above The front and rear wheels could therefore lock if you brake hard for example The steerability and braking characteristics may be severely affected The braking distance in an emergency braking si...

Страница 261: ...e on carefully X Visit a qualified specialist workshop USA only J Canada only The red brake warning lamp the yellow ESP and ESP OFF warning lamps and the yellow ABS warning lamp are lit while the engi...

Страница 262: ...G WARNING If ESP is switched off ESP is unable to stabilize the vehicle There is an increased risk of skidding and an accident X Reactivate ESP For exceptions see Y page 59 X Adapt your driving style...

Страница 263: ...ps are lit while the engine is running ESP BAS PRE SAFE the HOLD function and hill start assist are temporarily unavailable BAS PLUS and PRE SAFE Brake may also have failed ATTENTION ASSIST is deactiv...

Страница 264: ...against rolling away Y page 154 X Observe the additional display messages in the multifunction display 6 The red SRS warning lamp is lit while the engine is running There is a malfunction in the SRS S...

Страница 265: ...nearest gas station 8 The yellow reserve fuel warning lamp flashes while the vehicle is in motion In addition the Engine Check warning lamp may light up The fuel system pressure is too low The fuel f...

Страница 266: ...slush or ice X Do not start the engine again until the coolant temperature is under 248 120 Otherwise the engine could be damaged X Drive to the nearest qualified specialist workshop X Avoid subjecti...

Страница 267: ...specialist workshop X Avoid subjecting the engine to heavy loads e g driving in mountainous terrain and stop and go traffic Driving systems Problem Possible causes consequences and M Solutions The re...

Страница 268: ...accident X Stop the vehicle without making any sudden steering or braking maneuvers Pay attention to the traffic conditions as you do so X Secure the vehicle against rolling away Y page 154 X Observe...

Страница 269: ...Useful information 268 Operating safety 268 At a glance 271 System settings 289 Navigation 295 Telephone 357 Online and Internet functions 385 Audio 411 Video 452 SIRIUS Weather 461 267 COMAND...

Страница 270: ...e vehicle covers a distance of 44 feet approximately 14 m per second COMAND delivers information to simplify your choice of route and guide you comfortably and safely to your destination For safety re...

Страница 271: ...the electronic systems are connected Electronic malfunctions can seriously jeopardize the operational safety of your vehicle i Roof antenna functionality telephone satellite radio GPS can be affected...

Страница 272: ...eetype org All rights reserved 1996 2000 by David Turner Robert Wilhelm and Werner Lemberg NetFront This product contains NetFront Browser software of ACCESS Co Ltd Copyright 1996 2010 ACCESS Co Ltd A...

Страница 273: ...ion Rthe video function Rthe system settings Rthe online and Internet functions and the Digital Operator s Manual You can call up the main functions Rusing the corresponding function buttons Rusing th...

Страница 274: ...the white lettering In the example the audio main function is set to radio mode and display selection window is active Radio menu bar A allows you to operate the radio functions Switching the COMAND...

Страница 275: ...COMAND controller Overview COMAND controller You can use the COMAND controller to select the menu items in the COMAND display You can Rcall up menus or lists Rscroll within menus or lists and Rexit m...

Страница 276: ...nd hold CLR button Seat function button You can use button to call up the following seat functions RMulticontour seat with 4 way lumbar support RActive multicontour seat dynamic seat and massage funct...

Страница 277: ...menu from audio CD mode an audio CD is playing X Select Audio in the main function bar by sliding ZV the COMAND controller and press W to confirm The Audio menu appears The dot indicates the currentl...

Страница 278: ...Turns on maximum cooling Example settings for the defrost function top and for the climate mode in automatic mode X To hide the display turn or press the COMAND controller or X Press one of the button...

Страница 279: ...ents back on X Press the 8 button again The navigation announcements are active again Rif COMAND is switched off on with the q control knob Ror after starting route guidance Adjusting the volume Adjus...

Страница 280: ...Treble or Bass in the sound menu by turning cVd the COMAND controller and press W to confirm An adjustment scale appears X Select a setting by turning cVd the COMAND controller and press W to confirm...

Страница 281: ...e DVDs contain both stereo and multichannel audio formats it may be necessary to set the audio format Y page 430 Discs which support the audio formats mentioned have the following logos Dolby Digital...

Страница 282: ...imum playback of music and films on CD audio DVD or video DVD with multichannel audio formats such as MLP dts or Dolby Digital This results in sound characteristics like those intended by the sound en...

Страница 283: ...3 tracks should have a bit rate of at least 224 kbit s When playing using an iPod the bit rate should also be at least 224 kbit s For optimum playback quality X Deactivate the EQ setting on the iPod S...

Страница 284: ...COMAND controller repeatedly until the character bar disappears X Select the data field by sliding ZV and press W to confirm Storing an entry X After making an entry in the input menu Y page 370 selec...

Страница 285: ...cter entry navigation General information Character entry is explained in the following sections using NEW YORK as an example for entering a city If you want to use the address entry menu to enter a c...

Страница 286: ...der and confirm each with W Entering characters using the number keypad X To enter the letter N press the p number button twice in quick succession The character appears at the bottom of the display w...

Страница 287: ...n the character bar X Press W the COMAND controller It is also possible to switch the city list to the selection list at any time during character input X Slide ZV the COMAND controller repeatedly unt...

Страница 288: ...the COMAND controller and press W to confirm Multicontour seat Overview The contour of the driver s seat and front passenger seat backrests can be individually adjusted to provide optimum support for...

Страница 289: ...turning cVd the COMAND controller and press W to confirm A crosshair appears You can make two settings RVertical to move the point of greatest lumbar support up or down RHorizontal to adjust the amou...

Страница 290: ...set heating level of the seat heating Y page 100 X Select the seat Y page 286 X Select Balance by turning cVd the COMAND controller and press W to confirm A scale appears and shows the current settin...

Страница 291: ...he design by manually selecting day or night design or opt for an automatic setting X Press W X Select Settings by turning cVd the COMAND controller and press W to confirm X Select Display and press W...

Страница 292: ...OMAND controller and press W to confirm Abbreviation Meaning DD MM YY Day Month Year date format HH MM Hours Minutes time format You can set the 24 hour or the AM PM format Adjusting the time zone and...

Страница 293: ...ional information in the COMAND display Calling up drive status regulator ABC X Press W X In the system menu slide ZV the COMAND controller up until the display selection window is selected X Slide XV...

Страница 294: ...etooth Special Interest Group SIG Inc Activating deactivating Bluetooth X Press W The system menu appears X Select Settings by turning cVd the COMAND controller and press W to confirm X Select Activat...

Страница 295: ...u can call up the full screen with map RSpoken Driving Tip you can call up the current driving recommendation RDisplay Traffic Messages you can call up traffic reports RNavigate Home you can start rou...

Страница 296: ...imported again using this function Reset function You can completely reset COMAND to the factory settings Amongst other things this will delete all personal COMAND data This includes the station prese...

Страница 297: ...cover all areas nor all routes in an area For example a route may have been diverted or the direction of a one way street may have changed For this reason you must always observe road and traffic rule...

Страница 298: ...en or X Select Navi in the main function bar by sliding ZV and turning cVd the COMAND controller and press W to confirm The map is displayed with the menu shown Map without the menu route guidance ina...

Страница 299: ...ulates a route with the shortest minimized journey time RDynamic Traffic Route same route type as Fast Route In addition COMAND takes into account any relevant traffic reports received during route gu...

Страница 300: ...and out of carpool lanes using visual and acoustic driving directions X In the route settings menu select Number of Occupants in Vehicle by turning cVd the COMAND controller X Select 1 2 or More than...

Страница 301: ...may not be available at all or may not yet be available Example after you enter the state province the Map No Center Intersection Save and Start menu items are not available The ZIP code menu item is...

Страница 302: ...Y page 299 X Select Street in the address entry menu by turning cVd and sliding ZV the COMAND controller and press W to confirm You will see the street list either with the character bar option 1 or...

Страница 303: ...Option 1 house number list with character bar X Enter 4 and 0 Character entry using city input as an example Y page 283 House number list as selection list Option 2 house number list as selection list...

Страница 304: ...ation Y page 303 Entering a center Entering a center will for example delete a previously entered street X Call up the address entry menu Y page 299 X Select Center in the address entry menu by turnin...

Страница 305: ...303 Starting route calculation Address entry menu with destination address Destination address To start route calculation You can now have COMAND calculate the route for the address specified or save...

Страница 306: ...ter the address e g a city street and house number Y page 299 X Once you have entered the address select Save in the address entry menu by turning cVd and sliding ZV the COMAND controller and press W...

Страница 307: ...your selection The address entry menu appears again My address has been entered X To start route calculation select Start and press W to confirm Entering a destination from the list of last destinati...

Страница 308: ...as soon as you turn cVd the COMAND controller the scale bar appears X Turn cVd until the desired scale is set Turning clockwise zooms out from the map turning counter clockwise zooms in X To select a...

Страница 309: ...ocated over a body of water you will see the message The destination is in a body of water Please select another destination Intermediate stop Entering an intermediate stop X To switch to navigation m...

Страница 310: ...age to this effect X Confirm OK by pressing W X Select a different category Deleting a stopover If a stopover has already been entered you can delete it X To switch to navigation mode press the functi...

Страница 311: ...n Using Map X Enter a destination using the map Y page 306 Using Geo Coordinates X Enter a destination using the geo coordinates Y page 306 When the entry is complete the waypoint appears X To accept...

Страница 312: ...the COMAND controller and press W to confirm The entries are swapped X To delete waypoints select the symbol for waypoint 1 or 2 in the waypoint menu by turning cVd the COMAND controller and press W...

Страница 313: ...stination in the navigation system menu bar by turning cVd the COMAND controller and press W to confirm X Select From POIs and press W to confirm A menu appears X Choose one of the options and press W...

Страница 314: ...the Entering a city section Y page 299 X Select a POI category Y page 313 Option 2 X Enter a city in the address entry menu Y page 299 X Select POI and press W to confirm X Select a point of interest...

Страница 315: ...selected position Point of interest search near the current position example The example shows a search after selection of the Rest Area entry i The POI search is canceled when 50 POIs have been foun...

Страница 316: ...To cancel selection C To display a point of interest s position on the map The example has been selected in the BAR RESTAURANT POI category Further information on searching via POI categories Y page 3...

Страница 317: ...by turning cVd the COMAND controller and press W to confirm The ZAGAT evaluations appear ZAGAT example description X To show the information select Details and press W to confirm Selecting a point of...

Страница 318: ...irm A prompt appears asking whether the point of interest should be used as the destination X Select Yes or No and press W to confirm If you select Yes route guidance starts If you select No you can c...

Страница 319: ...p The display for the corresponding category must be activated for this X Call up the Personal POIs menu Y page 316 X In the Personal POIs menu select Visual Warning For Personal POIs and press W to c...

Страница 320: ...select Yes the category will be deleted If you select No the process will be canceled Managing personal POIs X Call up the Personal POIs menu Y page 316 X Select Manage Personal POIs in the menu and...

Страница 321: ...confirm X Select a category X Enter the name The current address is saved as a personal point of interest on the SD memory card Importing personal POIs via the online function You can import personal...

Страница 322: ...ou select Yes the personal POI is accepted as the destination If you select No the process will be canceled X To make a call select Call and press W to confirm COMAND switches to telephone mode Y page...

Страница 323: ...destination memory for later use i The destination addresses are downloaded in the same order as they are sent If you own several Mercedes Benz vehicles equipped with an mbrace subscriber account eac...

Страница 324: ...dance on days when they are open For this purpose the relevant times must be correctly stored in the database Displays during route guidance Change of direction Changes of direction have three phases...

Страница 325: ...or a 3D image of the road s course with the route indicating the next maneuver Example change of direction phase Current vehicle position the tip of the triangle indicates the vehicle s direction of...

Страница 326: ...ich the next change of direction is required i The multifunction display also shows lane recommendations Only the recommended lanes are displayed here Y page 210 Display and description of lane recomm...

Страница 327: ...announcements are made during a phone call X To show the menu press W the COMAND controller X Select RPT in the navigation system menu bar by turning cVd the COMAND controller and press W to confirm...

Страница 328: ...or area of destination reached When you reach your destination COMAND displays a checkered flag and route guidance is automatically ended If the destination is not in close proximity to a digitized s...

Страница 329: ...o show the menu press W the COMAND controller X Select Route in the navigation system menu bar by turning cVd the COMAND controller and press W to confirm X Select Alternative Route and press W to con...

Страница 330: ...ntermediate stop if they are part of the route If a mobile phone is connected to COMAND and a phone number is included in the destination information you can call it Y page 359 Route overview You can...

Страница 331: ...emonstration has been stopped Distance of the crosshair from current vehicle position X To get to the current vehicle position press W to confirm the symbol for the current vehicle position X To chang...

Страница 332: ...th gray strokes symbol for tire tracks X To end recording select Stop Recording in the Routes menu by turning cVd the COMAND controller and press W to confirm Displaying and editing the recorded route...

Страница 333: ...ning cVd the COMAND controller and press W to confirm X To delete a route select Delete in the menu by turning cVd the COMAND controller and press W to confirm A prompt appears asking whether the rout...

Страница 334: ...e start of the route guidance you will see the Off Mapped Road message an arrow and the distance to the destination The arrow shows the compass heading to the actual destination The route is highlight...

Страница 335: ...nd take account of these for route guidance in the navigation system Received traffic reports are displayed on the map either as text or as symbols Real time traffic reports on the map Symbol delimiti...

Страница 336: ...on the route On the map symbol appears when approaching a traffic jam if route guidance is active and the route passes through the area affected by the traffic jam The symbol marks average speeds of 5...

Страница 337: ...list shows all the roads areas or regions for which reports are available A traffic report may refer to an area or a region e g if visibility is impaired due to fog X Calling up a list Y page 335 X To...

Страница 338: ...traffic symbol information X To continue highlighting traffic symbols select Next or Previous by turning cVd the COMAND controller and press W to confirm X To change the map scale select Map by slidi...

Страница 339: ...nly After Request take all relevant traffic messages into account when calculating a route Y page 297 If you have set the route type Dynamic Route COMAND guides you on the updated route to your destin...

Страница 340: ...ss is automatically highlighted in the selection list If no home address has been stored yet you can now assign an address book entry If a home address already exists it is displayed and you can alter...

Страница 341: ...ddress book is full no destinations can be saved in the destination memory You must first delete address book entries Y page 379 After destination entry X The destination has been entered and is shown...

Страница 342: ...No the process will be canceled X To save the destination with a name select Save With Name and press W to confirm X Select a category e g Home and press W to confirm X The input menu appears with da...

Страница 343: ...nd press W to confirm If you select Yes COMAND deletes the destination You will see a message to this effect If you select No the process will be canceled i If the navigable address data for the desti...

Страница 344: ...dress appears X Select Delete and press W to confirm A prompt appears asking whether the entry should be deleted X Select Yes or No and press W to confirm If you select Yes the entry is deleted If you...

Страница 345: ...the vehicle position Centering the map on the vehicle s position X To show the menu press W the COMAND controller X Select Position in the navigation system menu bar by sliding V and turning cVd the C...

Страница 346: ...he orange point of the symbol points north Map orientation menu Setting the map orientation X To show the menu press W the COMAND controller X Select Navi in the main function bar by sliding ZV and tu...

Страница 347: ...remain unchanged If the function is switched off you can reselect the individual POIs They show the most recently selected settings i The list shows all symbols that are contained on the digital map...

Страница 348: ...Number of GPS satellites currently being used There must be sufficient GPS reception for all displays to be shown If this is not the case the display will be grayed out Height display may vary from t...

Страница 349: ...white snow for mountains Example highway information Switching freeway information on off When driving on the highway you can see the following information on the right of the display Rthe nearest ga...

Страница 350: ...upper edge of the display X To show the menu press W the COMAND controller X Select Navi in the main function bar by sliding ZV and turning cVd the COMAND controller and press W to confirm X Select Ma...

Страница 351: ...route If you activate or deactivate a route block while route guidance is inactive COMAND will use the new setting for the next route guidance The calculated route may include an area to be avoided if...

Страница 352: ...of the square turn cVd the COMAND controller The square is enlarged or reduced X To confirm the settings press W The list appears The previously selected area to be avoided has been added and activate...

Страница 353: ...e XVY ZV or aVb the COMAND controller The area is moved on the map X To adjust the size of the area turn cVd the COMAND controller The area is enlarged or reduced X To confirm the change press W the C...

Страница 354: ...t Compass and press W to confirm Example compass Current direction of travel Current height above average sea level rounded Current vehicle position longitude coordinates Number of GPS satellites curr...

Страница 355: ...em software A prompt then appears asking if you want to install the database Versions of the database currently installed and the database that is to be installed are displayed X Select Yes or No and...

Страница 356: ...X To confirm the message press W the COMAND controller X Take the DVD out of the slot 354 Navigation COMAND...

Страница 357: ...equences and M Solutions COMAND is unable to determine the vehicle s position COMAND has to redetermine the position of the vehicle if the vehicle has been transported Example RAfter transporting the...

Страница 358: ...hard drive once more The message will then reappear X Consult an authorized Mercedes Benz Center Problem Possible causes consequences and M Solutions You see a message informing you that the DVD conta...

Страница 359: ...fety of others we recommend that you pull over to a safe location and stop before placing or taking a telephone call If you choose to use the mobile phone while driving please use the hands free devic...

Страница 360: ...ency call you must arrange rescue measures yourself X Enter the number on COMAND Y page 365 X Press 6 The telephone makes the connection X Wait until the emergency call center answers and describe the...

Страница 361: ...ions at 1 800 387 0100 for Canada i Some displays e g the signal strength depend on the supported version of the Hands Free Profile Connecting a mobile phone General information Before using your mobi...

Страница 362: ...s already full you will be requested to de authorize a mobile phone Y page 362 If COMAND does not find your mobile phone external authorization may be necessary Y page 361 i If you call up the telepho...

Страница 363: ...ed to enter a confirmation in your mobile phone to connect calls Please check your mobile phone display On some mobile phones this confirmation can be saved In this case you do not need to enter it ag...

Страница 364: ...e phones If you have authorized more than one mobile phone you can switch between the individual phones X Select the mobile phone in the Bluetooth telephones list by turning cVd the COMAND controller...

Страница 365: ...d or slide XVY the COMAND controller Telephone basic menu Bluetooth interface Basic menu display Telephone basic menu Bluetooth interface Telephone status Signal strength of mobile phone network Recei...

Страница 366: ...Select Connect Device in the telephone basic menu by sliding V and turning cVd the COMAND controller and press W to confirm X Select an authorized mobile phone from the list by turning cVd X Select th...

Страница 367: ...the multifunction steering wheel Using the telephone basic menu X Call up the telephone basic menu Y page 363 X Select the digits one by one by turning cVd and sliding ZV the COMAND controller and pre...

Страница 368: ...Availability depends on the network only possible in the GSM network and on the Bluetooth mobile phone Switching the hands free microphone on off This function is also available during an active phon...

Страница 369: ...e multifunction steering wheel X To accept select Accept and press W to confirm or X Press the 6 button on COMAND or on the multifunction steering wheel The system behavior after accepting the incomin...

Страница 370: ...367 Using the phone book Introduction The phone book displays the names and phone numbers of all of the address book entries saved in the COMAND address book If an address book entry does not have a...

Страница 371: ...ess W to confirm The first entry in the list that starts with the letter selected is highlighted If there are similar entries the next different character is shown For example with entries such as Chr...

Страница 372: ...he entry contains only phone numbers it is deleted from the phone book and address book If it contains additional data such as a navigable destination the entry is deleted in the phone book However th...

Страница 373: ...ting numbers X Select Yes or No and press W to confirm If you select Yes a selection list will appear containing the five existing numbers If you select No the process will be canceled X Select the nu...

Страница 374: ...ed by turning cVd and press W to confirm The corresponding list appears i You can also call up the list of dialed calls by pressing the 6 button when the telephone basic menu is shown In this case the...

Страница 375: ...and select an entry Y page 372 X Select the list symbol to the right of the entry by sliding VY the COMAND controller and press W to confirm X Select Save and press W to confirm i Save is shown in gr...

Страница 376: ...call lists are deleted If you select No the process will be aborted i If you delete these call lists from the mobile phone see the separate mobile phone operating instructions COMAND updates the call...

Страница 377: ...COMAND controller and press W to confirm The speed dial list appears X Select preset and press W to confirm The basic telephone menu displays the selected entry This initiates dialing Deleting a spee...

Страница 378: ...r the read aloud function Rlanguage Y page 292 Rspeed Y page 291 X Press W while a text message is being displayed then select Read Aloud and press W to confirm COMAND reads out the text message X To...

Страница 379: ...all The telephone makes the call i It is possible that a highlighted numerical sequence may not contain a telephone number i You can use the New entry or Add no functions to save this telephone number...

Страница 380: ...from other sources The remaining 1 000 entries are assigned by COMAND as necessary i Display of mobile phone contacts contacts downloaded from the mobile phone remain in the address book even if you d...

Страница 381: ...page 369 Creating a new entry in the address book You can enter address data directly into the address book If you store telephone numbers in the COMAND phone book these are also saved in the address...

Страница 382: ...pears Starting route guidance to an address X Select the address data field by turning cVd the COMAND controller and press W to confirm The route to the destination address is calculated and route gui...

Страница 383: ...onnected via the Bluetooth interface Y page 359 Dialing a number X Display details for an address book entry Y page 380 X Select the phone number data field by turning cVd the COMAND controller X Pres...

Страница 384: ...command and dial a phone number for example You can add one voice tag per address book entry Adding or changing a voice tag X Search for an address book entry with or without a voice tag Y page 379 X...

Страница 385: ...requirements apply Source Conditions Memory card The SD memory card is inserted Y page 424 It contains importable contact details USB device The USB device is inserted into the USB port Y page 424 It...

Страница 386: ...ne by sliding V and turning cVd the COMAND controller and press W to confirm A menu appears X Select Download Contacts and press W to confirm X Select Receive Contacts From Phone in the menu by turnin...

Страница 387: ...nnection For this reason you cannot connect to the Internet during a service call i The availability of individual COMAND Mercedes Benz Apps may vary depending on the country i The terms of use are sh...

Страница 388: ...ze any user input within a five minute time period i The button is inoperative Local search Calling up the local search menu X Select the icon in the main function bar by sliding ZV and turning cVd th...

Страница 389: ...tering the search term select by turning cVd the COMAND controller and press W to confirm A menu appears Here you can select where the POI search should begin Selecting the search position The POI is...

Страница 390: ...elephone function and make the call Y page 365 i The menu item is grayed out if there is no phone number available X To import a destination select Import with the COMAND controller and press W to con...

Страница 391: ...tel Adler Search History This function offers you all the previous search queries X Bring Search history in the local search menu to the front by turning cVd the COMAND controller and press W to confi...

Страница 392: ...n function bar by sliding ZV and turning cVd the COMAND controller and press W to confirm The carousel view appears X Bring the COMAND panel to the front by turning cVd the COMAND controller and press...

Страница 393: ...359 Rthe destination address contains a telephone number Using as the destination X Select Navigate to in the menu by turning cVd the COMAND controller and press W to confirm You then switch to naviga...

Страница 394: ...select To Address Book by turning cVd the COMAND controller and press W to confirm The entry is stored in the address book Deleting a destination route from the server X Select an entry in the list b...

Страница 395: ...weather report Rthe current temperature Rinformation on the weather e g cloudy rain Rthe maximum daytime temperature Rthe minimum daytime temperature Rthe probability of rain Rthe forecast for the cu...

Страница 396: ...her station Option 1 selecting the area in the information chart X Select Position in the information chart by turning cVd the COMAND controller and press W to confirm A menu appears X To select the c...

Страница 397: ...port New York NY Option 2 selecting the area in the weather map X Call up the weather map and move to the desired location Y page 395 X Press W the COMAND controller The menu bar is shown X Press W th...

Страница 398: ...ory This presetting can be changed in the Options menu Y page 398 X Select a weather characteristic by turning cVd the COMAND controller and press W to confirm The dot indicates which weather characte...

Страница 399: ...default settings Y page 401 Calling up the options menu Options menu X Select the icon in the main function bar by sliding ZV and turning cVd the COMAND controller and press W to confirm The carousel...

Страница 400: ...cepted X To exit the menu select Back by turning cVd the COMAND controller and press W to confirm Deleting saving search queries X Select the Delete all searches entry by turning cVd the COMAND contro...

Страница 401: ...t the entry next to Default location by turning cVd the COMAND controller and press W to confirm The dot indicates the currently selected default location X Select an entry by turning cVd the COMAND c...

Страница 402: ...g options for destination route download Setting the type of import You can choose between manual and automatic importing X Select the entry next to Import by turning cVd the COMAND controller and pre...

Страница 403: ...function bar by sliding ZV and turning cVd the COMAND controller and press W to confirm The carousel view appears X Bring the COMAND panel to the front by turning cVd the COMAND controller and press W...

Страница 404: ...ome page appears X To call up Google services this is done through Google Local Search Y page 389 i Facebook is a social network This App allows you to log in from your vehicle and use Facebook s many...

Страница 405: ...cters using the number keypad Y page 283 X After entering the web address select the symbol by turning cVd or sliding XVY the COMAND controller and press W to confirm The website is called up X To sel...

Страница 406: ...cted e g link text field or selection list to the next and highlights the respective element on the website Sliding the controller X Left or right XVY X Up or down ZV X Diagonally aVb Moves the pointe...

Страница 407: ...haracter bar or the number keypad Character entry Y page 281 X If the text has been entered select the icon by turning cVd the COMAND controller and press W to confirm The text has now been entered Me...

Страница 408: ...up the menu Y page 405 X Select Next by turning cVd or sliding ZV the COMAND controller and press W to confirm View You can use this function to Rposition a selection window on websites that are large...

Страница 409: ...menu Y page 405 X Select Add To Favorites by turning cVd or sliding ZV the COMAND controller and press W to confirm The following message appears The page has been added to your favorites Displaying...

Страница 410: ...he COMAND controller An input menu appears X Enter the web address URL and name using either the character bar or the number keypad Character entry Y page 281 X Select the icon and press W to confirm...

Страница 411: ...he web address URL and name using either the character bar or the number keypad Character entry Y page 281 Other functions in the favorites menu Opening current favorites X Call up the Favorites menu...

Страница 412: ...the following settings RDownload Images Automatically It may take some time to download the contents of websites that contain a large amount of images Therefore it may be useful to deactivate this opt...

Страница 413: ...created by websites which you have called up Option Function URL History Deletes all websites visited path ODelete All Data On Exit If this function is activated O all private data is deleted when yo...

Страница 414: ...io and number of subprogram Frequency of the selected station A Sound settings B FM radio AM radio or WB radio C Program information D Preset functions E Radio functions X Select FM AM Radio by turnin...

Страница 415: ...e dot shows the currently selected waveband Selecting a station Selecting stations via the station search function X Press the E or F button or X Turn cVd or slide XVY the COMAND controller while the...

Страница 416: ...ons automatically This function automatically stores stations with adequate reception under the presets The search starts at the lowest frequency COMAND stores any stations found beginning with preset...

Страница 417: ...COMAND controller and press W to confirm or X Press a number key on the control panel e g 4 at any time Displaying station information This function is only available for analog FM programs and digita...

Страница 418: ...next to buildings Rlocations in the vicinity of other structures i SIRIUS XM Radio offers more than 130 radio stations in digital quality for example 100 commercial free music sports news and enterta...

Страница 419: ...played i Repeatedly pressing this function button switches through the wavebands in this order FM AM WB and subsequently switches on the satellite radio Pressing the button again takes you back to FM...

Страница 420: ...a category by turning cVd the COMAND controller and press W to confirm The category selected is shown in the display You hear the station last selected for this category The All Channels category is...

Страница 421: ...turning cVd the COMAND controller and press W to confirm Option 1 X Select Channel List and press W to confirm The channel list appears X Select a channel by turning cVd the COMAND controller and pres...

Страница 422: ...reset positions X To cancel storing select Cancel and press W to confirm Selecting a channel from the preset list X To call up the preset list select Presets by turning cVd the COMAND controller and p...

Страница 423: ...insert a data carrier Reject a disc There is a risk of being distracted from the road and traffic conditions if you insert or eject a disc while the vehicle is in motion Inserting ejecting CDs DVDs No...

Страница 424: ...on is available Empty magazine tray disc can be inserted X To exit the menu press the V eject load button again or press the back button or X Select Back by sliding V and turning cVd the COMAND contro...

Страница 425: ...disc by turning cVd the COMAND controller and press W to confirm or X Press a number key e g j You see the message Ejecting disc x You then see the following message X Take the disc out of the slot I...

Страница 426: ...message to this effect Ejecting an SD memory card X Press the memory card The memory card is ejected X Remove the memory card from slot Connecting a USB device The USB port is located in the stowage c...

Страница 427: ...the media list Y page 426 Example display audio CD mode CD cover if available Gracenote data is read then the elapsed track time Track number and track name if stored on the disc as CD text or if Grac...

Страница 428: ...liding V and turning cVd the COMAND controller and press W to confirm The display changes to The symbol remains highlighted X To continue playback select and press W to confirm Playback continues from...

Страница 429: ...e device position 4 Media Interface position 5 Bluetooth audio position 6 i If you select a video DVD the system switches to video DVD mode Y page 453 Selecting a track using the number keypad X When...

Страница 430: ...isc audio CD DVD MP3 Rmemory card RMUSIC REGISTER RUSB storage device The Track information is complete message appears once the search is completed COMAND stores the music data in its own database Yo...

Страница 431: ...turning cVd the COMAND controller and press W to confirm A menu appears The dot indicates the current selection for the display If several entries exist for the CD of a particular artist you can sele...

Страница 432: ...ective DVD A group can contain music in different sound qualities stereo and multichannel formats for example or bonus tracks Each group can contain up to 99 tracks If an audio DVD only contains one a...

Страница 433: ...ssible file systems RISO 9660 Joliet standard for CDs RUDF for audio and video DVDs RFAT16 or FAT32 for SD memory cards and USB storage media Multisession CDs For multisession CDs the content of the f...

Страница 434: ...te or play back are generally subject to copyright protection in accordance with the applicable international and national regulations In many countries reproductions even for private use are not perm...

Страница 435: ...he music search function If you select a category COMAND starts a music search under the following conditions Rthe data carriers are inserted or connected Rthe music tracks on these data carriers are...

Страница 436: ...entry and press W to confirm The genre list is displayed X Select a genre e g pop and press W to confirm The track list is displayed X Select a track and press W to confirm Playback starts Selecting...

Страница 437: ...liding V and turning cVd the COMAND controller and press W to confirm A list of available character sets is shown X Select the desired character set and press W to confirm X Enter characters and confi...

Страница 438: ...n 1 X Press the h function button repeatedly until the MUSIC REGISTER is switched on By pressing the function button repeatedly you can change the operating mode in the following order Raudio CD DVD M...

Страница 439: ...tracks to import X Select Track s by turning cVd the COMAND controller and press W to confirm To record all music files standard To copy single tracks O To confirm your selection If you do not select...

Страница 440: ...er and press W to confirm X Select Memory Info and press W to confirm The following is displayed Rstorage capacity Ravailable memory Roccupied memory Rcontent folders tracks Music search Introduction...

Страница 441: ...ollowing options are available RNormal Track Sequence The tracks are played in the normal order e g track 1 2 3 etc RRandom Medium All the tracks on the medium are played in random order RRandom Track...

Страница 442: ...2 USA or Customer Relations at 1 800 387 0100 Canada X Activate Bluetooth and Bluetooth visibility on the Bluetooth audio device Preconditions in COMAND X Activate the Bluetooth function in COMAND Y p...

Страница 443: ...ler X Select the symbol to the right of the Bluetooth audio device by sliding VY the COMAND controller and press W to confirm X Select Authorize and press W to confirm Depending on the Bluetooth audio...

Страница 444: ...ected If the No Bluetooth Audio Device Connected message appears you have two options to connect a Bluetooth audio device Connecting last device X Confirm Connect Last Device in the basic display by p...

Страница 445: ...rizing the Bluetooth audio device you should also delete the device name MB Bluetooth from your Bluetooth audio device s Bluetooth list See the Bluetooth audio device s operating instructions Switchin...

Страница 446: ...cVd the COMAND controller and press W to confirm A message appears is selected X To continue playback select by turning cVd the COMAND controller and press W to confirm A message appears is selected R...

Страница 447: ...etc X Select BT Audio by sliding V and turning cVd the COMAND controller and press W to confirm The dot indicates the option selected X Select the option by turning cVd the COMAND controller and press...

Страница 448: ...Benz USA LLC accepts no liability for damage to external devices i Never connect more than one device at a time You will otherwise not be able to play back from the external device USB hubs devices w...

Страница 449: ...lay B Track position in playlist C Album name if available D Artist if available E Music search F Position in the media list G Type of data medium H Playback options The type of device connected is in...

Страница 450: ...han eight seconds If the track has been playing for less than eight seconds it skips to the start of the previous track If you have selected a playback option other than Normal Track Sequence the trac...

Страница 451: ...se functions are available much more quickly However if you change the media content it has to be read and analyzed again Calling up a category list Example category list X Select Search in the basic...

Страница 452: ...layed X Press the corresponding number key once or repeatedly to select the initial letter of the desired artist For example to select an artist whose name begins with C press the l number key three t...

Страница 453: ...n impair functionality i DRM Digital Rights Management protected files are not supported by the Media Interface Audio AUX mode Notes on audio AUX mode You can connect an external audio source AUX to C...

Страница 454: ...rnal audio source is adjusted to a standard value Boost the volume of the external audio source is raised by approximately 10 dB A device which is connected as an external audio source may seem quiete...

Страница 455: ...must be carried out by qualified aftersales technicians G WARNING Only when the vehicle is stationary should you Rload a disc Reject a disc There is a risk of being distracted from the road and traffi...

Страница 456: ...Option 1 X Single DVD drive insert a video DVD COMAND loads the medium inserted and starts to play it X DVD changer insert a video DVD X Press h or X Press the back button COMAND loads the medium inse...

Страница 457: ...lide ZV the COMAND controller and confirm Full Screen by pressing W Menu shown Video DVD options Pause function Stop function Media selection A sound settings Fast forwarding rewinding X In full scree...

Страница 458: ...Slide XVY the COMAND controller or X Press the E or F button on the control panel The navigation menu Y page 454 appears for approximately eight seconds Selecting a film title DVD function menu This...

Страница 459: ...u X Show the DVD menu Y page 457 X Select a menu item by sliding ZV the COMAND controller and press W to confirm or X Select a menu item by sliding XVY the COMAND controller and press W to confirm The...

Страница 460: ...ect DVD Video in the menu by turning cVd the COMAND controller and press W to confirm X Select DVD Functions and press W to confirm X Select Subtitles or Camera Angle and press W to confirm In both ca...

Страница 461: ...m messages such as traffic announcements and navigation system announcements are much louder If necessary please deactivate the system messages or adjust their volume manually i A device which is conn...

Страница 462: ...appears X Select a folder with photos and press W to confirm The folder displays the existing picture files example X Select a photo and press W to confirm The photo is displayed and the music is stop...

Страница 463: ...COMAND can receive weather forecasts via satellite radio for the entire USA including Alaska and Hawaii The received weather data can be displayed as an information chart daily forecast five day forec...

Страница 464: ...for the next 3 6 12 hours Rthe current highest temperature and forecasts Rthe current lowest temperature and forecasts Rthe probability of rain Example five day forecast as an information chart X To s...

Страница 465: ...tation at the selected location Option 1 selecting the location in the information chart Selecting the location for the weather forecast menu X Select Position in the information chart by turning cVd...

Страница 466: ...cting the location in the weather map X Call up the weather map Y page 465 X Move the weather map so that the crosshair is over the desired area Y page 465 X Press W the COMAND controller The informat...

Страница 467: ...available in the weather memory e g when the daily forecast is shown briefly press a number key such as l The weather data for the selected location is displayed Weather map Calling up the weather map...

Страница 468: ...sition from the nearest weather station and displays it automatically as a daily forecast Switching layers on the map on off You can switch on different layers for example to display the rain radar we...

Страница 469: ...orm can develop Rhailstorm Rthe likelihood of a hailstorm All Atmospheric Pressure Shows the position of high and low pressure areas H L weather fronts and isobars 200 mi 200 km 500 mi 500 km Tropical...

Страница 470: ...s Example weather map showing weather fronts Conditions the Atmospheric Pressure layer is switched on Y page 466 and weather data is available The example shows the position of high and low pressure a...

Страница 471: ...e Information on a cyclone You can select individual points and on the path and display further information on them X In the map slide XVY ZV or aVb the COMAND controller and slide the crosshair to or...

Страница 472: ...nd smaller The weather map shows wind directions and wind speeds Legend precipitation radar and storms X Display the menu on the weather map Y page 465 X Select Map Options by turning cVd the COMAND c...

Страница 473: ...to standard time is performed automatically X Display the menu on the weather map Y page 465 X Select Map Options by turning cVd the COMAND controller and pressing W to confirm X Select Time stamp an...

Страница 474: ...472...

Страница 475: ...Useful information 474 Stowage areas 474 Features 478 473 Stowage and features...

Страница 476: ...jects in the vehicle Put luggage or cargo in the trunk if possible Do not pile luggage or cargo higher than the seat backrests Keep compartment lids closed This will help to prevent stored objects fro...

Страница 477: ...t in the center console X To open press the trim element on cover X To remove the rubber mat grasp the tabs on the rubber mat and pull up to remove X To insert the rubber mat press the rubber mat into...

Страница 478: ...the seat belt Y page 99 X Move the left hand front seat forwards Y page 99 and fold the backrest forwards X To open press release button Cover folds upwards X To close fold down cover and let it engag...

Страница 479: ...oading aid switch lights up and a warning tone sounds To make it easier to load your luggage you can raise the stowed roof after you have opened the trunk lid You can only raise roof if trunk partitio...

Страница 480: ...ntainers and do not fill containers to a height where the contents especially hot liquids could spill during braking vehicle maneuvers or in an accident Liquids spilled on vehicle occupants may cause...

Страница 481: ...direction of the arrow X Lift bottle holder insert up and remove X To re install the insert place insert in the stowage compartment X Slide catches outwards in the direction of the arrow until they e...

Страница 482: ...you do not injure themselves or start a fire with the hot cigarette lighter X Turn the SmartKey to position 2 in the ignition lock X To open open stowage compartment under the armrest Y page 475 X Pr...

Страница 483: ...ld always be securely fastened using the fastening equipment Before driving off check that the floormat is securely in place and adjust it if necessary A loose floormat could slip and hinder proper fu...

Страница 484: ...garage door opener If you experience difficulties programming the integrated garage door opener contact an authorized Mercedes Benz Center Alternatively you can call the following telephone assistance...

Страница 485: ...old button B on remote control A until indicator lamp lights up green If indicator lamp lights up green or flashes then programming has been successful X Release button or on the integrated garage doo...

Страница 486: ...above Problems when programming If you are experiencing problems programming the integrated garage door opener on the rear view mirror take note of the following instructions RCheck the transmitter fr...

Страница 487: ...or again if necessary Clearing the memory Integrated garage door opener on the rear view mirror X Turn the SmartKey to position 2 in the ignition lock X Press buttons and The indicator lamp lights up...

Страница 488: ...Online at http www mbusa com System self test G WARNING A malfunction in the system has been detected if one of the following conditions occurs Rthe indicator lamp in the SOS button does not light up...

Страница 489: ...icle identification number Rinformation on serious accidents Shortly after the emergency call has been initiated a voice connection is automatically established between the Mercedes Benz Customer Assi...

Страница 490: ...istance center can ascertain the nature of the problem Y page 492 The Mercedes Benz Customer Assistance Center either sends a qualified Mercedes Benz technician or organizes for your vehicle to be tra...

Страница 491: ...tton for ending a phone call on COMAND Call priority When service calls are active e g Roadside Assistance or MB Info calls an emergency call can still be initiated In this case an emergency call will...

Страница 492: ...our mbrace account click on the corresponding button i Example If you select Send to vehicle and then Mercedes Benz the destination address will be sent to your vehicle X When the Send dialog window a...

Страница 493: ...by 15 to 60 minutes After 30 days the vehicle can no longer be closed remotely X Contact the following service hotlines RUSA Mercedes Benz Customer Assistance center at 1 800 FOR MERCedes 1 800 367 6...

Страница 494: ...ng vehicle diagnosis data Voice connection may be interrupted during data transfer message appears The vehicle data can now be sent to the Customer Assistance center X Press OK to confirm the message...

Страница 495: ...e Customer Assistance center contains the following information Rthe location where the speed limit was exceeded Rthe time at which the speed limit was exceeded Rthe selected speed limit which was exc...

Страница 496: ...494...

Страница 497: ...Useful information 496 Engine compartment 496 ASSYST PLUS 500 Care 500 495 Maintenance and care...

Страница 498: ...components can become very hot To avoid the risk of burns only touch those components described in the Operator s Manual and observe the relevant safety notes G WARNING To avoid injury stay clear of m...

Страница 499: ...inches 20cm X Check that the hood has engaged properly If the hood can be raised slightly it is not properly engaged Open it again and close it with a little more force Engine oil Notes on the oil le...

Страница 500: ...g engine oil additives Do not add too much oil If the oil level is above the max mark on the dipstick too much oil has been added This can lead to damage to the engine or the catalytic converter Have...

Страница 501: ...is at the level of marker bar in the filler neck when cold there is enough coolant in coolant expansion tank If the coolant level is approximately 0 6 in 1 5 cm above marker bar in the filler neck whe...

Страница 502: ...ge the surfaces and protective film Do not park the vehicle for an extended period straight after cleaning it particularly after having cleaned the wheels with wheel cleaner Wheel cleaners could cause...

Страница 503: ...ampoo approved by Mercedes Benz X Thoroughly hose down the vehicle with a gentle jet of water X Do not point the water jet directly towards the air inlets X Use plenty of water and rinse out the spong...

Страница 504: ...els Polishing causes the finish to shine The following may cause the paint to become shiny and thus reduce the matte effect RVigorous rubbing with unsuitable materials RFrequent use of car washes RWas...

Страница 505: ...lectronic components X Clean the inside and outside of the windows with a damp cloth and a cleaning agent that is recommended and approved by Mercedes Benz Cleaning the wiper blades G WARNING Before c...

Страница 506: ...th a power washer X Use clear water and a soft cloth to clean camera lens Cleaning the exhaust pipe Do not clean the exhaust pipe with alkaline based cleaning agents such as wheel cleaner X Clean the...

Страница 507: ...genuine wood and trim elements Do not use solvent based cleaning agents such as tar remover wheel cleaners polishes or waxes There is otherwise a risk of damaging the surface Do not use chrome polish...

Страница 508: ...and comfort of the covers is retained over time Cleaning the seat belts G WARNING Do not bleach or dye seat belts as this may severely weaken them In a crash they may not be able to provide adequate...

Страница 509: ...Useful information 508 Where will I find 508 Flat tire 509 Battery 513 Jump starting 516 Towing and tow starting 518 Fuses 521 507 Roadside Assistance...

Страница 510: ...move first aid kit i Check the expiration date on the first aid kit at least once a year Replace the contents if necessary and replace missing items Vehicle tool kit General notes The vehicle tool kit...

Страница 511: ...If possible bring the front wheels into the straight ahead position X Switch off the engine X Vehicles without KEYLESS GO remove the SmartKey from the ignition lock X Vehicles with KEYLESS GO open th...

Страница 512: ...ndition Routside temperature The driving distance possible in run flat mode may be reduced by extreme driving conditions maneuvers or it can be increased through a moderate style of driving The maximu...

Страница 513: ...he tire inflation compressor for longer than eight minutes at a time without a break It may otherwise overheat The tire inflation compressor can be operated again once it has cooled down X Do not remo...

Страница 514: ...X Pump up the tire again After a maximum of five minutes the tire pressure must be at least180 kPa 1 8 bar 26 psi G WARNING If the required tire pressure is not reached after the specified time the ti...

Страница 515: ...there X Have the tire sealant bottle replaced as soon as possible at a qualified specialist workshop X Have the tire sealant bottle replaced every four years at a qualified specialist workshop Batter...

Страница 516: ...synthetic materials Never touch the battery first First touch the outside body of the vehicle in order to release any possible electrostatic charges Do not rub the battery with rags or cloths The batt...

Страница 517: ...power i After an interruption to the power supply e g due to a discharged battery you must reset the clock Y page 289 Charging the battery G WARNING Never charge a battery still installed in the vehic...

Страница 518: ...ng points RThe battery is not accessible in all vehicles If the other vehicle s battery is not accessible jump start the vehicle using a second battery or a jump starting device RYou may only jump sta...

Страница 519: ...f your vehicle using the jumper cable connecting the jumper cable to donor battery B first X Start the engine X Before disconnecting the jumper cables let the engine run for several minutes X First re...

Страница 520: ...vehicle When towing vehicles with KEYLESS GO use the key instead of the Start Stop button Otherwise the automatic transmission may shift to position P when the driver s or front passenger door are op...

Страница 521: ...g eye in clockwise to the stop and tighten it Removing the towing eye Example towing eye mounting covers Front cover Back cover X Loosen the towing eye and unscrew it X Front bumper place cover on the...

Страница 522: ...zard warning lamps start flashing again X Make sure that the vehicle is stationary and the SmartKey in the ignition lock is in position 0 X Turn the SmartKey to position 2 in the ignition lock On vehi...

Страница 523: ...use traced and rectified at a qualified specialist workshop e g an authorized Mercedes Benz Center Before changing a fuse X Secure the vehicle against rolling away Y page 154 X Switch off all electric...

Страница 524: ...and remove it X To close clip in cover at the front of the dashboard X Fold cover inwards until it engages Fuse box in the rear Make sure that no moisture can enter the fuse box when the cover is open...

Страница 525: ...t engages audibly X Insert the securing tags underneath top cover in the recesses at the front of the fuse box X Push front cover towards the rear until it engages audibly X Move the right hand seat b...

Страница 526: ...524...

Страница 527: ...on 526 Important safety notes 526 Operation 526 Winter operation 528 Tire pressure 529 Loading the vehicle 537 All about wheels and tires 540 Changing a wheel 547 Wheel and tire combinations 552 525 W...

Страница 528: ...are not being used correctly can impair the operating safety Before purchasing and using non approved accessories visit a qualified specialist workshop and inquire about Rsuitability Rlegal stipulati...

Страница 529: ...ng systems Regularly check the pressure of all the tires particularly prior to long trips Adjust the tire pressure as necessary Y page 529 The service life of tires depends on the following factors am...

Страница 530: ...cialist workshop Winter operation General notes Have your vehicle winterproofed at a qualified specialist workshop at the onset of winter Observe the notes in the Changing a wheel section Y page 547 D...

Страница 531: ...n you come to a road that is not snow covered RLocal regulations may restrict the use of snow chains Observe the relevant regulations when mounting snow chains RDo not exceed the maximum permissible s...

Страница 532: ...ard contains the recommended tire pressures for cold tires The recommended tire pressures are valid for the maximum permissible load and up to the maximum permissible vehicle speed Tire pressure table...

Страница 533: ...accident Only screw the standard valve cap or other valve caps approved by Mercedes Benz for your vehicle onto the tire valve Use a suitable pressure gauge to check the tire pressure The outer appear...

Страница 534: ...is a risk of an accident Avoid tire pressures that are too high in all the tires including the spare wheel Overinflated tires may Rincrease the braking distance Rhave an adverse effect on handling ch...

Страница 535: ...pressure on several tires at the same time cannot be detected by the tire pressure loss warning system The tire pressure monitor is not able to warn you of a sudden loss of pressure e g if the tire is...

Страница 536: ...sure telltale when one or more of your tires are significantly underinflated Accordingly when the low tire pressure telltale illuminates you should stop and check your tires as soon as possible and in...

Страница 537: ...the tire pressure monitor is malfunctioning Rif the warning lamp is lit continuously the tire pressure on one or more tires is significantly too low The tire pressure monitor is not malfunctioning RU...

Страница 538: ...A warning tone also sounds and the tire pressure warning lamp lights up in the instrument cluster Each tire that is affected by a significant loss of pressure is highlighted in the pressure display X...

Страница 539: ...o brake failure There is a risk of accident Observe the load rating of the tires The load rating must be at least half of the GAWR of your vehicle Never overload the tires by exceeding the maximum loa...

Страница 540: ...details shown The number of seats in your vehicle can be found on the Tire and Loading Information placard Determining the correct load limit Step by step instructions The following steps have been de...

Страница 541: ...Example 1 Example 2 Permissible load maximum gross vehicle weight rating from the Tire and Loading Information placard minus the gross weight of all occupants 1500 lbs 680 kg 175 lbs 80 kg 1325 lbs 60...

Страница 542: ...d one half times as well on the government course as a tire graded 100 The relative performance of tires depends upon the actual conditions of their use however and may depart significantly from the n...

Страница 543: ...a level of performance which all passenger car tires must meet under the Federal Motor Vehicle Safety Standard No 109 Grades B and A represent higher levels of performance on the laboratory test wheel...

Страница 544: ...he tire height Tire code tire code specifies the tire type R represents radial tires D represents diagonal tires B represents diagonal radial tires Optionally tires with a maximum speed of over 149 mp...

Страница 545: ...for all tires with maximum speeds of over 186 mph 300 km h must include ZR and the service specification must be given in parentheses Example 275 40 ZR 18 99 Y The speed rating Y indicates that the m...

Страница 546: ...ge that depends on the maximum load that the tire can carry at a certain pressure i Tire data is vehicle specific and may deviate from the data in the example Maximum load rating Maximum load rating i...

Страница 547: ...of layers in sidewall and under tire tread i Tire data is vehicle specific and may deviate from the data in the example Definition of terms for tires and loading Tire ply composition and material use...

Страница 548: ...including all accessories occupants fuel luggage and the drawbar noseweight if applicable The gross vehicle weight rating is specified on the vehicle identification plate on the B pillar on the driver...

Страница 549: ...entification Number This is a unique identifier which can be used by a tire manufacturer to identify tires for example for a product recall and thus identify the purchasers The TIN is made up of the m...

Страница 550: ...n of rotation Tires with a specified direction of rotation have additional benefits e g if there is a risk of hydroplaning You will only gain these benefits if the correct direction of rotation is mai...

Страница 551: ...e vehicle G WARNING If you do not position the jack correctly at the appropriate jacking point of the vehicle the jack could tip over with the vehicle raised There is a risk of injury Only position th...

Страница 552: ...Rnever place your hands and feet under the raised vehicle Rnever lie under the raised vehicle Rnever start the engine when the vehicle is raised Rnever open or close a door or the trunk lid when the...

Страница 553: ...X Unscrew the uppermost wheel bolt completely X Screw alignment bolt into the thread instead of the wheel bolt X Unscrew the remaining wheel bolts fully X Remove the wheel Mounting a new wheel G WARNI...

Страница 554: ...ightened to the specified tightening torque There is a risk of accident Have the tightening torque immediately checked at a qualified specialist workshop after a wheel is changed X Turn the crank of t...

Страница 555: ...inside of the fuel filler flap Observe the notes on recommended tire pressures under various operating conditions Y page 529 Check tire pressures regularly and only when the tires are cold Comply with...

Страница 556: ...FA 255 35 R19 96 Y XL RA 285 30 R19 98 Y XL3 FA 8 5 J x 19 H2 Wheel offset 1 40 in 35 5 mm RA 9 5 J x 19 H2 Wheel offset 1 87 in 47 5 mm FA 255 35 R19 96 Y XL MOExtended RA 285 30 R19 98 Y XL MOExtend...

Страница 557: ...J x 19 H2 Wheel offset 1 40 in 35 5 mm RA 9 5 J x 19 H2 Wheel offset 1 89 in 48 mm AMG vehicles Summer tires R19 R20 Tires Alloy wheels FA 255 35 ZR19 96 Y XL RA 285 30 ZR19 98 Y XL3 FA 9 0 J x 19 H2...

Страница 558: ...19 Tires Alloy wheels FA 255 35 R19 96 V XL M Si RA 285 30 R19 98 V XL M Si FA 9 0 J x 19 H2 Wheel offset 1 06 in 27 mm RA 10 0 J x 19 H2 Wheel offset 1 89 in 48 mm 556 Wheel and tire combinations Whe...

Страница 559: ...nformation 558 Information regarding technical data 558 Genuine Mercedes Benz parts 558 Warranty 558 Identification plates 559 Service products and filling capaci ties 560 Vehicle data 565 557 Technic...

Страница 560: ...of the same quality as new parts They are covered by the same Limited Warranty entitlements as new parts Air bags and Emergency Tensioning Devices as well as control units and sensors for these restr...

Страница 561: ...If you lose the Service and Warranty Information booklet contact an authorized Mercedes Benz Center to arrange a replacement The new Service and Warranty Information booklet will be mailed to you Iden...

Страница 562: ...or clothing If a service fluid is swallowed contact a physician immediately H Environmental note Dispose of service products in an environmentally responsible manner Service products include the foll...

Страница 563: ...the engine only premium grade unleaded gasoline may be used If there is no premium grade unleaded gasoline available and regular unleaded gasoline must be used please observe the following precaution...

Страница 564: ...this case Mercedes Benz recommends additives approved for use in Mercedes Benz vehicles see http bevo mercedes benz com For a list of approved products consult an authorized Mercedes Benz Center Comp...

Страница 565: ...low temperature characteristics of engine oils can deteriorate significantly e g as a result of aging soot and fuel deposits It is therefore strongly recommended that you carry out regular oil changes...

Страница 566: ...m against freezing down to approximately 35 37 Rnot exceed 55 antifreeze protection down to 49 45 Otherwise heat will not be dissipated as effectively If the vehicle has lost coolant add equal amounts...

Страница 567: ...the outside temperature X Down to 14 10 mix 1 part MB WinterFit with 2 parts water X Down to 4 20 mix 1 part MB WinterFit with 1 part water X Down to 20 2 29 mix 2 parts MB WinterFit with 1 part wate...

Страница 568: ...Wheelbase 101 8 in 2585 mm Turning radius 36 2 ft 11 04 m Maximum trunk load 220 lb 100 kg SL 63 AMG and SL 65 AMG Vehicle length 182 9 in 4646 mm Vehicle length when opening closing the roof 190 8 i...

Страница 569: ...567...

Страница 570: ...568...

Страница 571: ...nd about Daimler AG can be found on the following websites http www mbusa com USA only http www mercedes benz ca Canada only Editorial office Not to be reprinted translated or otherwise reproduced in...

Страница 572: ...Order no 6515 3114 13 Part no 231 584 17 81 Edition Edition A 2013 2315841781 2315841781...

Отзывы: