background image

1

3

2 4 5 6

7 8

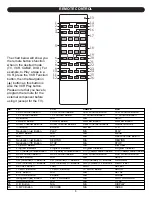
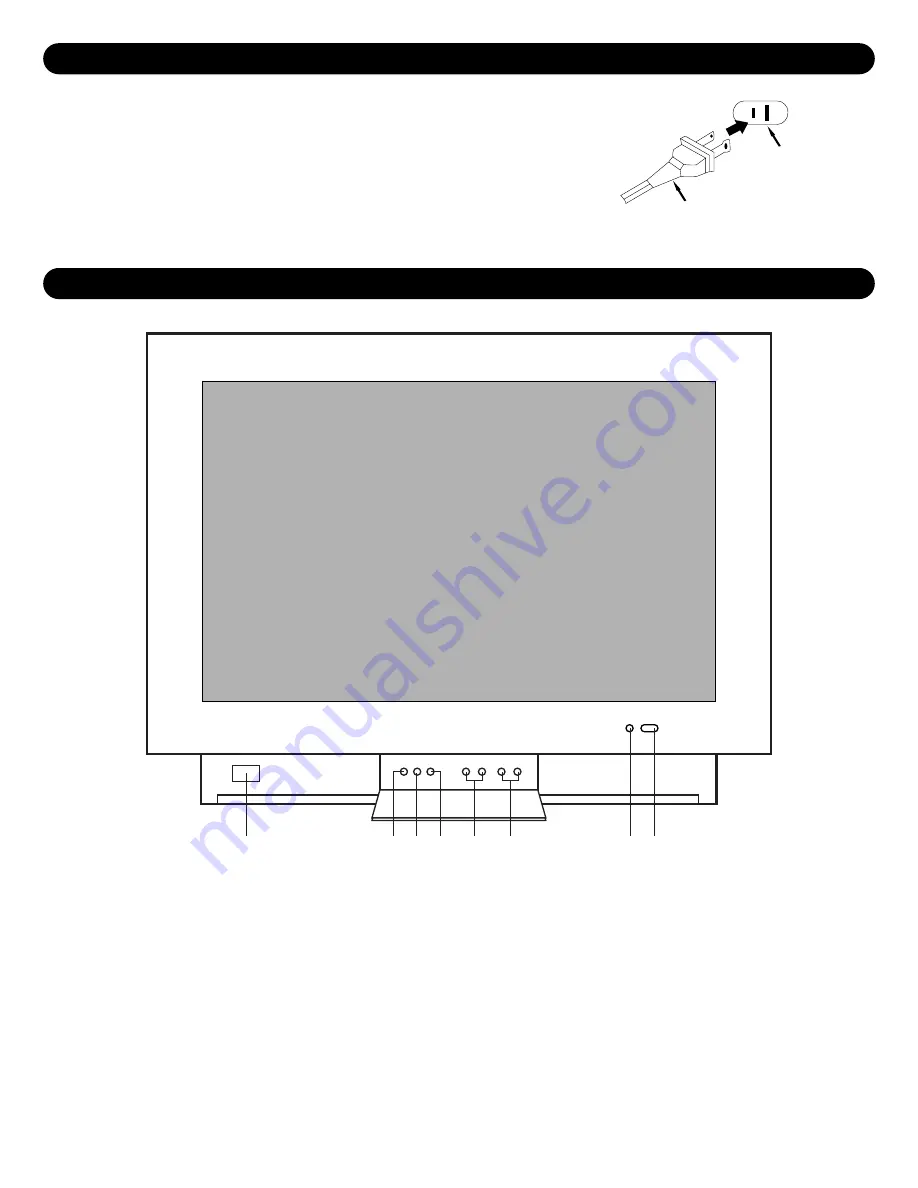
1.

POWER Button - 

Press to turn the TV on; the Power indicator will light red. Press again to turn the TV off;

the Power indicator will go off.

2.

MENU Button - 

Press to access the On-Screen menu.

3.

TV/CATV Button –

Press to switch between the TV and the CATV (Cable TV) mode.

4.

TV/AV Button –

Press to switch between the TV and the video inputs.

5.  VOLUME Up/Down Buttons

- Press to raise or lower the volume.

6.

CHANNEL Up/Down Buttons

- Press to select a channel.

7.

Power/Timer Indicator

- Lights red when the TV is on. Lights orange when the TV is on and the On Timer

option is on. Lights green when the TV is off, and the On Timer is on.

8.

REMOTE SENSOR

4

LOCATION OF CONTROLS

POWER SOURCE

FRONT

Insert the AC plug (with the 2 blades) into a conveniently located AC outlet having
120V, 60 Hz.

NOTE:

The AC plug supplied with the unit is polarized to help minimize the possibility

of electric shock. If the AC plug does not 

fi

t into a nonpolarized AC outlet, do not 

fi

le

or cut the wide blade. It is the user’s responsibility to have an electrician replace the
obsolete outlet.

AC Plug

AC Outlet

Содержание MT2245

Страница 1: ...UE FLAT STEREO COLOR TV MODEL MT2245 BEFORE OPERATING THIS PRODUCT PLEASE READ THESE INSTRUCTIONS COMPLETELY OPERATING INSTRUCTIONS IMPORTANT CHANNELS MUST BE SET INTO MEMORY BEFORE USING THE CHANNEL BUTTONS ...

Страница 2: ...ection 17 Setting the Language 18 Clock Setting 19 Setting the TV CATV Button 20 Setting Channels into Memory 20 Adding and Deleting Channels 21 Tuning Menu 22 TV Operation 23 Mute 24 Sleep 24 Recall 24 Channel Review C R 24 AV 24 Closed Captions 25 On Screen Control Adjustments Picture 26 On Screen Control Adjustments Sound 27 Setting Parental Control 28 Parental Control Set up 28 MPAA Rating Set...

Страница 3: ...uld never be placed near or over a radiator or heat source This product should not be placed in a built in installation such as a bookcase or rack unless proper ventilation is provided or the manufacturer s instructions have been adhered to 10 POWER SOURCES This product should be operated only from the type of power source indicated on the marking label If you are not sure of the type of power sup...

Страница 4: ...those that have the same characteristics as the original part Unauthorized substitutions may result in fire electric shock or other hazards 20 SAFETY CHECK Upon completion of any service or repairs to this product ask the service technician to perform safety checks to determine that the product is in proper operating condition 21 WALL OR CEILING MOUNTING The product should be mounted to a wall or ...

Страница 5: ...to select a channel 7 Power Timer Indicator Lights red when the TV is on Lights orange when the TV is on and the On Timer option is on Lights green when the TV is off and the On Timer is on 8 REMOTE SENSOR 4 LOCATION OF CONTROLS POWER SOURCE FRONT Insert the AC plug with the 2 blades into a conveniently located AC outlet having 120V 60 Hz NOTE The AC plug supplied with the unit is polarized to hel...

Страница 6: ...IN Jacks Audio and Video signal cables from an external source can be connected here AV button must be set to VIDEO1 16 AV2 AUDIO VIDEO IN Jacks Audio and Video signal cables from an external source can be connected here AV button must be set to VIDEO2 17 AV2 DVD Cr Cb Y IN Jacks Cr Cb Y signal cables from an external source can be connected here AV button must be set to VIDEO2 REAR PANEL SIDE 9 C...

Страница 7: ...Cable Function Button CTV Cable Function Button CTV Cable Function Button 15 DVD Function Button DVD Function Button DVD Function Button DVD Function Button 16 SLEEP Button N A N A SKIP 17 CH Channel Buttons CH Channel Buttons CH Channel Buttons UP DOWN 18 VOL Volume Buttons VOL Volume Buttons VOL Volume Buttons RIGHT LEFT 19 RECALL Button LAST LAST SELECT 20 TV MUTE Button TV MUTE Button TV MUTE ...

Страница 8: ...y from possible battery leakage 5 Do not try to recharge batteries not intended to be recharged they can overheat and rupture Follow battery manufacturer s directions FAQs Why is the remote control not working properly The remote control is not aimed at the sensor The remote control is too far away from the remote sensor There is too much light in the room There is an obstacle in the path of the b...

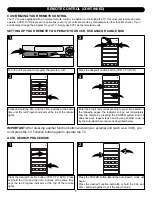
Страница 9: ...ator at the top of the remote lights 3 Enter the 4 digit code corresponding to your set as listed on the following pages the indicator will go out immediately Test the remote by pressing the POWER button and if it does not work repeat steps 3 and 4 using another code or try the Auto Search procedure as described below 4 Press the desired Function button VCR CTV DVD Press and hold the CH and the VO...

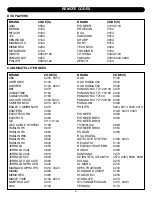
Страница 10: ...0653 HAMLIN H8 0643 HAMLIN H9 0633 JERROLD 0253 JERROLD 400L 0623 JERROLD 450L 0613 JERROLD 550 0603 JERROLD OSD CATV 0593 JERROLD SPRUCER 0433 MAGNAVOX PHILIPS 0413 0423 MAMM 0293 MEMOREX 0383 MOVIE TIME 0143 0203 NORTHCOAST 0013 NSC 0143 BRAND CODE S OAK 0103 OAK SIGMA 450 0543 OAK SIGMA 550 0533 PANASONIC TZ 120 130 0473 PANASONIC TZ 170 180 0443 PANASONIC TZ140 0463 PANASONIC TZ 150 160 0453 P...

Страница 11: ...2 0842 0852 0912 0922 CURTIS MATHIS 0662 0822 0932 CYBERNEX 0922 DAEWOO 0802 0812 0982 DBX 0202 DYNATECH 0472 0992 ELECTROHOME 0912 ELECTROPHONIC 0912 EMEREX 0792 EMERSON 0072 0122 0132 0142 0152 0162 0172 0182 0192 0212 0702 0712 0722 0732 0742 0882 0752 0762 0772 0782 BRAND CODE S 0872 0892 0912 0912 0952 0992 FINLUX 0002 0992 FISHER 0682 0692 0642 0902 FUJI 0672 0932 FUNAI 0992 GURRARD 0992 GE ...

Страница 12: ...0392 0482 0592 0602 0662 0822 0942 REALISTIC 0402 0472 0612 0682 0842 0902 0912 0922 0932 0992 RICOH 0352 0382 SAISHO 0212 0582 0722 0732 0742 0772 BRAND CODE S SALORA 0612 0762 SAMSUNG 0212 0312 0922 0962 SANKY 0472 0512 SANSUI 0292 0542 0832 SANYO 0242 0612 0842 0902 0922 SBR 0002 0282 SCHNEIDER 0652 SCOTT 0342 0712 0762 0872 0882 0892 SEARS 0302 0592 0602 0612 0682 0692 0842 0902 0912 0932 SHAR...

Страница 13: ...lite box usually 3 or 4 and use the converter descrambler or satellite box to select channels INCOMING 75 OHM CATV CABLE SPLITTER A B SWITCH 75 OHM CABLE CONVERTER DESCRAMBLER CONVERTER DESCRAMBLER OR SATELLITE BOX 75 OHM CABLE TO TV VCR INCOMING 75 OHM CATV CABLE FOR SUBSCRIBERS TO UNSCRAMBLED BASIC CABLE TV SERVICE WITH SCRAMBLED PREMIUM CHANNELS If you subscribe to a satellite service or a cabl...

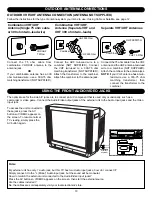
Страница 14: ...F 300 Ohm Combiner Connect the 75 ohm cable from combination VHF UHF antenna to the antenna jack OR If your combination antenna has a 300 ohm twin lead wire use a 300 75 ohm matching transformer NOT SUPPLIED The optimal use for the side A V jacks are to connect an A V component that is used only occasionally such as a camcorder or video game Connect the Audio Video output jacks of the external uni...

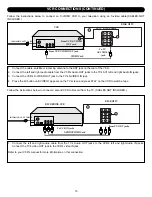
Страница 15: ...VCR s Audio OUT jacks to the TV s AV1 or AV2 left and right Audio IN jacks Connect the VCR s video OUT jack to the TV s video IN jack 3 Press the AV button until VIDEO1 or VIDEO2 appears on the TV screen and press PLAY on the VCR to watch a tape REAR OF TV VCR AUDIO VIDEO Cord To TV IN jacks From VCR OUT jacks INCOMING CATV CABLE Follow the instructions below to connect a VCR to your television us...

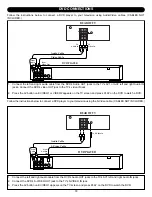
Страница 16: ...TV screen and press PLAY on the VCR to watch a tape REAR OF TV VCR VIDEO Cord To TV AV1 VIDEO jack To TV S VIDEOjack From VCR S VIDEO OUT jack From VCR VIDEO OUT jack INCOMING CATV CABLE 1 Connect the left and right audio cable from the TV s Audio OUT jacks to the VCR s left and right Audio IN jacks Connect the TV s video OUT jack to the VCR s video IN jack Refer to your VCR s manual for more info...

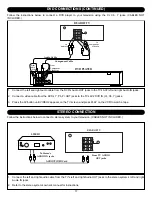
Страница 17: ... Follow the instructions below to connect a DVD player to your television using Audio Video cables CABLES NOT INCLUDED 1 Connect the left and right audio cable from the DVD s Audio OUT jacks to the TV s AV1 left and right Audio IN jacks 2 Connect the DVD s S VIDEO OUT jack to the TV s S VIDEO IN jack 3 Press the AV button until VIDEO1 appears on the TV screen and press PLAY on the DVD to watch the...

Страница 18: ...om Component Video Out From Audio Out To Audio In To Component Video In REAROFTV DVDPLAYER Follow the instructions below to connect a DVD player to your television using the Cr Cb Y jacks CABLES NOT INCLUDED 1 Connect the left and right audio cable from the TV s left and right Audio OUT jacks to the stereo system s left and right Audio IN jacks 2 Refer to the stereo system s owner s manual for ins...

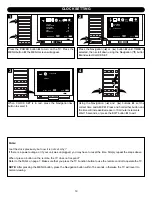
Страница 19: ...Screen display in English Spanish or French When the desired language is in red press the Navigation button to select it ENGLISH FRANCAIS ESPANOL MENU BAR QUIT MENU EXIT PICTURE SOUND TIMER CUSTOM LANGUAGE TUNING 3 Wait 15 seconds or press the EXIT button to exit 4 FAQs Will selecting a language change the audio or only the on screen menus Selecting a language will only change the on screen menus ...

Страница 20: ...ress the MENU button the MENU screen will appear 2 1 COLOR BRIGHTNESS CONTRAST SHARPNESS TINT BLUE BACK 39 72 60 62 24 OFF MENU BAR QUIT MENU EXIT PICTURE SOUND TIMER CUSTOM LANGUAGE TUNING 1 1 2 Press the Navigation or button until TIMER is selected then scroll down using the Navigation button and select CLOCK SET PICTURE SOUND TIMER CUSTOM LANGUAGE TUNING OFF TIMER ON TIMER CLOCK SET MENU BAR QU...

Страница 21: ...T MENU EXIT 2 1 1 2 When AUTO MEMORY is in red press the Navigation button to start the Auto Search The TV will automatically cycle through all the channels and store active channels into memory When completed the TV will be on the first available channel TUNING CATV 23 AUTO MEMORY STOP AUTO MEMORY 3 Press the Navigation button to stop Auto Memory while it is searching if desired 4 Simply press th...

Страница 22: ...ADD ERASE MANUAL FINE AUTO MEMORY 56 STD ERASE UP 1 MENU BAR QUIT MENU EXIT 3a When a channel is selected and ERASE appears next to the ADD ERASE option press the Navigation button to add the channel Press the EXIT button to exit the Tuning screen PICTURE SOUND TIMER CUSTOM LANGUAGE TUNING CHANNEL TV CABLE ADD ERASE MANUAL FINE AUTO MEMORY 56 STD ADD UP 1 MENU BAR QUIT MENU EXIT 4a TO ADD A CHANNE...

Страница 23: ...ntil TUNING is selected then scroll down using the Navigation button and select MANUAL or FINE PICTURE SOUND TIMER CUSTOM LANGUAGE TUNING CHANNEL TV CABLE ADD ERASE MANUAL FINE AUTO MEMORY 56 STD ERASE UP 1 MENU BAR QUIT MENU EXIT 2 1 1 2 MANUAL Press the Navigation or button while MANUAL is selected the unit will then automatically go up one channel and automatically adjust the fine tuning 3 FINE...

Страница 24: ...utton then the remaining 2 digits 1 2 1 3 4 Simply press the TV CATV button to set the TV to TV or CATV Cable TV mode To change the type of cable STD HRC IRC simply change the TV CATV option under the TUNING menu 2 Press the POWER button to turn on the TV 1 OPTIONS TV If using a VHF UHF antenna CATV If using Cable TV NOTES When TV CATV is set to TV only channels up to 69 can be selected When set t...

Страница 25: ...EEP button on the remote SLEEP OFF will appear on the screen Each additional press will decrease the Sleep time by 10 minutes from 120 minutes to 90 minutes To confirm remaining sleep time press the SLEEP button the remaining time will briefly appear on the screen To cancel the sleep time press SLEEP button repeatedly until SLEEP OFF appears on the screen 1 1 Press the AV button to cycle through t...

Страница 26: ...tions placed near the character who is speaking so the viewer can follow the dialogue Words in italics or underlined describe titles words in foreign languages or words requiring emphasis Words that are sung usually appear enclosed by musical notes For television programs broadcasting with Closed Captions look in your TV guide for the Closed Captions symbol CC 25 CLOSED CAPTIONS NOTES When selecti...

Страница 27: ...ed COLOR BRIGHTNESS CONTRAST SHARPNESS TINT BLUE BACK 39 72 70 62 24 OFF MENU BAR QUIT MENU EXIT PICTURE SOUND TIMER CUSTOM LANGUAGE TUNING 3 If the Blue Back option is set to ON when a station is selected with no broadcast signal a blue screen will appear Turn this option off if using a DVD player COLOR BRIGHTNESS CONTRAST SHARPNESS TINT BLUE BACK 39 72 70 62 24 ON MENU BAR QUIT MENU EXIT PICTURE...

Страница 28: ...E TUNING 2 1 Adjust the setting using the Navigation and buttons as desired BASS TREBLE EFFECT BALANCE 03 02 OFF CENT MENU BAR QUIT MENU EXIT PICTURE SOUND TIMER CUSTOM LANGUAGE TUNING 3 The EFFECT option will simulate a Surround Sound effect Choose between OFF MOVIE or HALL BASS TREBLE EFFECT BALANCE 03 02 HALL CENT MENU BAR QUIT MENU EXIT PICTURE SOUND TIMER CUSTOM LANGUAGE TUNING 4 Press the EX...

Страница 29: ...2 When PARENTAL CONTROL is in red press the Navigation button to select it Using the Direct Channel Selection buttons 0 9 enter the password 0000 is the preset password if you have not changed it This password can be changed to consist of different numbers i e 1467 9732 after the original password is entered ENTER SECRET CODE _ _ _ _ PARENTAL CONTROL MENU BAR QUIT MENU EXIT CUSTOM 3 1 2 1 Scroll d...

Страница 30: ...button N A G PG PG 13 R NC 17 X MPAA RATING SYSTEM MENU BAR QUIT MENU EXIT CUSTOM 3 1 Press the EXIT button to exit 5 MPAA RATING SET UP Using the Navigation or button select the desired rating then press the Navigation button See below All programs with a higher rating than the one selected will also be blocked If you do not want to block any set it to N A N A G PG PG 13 R NC 17 X MPAA RATING SYS...

Страница 31: ...Y TV Y7 TV G TV PG TV 14 TV MA CONTENT F V S L D U S TV PARENTAL GUIDELINES RATING SYSTEM MENU BAR QUIT MENU EXIT CUSTOM 3 1 Press the EXIT button to exit 5 TV RATING SET UP Using the Navigation or button select the desired rating then press the Navigation button The letters boxes next to the ratings represent the following All programs with a higher rating than the one selected will also be block...

Страница 32: ... RATING CHANGE SECRET CODE BLOCK ON PARENTAL CONTROL MENU BAR QUIT MENU EXIT CUSTOM 2 1 While CANADIAN ENGLISH RATING or CANADIAN FRENCH RATING is selected press the Navigation button E C C8 G PG 14 18 CANADIAN ENGLISH LANGUAGE RATING SYSTEM MENU BAR QUIT MENU EXIT CUSTOM 3 1 Press the EXIT button to exit 5 Using the Navigation or button select the desired rating then press the Navigation button A...

Страница 33: ...G CHANGE SECRET CODE BLOCK ON PARENTAL CONTROL MENU BAR QUIT MENU EXIT CUSTOM 2 1 While CHANGE SECRET CODE is selected press the Navigation button NEW SECRET CODE CONFIRM MPAA RATING SYSTEM MENU BAR QUIT MENU EXIT CUSTOM 3 1 Press the EXIT button to exit 5 Using the Direct Channel Selection buttons enter the new secret code and then confirm the new code again NEW SECRET CODE X X X X CONFIRM X X MP...

Страница 34: ... to set the correct AM PM Press and hold either button and the time will increase decrease in 10 minute increments TIMER PM 5 25 CHANNEL TV CATV OFF ONCE DAILY 9 TV ON TIMER AM 11 26 MENU BAR QUIT MENU EXIT 4 Press the Navigation button and then the Navigation and buttons to set the desired channel you would like the TV to turn on to Press the Navigation button and then the Navigation and buttons ...

Страница 35: ...ired time you would like the TV to turn off make sure to set the correct AM PM Press and hold either button and the time will increase decrease in 10 minute increments TIMER PM 9 30 OFF ONCE DAILY OFF TIMER AM 11 26 MENU BAR QUIT MENU EXIT 4 Press the Navigation or button to select between OFF will turn Off Timer off ONCE will set the Off Timer to turn off once or DAILY will set the Off Timer to t...

Страница 36: ...m Increase volume TV station stopped broadcasting Tune to a new channel TV shuts off Sleep Timer is set Set Sleep Timer to Off Off Timer is set Set Off Timer to Off TV signal is weak Check CATV or VHF UHF antenna connection Closed Captioning not TV station experiencing problems or Try another channel working program tuned is not closed captioned Closed Captioning not turned on Turn Closed Captioni...

Страница 37: ...pearance of small dots When the signal is extremely weak it may be necessary to install an external antenna to improve the picture RADIO FREQUENCY INTERFERENCE This interference produces moving ripples or diagonal streaks and in some cases causes loss of contrast in the picture PICTURE SIZE VARIATION A slight picture size variation is quite normal when you adjust the CONTRAST or BRIGHTNESS setting...

Страница 38: ...EAST 90 DAYS IN CASE YOU NEED TO RETURN THIS PRODUCT TO YOUR PLACE OF PURCHASE OR MEMOREX FOR PARTS AND ACCESSORIES CONTACT FOX INT L AT 1 800 321 6993 Picture Tube 24 True Flat Tuner Type Quartz PLL Frequency Synthesized Receiving Channels VHF 2 13 Receiving Channels UHF 14 69 Receiving Channels CATV 14 36 A W 37 59 AA WW 60 85 AAA ZZZ 86 94 86 94 95 99 A 5 A 1 100 125 100 125 01 5A Antenna Input...

Страница 39: ...38 Memcorp Inc Weston FL 33331 Printed in Hong Kong Visit our website at www memcorpinc com ...

Отзывы: