-8-
MT-50
Series
2-2-4
Assemble light source
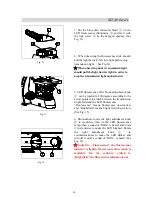
1. Align the oriented pin
①
and power pin
②
on
the light source to oriented holder
③
and power
socket
④
, and then push light source into arm
smoothly and plug it thoroughly (see Fig. 7).
★
Whenever replacing the bulb, turn off the
main power and wait until the bulb and holder
cool down.
★
LED illumination, replace whole LED light
source if LED bulb is burnt out. The
assembling for halogen bulb light source is as
same as LED light source‟s.
2-2-5
Connect the Power Cord
★
Don‟t use strong force when the power cord
is bended or twisted, otherwise it will be
damaged.
1. Make sure the power switch is at“0”(OFF)
before connecting.
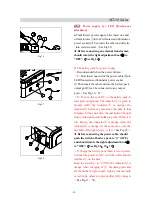
2. Insert the connector
①
of power cord into the
power socket
②
, and make sure it connects well
(see Fig. 8).
3. Insert the other connector into the socket of
power supply, and make sure it connects well.
★
Use the special wire supplied by our
company. If it‟s lost or damaged, choose one
with the same specifications.
★
Wide voltage range is supported as
100~240V.
★
Connect the power cord appropriately to
make sure the instrument is connected to
ground.
Fig. 7
Fig. 8


