background image


WARNING 

Do not install this unit in combustible enclosures. There should be a minimum clearance of 24 inches from all 
sides to combustible materials. 


Exercise caution when cleaning grill. To avoid steam burns, do not use a wet sponge or cloth to clean the grill 
while it is hot. Some cleaners produce noxious fumes or can ignite if applied to a hot surface. 
 
Never use a dented or rusty propane cylinder. 
 
Turn off all control knobs and make certain the grill is cool before using any type of aerosol cleaner on or 
around it. The chemical that produces the spraying action could, in the presence of heat, ignite or cause metal 
parts to corrode. 
 
Do not use the grill to cook excessively fatty meats or other products, which promote flare-ups.  
 
Do not operate the grill under unprotected combustible constructions. Use only in well ventilated areas. Do not 
use in buildings, garages, sheds, breezeways or other such enclosed areas.  
 
This unit is intended for outdoor use only. 
 
Keep the areas surrounding the grill free from combustible materials including, fluids, trash, and vapors such 
as gasoline or charcoal lighter fluid. Do not obstruct the flow of combustion and ventilation air. If the unit is 
stored indoors, make sure it is cool.  
 
Do not use briquettes of any kind in the grill.  
 
This liquid propane gas grill is designed for optimum performance without the use of briquettes. Do not place 
briquettes on the flame tamers as this will block the vent to the grill burners. Adding briquettes can damage 
ignition components, thus voiding the warranty.  
 
Keep the back of the cart free and clear from debris. Keep any electrical supply cord and the fuel supply hose 
away from any heated surface. 
 
Never use the grill in extremely windy conditions. If located in a consistently windy area (oceanfront, 
mountaintop, etc.), a windbreak will be required. Always adhere to the clearance specifications. 


PLACEMENT OF THE GRILL 


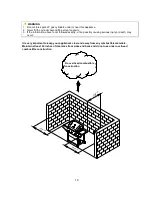
Outdoor cooking appliances should not be used under overhead combustible construction. 


When determining a suitable location take into account concerns such as exposure to wind, proximity to traffic 
paths, and keeping gas supply lines as short as possible.  
 
Place the grill in well-ventilated areas. Never place the grill in a building, garage, breezeway, shed or other 
such enclosed areas. During heavy use, the grill will produce a lot of smoke. 


Be aware that small insects, spiders, etc. can make nests in the mixing tubes and burners of the appliance 
which can cause a burn back to occur.  
 
In the event of burn back, where the flame burns back to the jet, immediately turn off the gas supply at the 
burner control valve.  
 
After ensuring that the flame is extinguished, re-light the appliance as described in below. Should the 
appliance again burn back, close the valves and examine the mixing tube or burner for any obstruction. If there 
are no obstructions and the burn back still occurs, call a technician to examine the appliance and make any 
necessary repairs.  


Do not make any unnecessary adjustments or modifications to this grill, a qualified LP gas technician should 
do any adjustments.  


Содержание Blaze-300

Страница 1: ...talled in or on recreational vehicles and or boats LPGSASA Permit Number 1185 16 RSA 08 A www megamaster co za Manufactured in China Distributed by Mega Group PO Box 15 Woodlands 0072 South Africa Tel 27 0 12 802 1515 ASSEMBLY OPERATING INSTRUCTIONS Important Read these instructions for use carefully so as to familiarize yourself with the appliance before connecting it to its gas container Keep th...

Страница 2: ... CONTENTS DANGER If you smell gas 1 Shut off gas to the appliance 2 Extinguish any open flame 3 Open lid 4 If odor continues keep away from the appliance and immediately call your gas supplier or your fire department WARNING 1 Do not store or use gasoline or other flammable liquids or vapors in the vicinity of this or any other appliance 2 An LP cylinder not connected for use shall not be stored i...

Страница 3: ...ot use the grill until all connections have been checked and do not leak Do not smoke while leak testing Never leak test with an open flame WARNING Do not install this unit into combustible enclosures There should be a minimum clearance of 60 cm from all sides to combustible materials WARNING This grill is not intended to be installed in or on recreational vehicles and or boats WARNING When lighti...

Страница 4: ...o occur behind and beneath the valve panel thereby damaging the grill and making it unsafe to operate CAUTION When using a match to light the grill make sure to use the attached lighting rod CAUTION Before cleaning make sure the gas supply and control knobs are in the OFF position and the burners have cooled CAUTION The grill head is heavy and will require two or more people to lift and position o...

Страница 5: ...table for grill use Other types of materials may shatter with sudden temperature changes Use only low or medium heat settings in accordance with the manufacturer s guidelines Do not heat unopened food containers as a build up of pressure may cause the containers to burst Use a covered hand when opening the grill lid Never lean over an open grill When lighting a burner always pay close attention to...

Страница 6: ...ent to the grill burners Adding briquettes can damage ignition components thus voiding the warranty Keep the back of the cart free and clear from debris Keep any electrical supply cord and the fuel supply hose away from any heated surface Never use the grill in extremely windy conditions If located in a consistently windy area oceanfront mountaintop etc a windbreak will be required Always adhere t...

Страница 7: ...Leg Back Left 1pc H Cart Frame 2 pcs I Cart Leg Front Right 1pc J Cart Leg Back Right 1pc K Cart Caster Insert 2 pcs L Grease Tray 1pc M Side Burner Control Knob 1pc N Cooking Grids 2pcs O Triangle Bracket Left 1pc P Triangle Bracket Right 1pc Z Flame Tamers 3pcs R Cart Beam 1pc S Front Panel 2pcs T Warming Rack 1pc U Side Tube Burner 1pc 1 0 0 2 0 0 3 0 0 4 0 0 5 0 0 6 0 0 7 0 0 8 0 0 ...

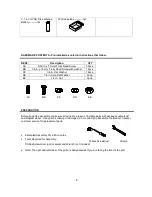
Страница 8: ...ted Assembly Time 40 minutes Tools Required for Assembly Phillips Screwdriver not included and Wrench not included Note The right and left sides of the grill are designated as if you are facing the front of the grill HARDWARE CONTENTS Pre installed as noted in instructions that follow REF Description QTY AA 5 32 in x 10 mm Truss Head Screw 32pcs BB 1 4 in x 15 mm Truss Head Screw with washer 18pcs...

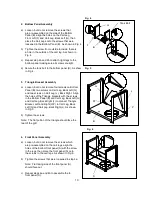
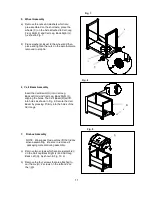
Страница 9: ...screws that were loosened above Note Make sure the flat side of Cart Frame H faces out to the left when attaching As shown in Fig 2 c Loosen but do not remove the screws that are pre assembled on the Cart Leg Front Right I and Cart Leg Back Right J Attach Cart Leg Front Right I and Cart Leg Back Right J to Cart Frame H by aligning the holes on the Cart Frame H Tighten the screws that were loosened...

Страница 10: ...rt Leg Back Left G and two screws on Cart Leg J Back Right Align the holes of the Triangle brackets with the screws in the Bottom Panel B and Cart Leg Back Left G and Cart Leg Back Right J to connect Triangle Bracket Left and Right O P to Cart Leg Back Left G and Cart Leg Back Right J As shown in Fig 5 b Tighten the screws Note The flat portion of the triangle should face the rear of the grill 4 F...

Страница 11: ...g Back Right J aligning the holes The Cart Beam R will fit into holes as shown in Fig 8 Secure the Cart Beam by pressing it firmly into the holes of the Cart Legs 7 Firebox Assembly NOTE We suggest two persons lift the firebox when assembling Be sure to remove all packaging material during assembly a Remove two screws which are pre assembled on the Cart Leg Back Right J and Cart Leg Back Left G As...

Страница 12: ...nel As shown in Fig 9 d Once the firebox is in place secure the Firebox Assembly A to Cart Leg Back Right J and Cart Leg Back Left G using the screws removed in step 8a As shown in Fig 10 A e From inside the firebox install the four screws that were removed in step 7b securing the firebox to the cart frames As shown in Fig 10 B Fig 10 A Fig 10 B ...

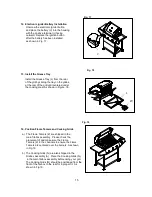
Страница 13: ... d Secure the Side Burner Shelf Control Panel D and main control panel by one screw which is pre assembled on the main control panel As shown in Fig 11 Tighten all screws e Tighten screws loosened in 8b Ensure all screws are tight 9 Left Side Shelf Assembly Repeat Step 9 to assemble Left Side Shelf E As shown in Fig 12 10 Side Burner Valve Installation a Loosen the screws which pre assemble on the...

Страница 14: ... Fig 15 Then with two screws secure the side burner from underneath to the Side Burner Shelf D As shown in Fig 15 b Then with two screws secure the side burner from underneath to the Side Burner Shelf D As shown in Fig 15 c Connect the ignition wire from Firebox Assembly A control panel to the side burner igniter pin from underneath the Side Burner Shelf Control Panel D As shown in Fig 15 Note Aft...

Страница 15: ...area As shown in Figure 18 14 Position Flame Tamers and Cooking Grids a The Flame Tamers Z are shipped in the main firebox assembly Please check the placement of and make sure the Flame Tamers Z in the channels to ensure the Flame Tamers are centered over the burners As shown in Fig 19 b The Cooking Grids N are also shipped in the Firebox Assembly A Place the Cooking Grids N in the main firebox as...

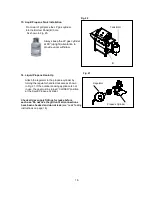
Страница 16: ...the outdoor cooking appliance is not in use the gas must be turned CLOSED position at the Liquid Propane Cylinder Check all gas supply fittings for leaks before each use Do not use the grill until all connections have been checked and do not leak see Leak Testing instructions on page 18 Fig 21 Propane Cylinder Regulator Always keep the LP gas cylinder at 90 upright orientation to provide vapor wit...

Страница 17: ...as hoses do not contact the grease pan or grill firebox when the LP gas cylinder is placed into the cart CONNECTING THE LP GAS CYLINDER To connect the LP Gas Supply Cylinder a The cylinder valve should be in the OFF position If not turn the valve clockwise until it stops b Make sure the cylinder valve has the proper type internal thread for a bullnose regulator c Make sure the burner valves are in...

Страница 18: ...e solution to the fittings For the initial leak test make sure the Liquid Propane Cylinder is full TO TEST 1 Turn the burner valves off 2 Turn the LP gas cylinder valve counterclockwise to open the valve 3 Apply the soap solution to all gas fittings Soap bubbles will appear where a leak is present 4 If a leak is present immediately turn the gas supply OFF and tighten leaky fittings 5 Turn the gas ...

Страница 19: ... use under overhead combustible construction WARNING 1 Do not store spare LP gas cylinders under or near this appliance 2 Never fill the cylinder beyond 80 percent capacity 3 If the information above is not followed exactly a fire possibly causing serious injury or death may occur No overhead combustible construction 8 0 0 7 0 0 6 0 0 5 0 0 4 0 0 3 0 0 2 0 0 1 0 0 ...

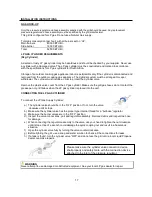
Страница 20: ...closed during the pre heat period 5 Place the food on the grill and cook to the desired degree of preparation If necessary adjust the heat setting The control knob may be positioned at any setting between HI and LO LIGHTING INSTRUCTIONS Before Lighting Inspect the gas supply hose prior to turning on the gas If there is evidence of cuts wear or abrasion it must be replaced prior to use Screw the re...

Страница 21: ...ht the main burner with the igniter allow 5 minutes for any accumulated gas to dissipate 2 Insert a match into the lighting rod as shown Fig 23 Ignite the match and insert through the cooking grids to the burner 3 If the burner does not light within seconds turn the knob to the OFF position wait 5 minutes and try again Side Burner 1 If you have already attempted to light the side burner with the i...

Страница 22: ... water Cleaning will be more difficult if the grill is allowed to cool Grease Pan The grease pan should be emptied wiped down and washed after each use with a mild detergent and warm water solution Check the grease pan frequently and do not allow excess grease to accumulate and flow out of the grease pan Grill Burners Extreme care should be taken when removing a burner It must be correctly centere...

Страница 23: ...Flame Characteristics and Setting of Flame Check for proper burner flame characteristics Burner flames should be blue and stable with no yellow tips excessive noise or lifting as shown in Fig 25 The following steps should be followed for correcting the flame characteristics 1 Turn the control knobs and Liquid Propane Cylinder valves OFF 2 Allow the grill and burners to cool 3 If the flame is yello...

Страница 24: ...er flame is yellow and there is a noticeable gas odor 1 Check the burner inlet for obstruction especially for spiders and other insects 2 Check the air shutter for proper adjustment 3 Check for the source of gas leaks Excessive flare ups 1 Hood up when grilling 2 Keep knobs on low 3 Turn one burner off if necessary 4 Post heat grill for 10 15 minutes as this will burn off drippings 5 Use meats con...

Страница 25: ...uctions 1 Make sure all burner valves are OFF 2 Open the tank valve and wait 5 seconds 3 Light the burner one at a time following the lighting instructions listed in the left door and Page 19 Low heat natural gas NOT FOR RSA Gas pressure is affected by gas line and length of gas line from house gas line Follow the recommendations in the chart below From House to Grill Distance Tubing Size Up to 25...

Страница 26: ...th a 9kg LP Gas Cylinder use of any other cylinder any resulting damage to the product will void the warranty This product is intended for use with the supplied low pressure 2 8kPa LP gas regulator use with any other type of pressure regulator and any resulting damage to the product will void the warranty It is the responsibility of the product owner to safely store and protect the grill from the ...

Страница 27: ...0 Side Burner Control Panel 1yr 1pc 13 Main Burner Bowl Assembly 1yr 1pc 41 Side Burner Pipe 1yr 1pc 14 Front Baffle 1yr 1pc 42 Side Burner Igniter Wire 1yr 1pc 15 Main Gas Valve 1yr 3pcs 43 Side Burner Bowl Assembly 1yr 1pc 16 Side burner Gas Valve 1yr 1pc 44 Side Burner Cooking Grid 1yr 1pcs 17 Pulse Ignite Module 1yr 1pc 45 Side Burner Lid 1yr 1pc 18 Regulator LP 1yr 1pc 46 Side Burner Lid Hing...

Страница 28: ... 02 80 0 700 600 500 40 0 300 20 0 100 01 05 03 07 12 13 14 15 17 22 24 26 29 31 32 36 33 32 16 45 23 03 11 55 54 53 49 48 46 44 43 42 41 35 30 27 28 37 37 34 25 20 21 19 18 34 40 39 12 51 47 04 04 02 06 10 09 08 ...

Страница 29: ...urn once when juices rise to the surface or desired condition is achieved Do not leave burgers unattended as flare ups can occur quickly Ribs 12 mm Full Rack Medium 20 to 40 minutes Turn occasionally During last few minutes brush with barbecue sauce and turn several times Hot Dogs N A Medium 5 to 10 Minutes Turn 4 times 2 4 minutes on each of four sides Poultry Cut 100 250 g Low or Medium 20 to 40...

Страница 30: ...ributed by Mega Group PO Box 15 Woodlands 0027 South Africa Tel 27 0 12 802 1515 WARNING Read and follow all Safety Assembly and Use Care Instructions in this guide before assembling and cooking with this grill Failure to follow all instructions in this Use Care Guide may lead to fire or explosion which could result in property damage personal injury or death ...

Отзывы: