background image

5

Part names

Using your touch monitor effectively

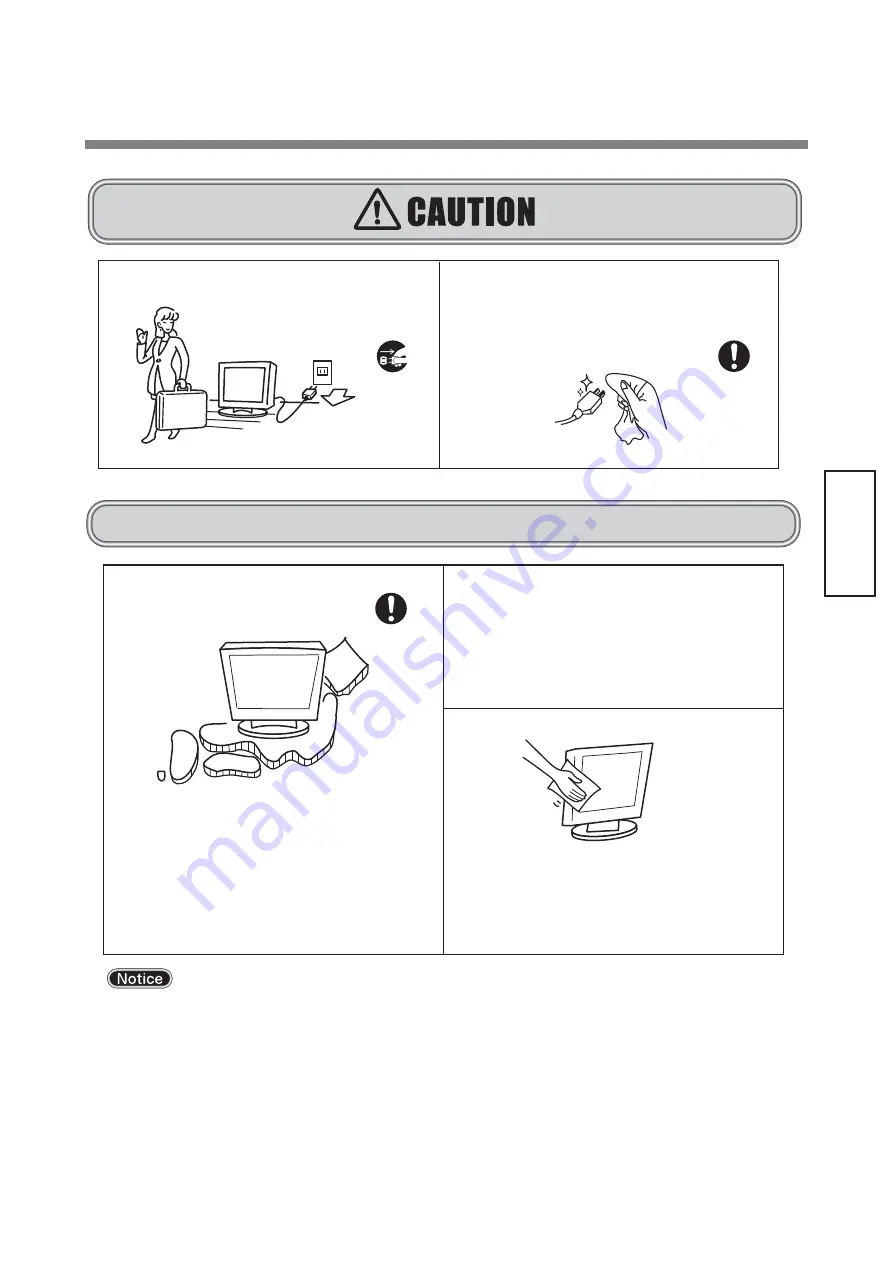
To keep the monitor’s optimum performance, it is recommended to 
clean the touch-sensor periodically.
Turn the power off and unplug from the outlet before cleaning to 
prevent product failure.  Use a soft cloth when cleaning.
Finish it with a dried soft cloth finally.  Avoid using any cleaning 
solution or glass cleaner.

Afterimage

The afterimage is the phenomenon in which the previous screen display remains as the screen display is 
changed after the same screen is displayed for a long time, and it is not a trouble. The afterimage will gradually 
resolve by changing the screen display. However, prevent displaying the same screen for a long time since the 
afterimage may not disappear if same screen is displayed too long. It is recommended to change the screen 
display with "Screen Saver" etc.

Wipe the dust, etc. from the power plug regularly

May cause fire.  Clean and
inspect connection of your
power plug once a year.

Remove dust

For use in Japan only

This Touch Monitor is manufactured and sold for use in
Japan only. 
Our company shall not be liable for any matters related
to use in any other countries of Japan.  
Furthermore, technical consultation and after service, etc.
for this device are not provided overseas.
This Touch monitor is designed for use in Japan and can not 
be used in any other countries.

For use in Japan only

Effective viewing

For the most comfortable viewing and to reduce eyestrain, 
the screen should be positioned slightly lower than eye level 
and 40-70 cm away from your eyes.  Rooms that are too 
bright will strain your eyes.  Please use in a suitably bright 
room.  Also, continuous viewing over a long period of time 
will tire your eyes.

Disconnect the power cord before leaving for long
vacations or leaving your home.

Disconnect plug

Reriodic cleaning is recommended

Содержание TSD-AT1513-CN

Страница 1: ...ケーブルの接続 8 タッチセンサ用 ドライバソフトのインストール 9 5 画面調節 12 画面の調節 12 タッチ OSD 機能 13 6 機能 17 自動画面表示 17 パワーマネージメント機能 17 7 困ったとき 18 故障かな と思ったら 18 お手入れ 20 保証とアフターサービス 20 8 付録 21 仕様 21 市販のアームを取り付けるとき 22 さくいん 23 インターネットホームページ http www mee co jp 製品情報などを提供しています この取扱説明書をよくお読みになり 正しくお使いください 特に 安 全のために必ず守ること は タッチモニタをご使用の前に必ず読ん で正しくお使いください この取扱説明書に同梱している保証書は必ず お買上げ日 販売店名 などの記入を確かめて 販売店からお受け取りください ࢼࣟࢢ ᢠ ᪉ᘧ ࢼࣟࢢ ᢠ ᪉ᘧ ...

Страница 2: ...つくもの この装置は 情報処理装置等電波障害自主規制協議会 VCCI の基準に基づくクラス B 情報技術装置です この装 置を家庭環境で使用することを目的としていますが この装置がラジオやテレビジョン受信機に近接して使用される と 受信障害を引き起こすことがあります 取扱説明書に従って正しい取扱いをしてください 本機は付属の電源コード 信号ケーブルおよび弊社推奨のケーブルを使用した状態で VCCI 基準に適合しています 本書の内容の一部または全部を無断で転載することは固くお断りします 本書の内容について 将来予告なしに変更することがあります 本書の内容については 万全を期して作成しましたが 万一誤り 記載もれなどお気付きの点がありましたら ご連絡ください 乱丁本 落丁本の場合はお取り替えいたします 販売店までご連絡ください Windows は 米国マイクロソフト社の米国およびその他の国にお...

Страница 3: ...をしない 特にお子さまにご注意 本体包装のポリ袋を頭からかぶると窒息の 原因になります ポリ袋で遊ばない 禁止 修理 改造禁止 正しい電源電圧で使用する プラグを抜く 水ぬれ禁止 風呂場や水のかかるところに置かない 液晶を口にしない 水などがタッチモニタの内部に入った場合はすぐに 本体の電源を切り 電源コードをコンセントから抜い てお買い上げの販売店にご連絡ください そのまま使 用すると 故障 火災 感電などの原因になります 液晶パネルが破損し 液晶が漏れ出た場合は 液晶を吸い込んだり 飲んだりしないようにしてください 中毒を起こす恐れが あります 万一口に入ってしまったり 目に入ってしまった場合は 水でゆすいでいただき 医師の診断を受けてください 手や 衣類に付いてしまった場合は アルコールなどで拭き取り 水洗いしてください 接触禁止 雷が鳴り出したら電源プラグには触れないでください 感...

Страница 4: ...で 布などで通風孔をふさがない 屋外での使用禁止 禁止 禁止 電源プラグは奥までしっかりと 差し込んでください しっかりと差し込まれていない と火災 感電の原因となること があります 屋外での使用禁止 本製品は屋内での使用を想定しています 屋外では使用しないでください 故障の原 因となることがあります 車載用など移動用途には使用で きません 故障の原因になるこ とがあります 故障のときに感電の原因になります アース接続は必ず電源プラグをコンセントにつなぐ前におこな ってください また アース接続を外す場合は 必ず電源プラグを コンセントから抜いてからおこなってください タッチセンサ面を固いもので たたいたりして衝撃を加えな いでください 破損してけがや故障の原因 になります コードを引っ張ると傷が つき 火災 感電の原因になり ます 火災 感電の原因になります 電源 プラグや機器間の接続線...

Страница 5: ...な見方 タッチモニタのお手入れ タッチモニタの上手な使い方 国内専用 電源プラグのほこりなどは定期的にとる 長期間の旅行 外出のときは電源プラグを抜く ほこりを取る プラグを抜く 火災の原因になります 1年に一度は電源プラグの定期的な清掃と接続を 点検してください タッチモニタの表面にほこりや汚れがついているときは 柔らかい布で やさしく拭いてください 表面は傷つきやすいので硬いものでこすっ たり 叩いたりしないでください また 液晶パネルは壊れやすいので 強く押したり 強い力を加えたりしないでください パネルの表面が変色したり 変質するなどの原因となりますので OAクリーナは使用しないでください 残像について 残像とは 長時間同じ画面を表示していると 表示画面を変えたときに前の画面表示が残る現象です 残像は 画面表示を変えることで徐々に解消されますが あまり長時間同じ画面を表示すると残像...

Страница 6: ...点灯します パワーマネージメント機能 の作動中は橙色に点灯しま す P17 電源入力コネクタ 電源コードを接続します 電源スイッチ I 入 切 デジタル映像信号入力 コネクタ DVI D DVI Dケーブルを接続します DVI Dケーブルは付属されてい ません アナログ映像信号入力 コネクタ ミニD Sub15ピン ミニD Sub15ピンケーブルを 接続します タッチセンサ通信コネクタ USB タイプB USBケーブルを接続します タッチセンサ通信 コネクタ RS232C ミニD Sub9ピンケーブ ルを接続します オーディオ入力端子 オーディオケーブルを 接続します オーディオケーブルは 付属されていません 盗難防止用ロック穴 盗難防止用のキー Kensington社製 を 取り付けられます ...

Страница 7: ...いただいたときに同梱されている付属品は次のとおりです 万一不足しているものや損傷しているものがありましたら 販売店までご連絡ください 電源コード 映像信号ケーブル タッチセンサ通信ケーブル タッチセンサ通信ケーブル USB タイプA タイプB お客さま相談窓口のご案内 保証書 タッチセンサ用ドライバCD ROM ミニD sub 15 ミニD sub 15 フェライトコア2つ付 D sub 9 D sub 9 フェライトなし お客さま相談窓口のご案内 ...

Страница 8: ...てください This socket outlet shall be installed near the equipment and shall be easily accessible ケーブルの接続 ケーブルは 接続後必ずそれぞれの固定ネジで確実に固定してください ケーブルを接続する前に 本機 コンピュータおよび周辺機器の電源を切ってください USB の接続は USB ハブなどを介さず 直接コンピュータに接続することをおすすめします アースリード線 電源コード 4 接続 RS 232C シリアルポート DVI出力 オーディオ出力 VGA出力 2 4 5 6 USB DVI D オーディオ 3 コンピュータ ミニD Sub 15ピン TOUCH USB TOUCH RS 232C DVI 入力 オーディオ 入力 1 USB 電源コード USBポート 1 電源コード 2 RS 232Cケー...

Страница 9: ...るか CD ROM のルー トフォルダの SETUP EXE をダブルクリックしてください Windows 3 1 OS 2 Macintosh 等では使用できません Windows 95 98 Me NT でご使用の場合は 販売店にお問い合わせください このメニュー画面の項目をクリックしていくことにより Touch Monitor Accessory に収められた主なソフトウェ アの起動やインストール ドキュメントの表示をおこなうことができます 項目ボタンは画面の右半分に表示されます 必要な項目をクリックしてください メニュー項目には 以下の実行項目 が表示されます 説明書 現在選択されているソフトウェアの説明書が表示されます 起動またはインストール前に必ずお読みください インストール ソフトウェアのインストールプログラムを実行します フォルダを開く ソフトウェアの入っているフォルダを表...

Страница 10: ...クリックします 手順 機種を選択します 本機は TSD AT1513 CN ですので その他 ボタンをクリックしてください 手順 機種を選択します タッチセンサ ドライバの種類が表示されます お使いになっているコンピュータのオペレー ティングシステム OS に合ったドライバを選 択してください 以下の手順に従ってインストールしてください 手順 左のようなメニュー画面が表示されます 本機は アナログ抵抗膜方式 のタッチセンサ を内蔵しておりますので アナログ抵抗膜方式 ボタン 緑色 をクリックします ...

Страница 11: ...必ず 説明書 ボタンをクリッ クして説明書をお読みください 手順 USB 接続の場合 インストールウィザードが起動します Controller USB USB を選択し インス トール ボタンをクリックしてください 手順 シリアル接続の場合 Controller Serial Serial を 選 択 し Serial Port の欄の矢印 をクリックし 使用 する COM ポートをを設定してください その 後 インストール ボタンをクリックしてくだ さい 手順 インストール完了です 閉じる ボタンをク リックしてください インストール直後ドライバが正常に動作し ない場合は PC を再起動してください ...

Страница 12: ...のリフレッシュレートまたは 解像度を変更してください 1 自動調節 1 本機 およびコンピュータの電源を入れてください 2 タッチ OSD 機能 P13 15 を参照の上 OSD MENU 内の Auto Image を選択することにより Display Width Phase H Position V Position の自動調節を開始します 自動調節中は Auto Adjust の文字が表示されます DOS プロンプトのように文字表示のみの場合は 自動画面調節がうまく機能しない場合があります コンピュータやビデオカードによっては 自動画面調節がうまく機能しない場合があります この場合 マニュ アル画面調節でお好みの画面に調節してください 2 マニュアル調節 1 本機およびコンピュータの電源を入れてください 2 タッチ OSD 機能 P13 15 を参照のうえ 調節項目を選択します 3 ...

Страница 13: ...青の が表示されます 画面左下端をタッチすると OSD が表示され タッチ OSD モードに入ります の手順通りにタッチされていない場合 タッチ OSD モードへ移行できません OSD は表示されません にて画面左下以外の場所をタッチされると 画面左上の 表示は消えます この状態で を実施しても OSD は表示されません OSD が表示されない が表示されない が途中で消える場合は タッチ OSD 機能は動作していません 上記以外の場所を一度タッチして タッチ位置にマウスカーソルが追従していることを確認し 再度 の手 順を行なってください OSD は タッチ OSD 機能設定 P15 OSD の表示 機能により表示することも可能です ...

Страница 14: ...モード中 OSD が表示されている時 はタッチモニタの表示画面を 4 つの領域に分けてキー を配置しています 下図に示すキー領域をタッチすることで Menu Select ボタンと同じ動作ができます 画面位置 キー名 動 作 左下 Menu OSD メニューが表示されている状態で Exit 選択に移動します また OSD 機能の操作最中には 1 つ上の画面に戻ります 右下 Select 選んだ調節項目を決定します 右上 調節項目 グループへ移動します 選んだ調節項目の値を調節 増 します 左下 調節項目 グループへ移動します 選んだ調節項目の値を調節 減 します 注 タッチ OSD 機能動作モード中は通常のタッチ動作は停止します Menu Select ...

Страница 15: ...モードへ移行するためのタッチ位置を任意に変更できます デフォルトは B 右上 C 右下 D 左下 です タッチドライバの UPDD コンソールの タッチ OSD をクリックすると下図ウインドウが表示されます 右側モニタイメージ図内の A B C D の文字部分をタッチし シーケンスを変更してください 下図参照 その後 設定保存 ボタンを押すことによって タッチシーケンスをタッチモニタへ保存します 2 タッチ OSD 機能の有効 無効 タッチ OSD 機能の有効 無効を設定できます デフォルトは有効 チェックマーク有 です 注 タッチ OSD 機能を無効にしても 3 項の機能により OSD を表示して操作することが可能です 3 OSD の表示 OSD の表示をクリックすると OSD が表示されます ...

Страница 16: ...ック位相 を調節します アナ ログ接続の場合のみ H Position 左右方向の表示位置を調節します アナログ接続の場合のみ V Position 上下方向の表示位置を調節します アナログ接続の場合のみ Exit このグループの調節を終了します Tool Sharpness 表示のシャープさを調節します Audio Volume スピーカーの音量調節をします Mute ミュート 消音 の設定 解除をします Change Input 信号入力コネクタを切り替えます アナログ デジタル LCD Direction LCD の表示方向を上下反転する Reset 出荷状態の設定に戻します Exit このグループの調節を終了します OSD Control OSD Timer OSD 表示が自動終了するまでの期間を設定します OSD H Position OSD の水平表示位置の調整が可能です OS...

Страница 17: ...面に調節 P16 するとタイミングおよび画面情報が自動的に記憶されます 入力信号によっては画像が表示面一杯に表示されなかったり すこし縦長または横長になる場合があります 本機は水平周波数 30 0 61 0kHz 垂直周波数 55 0 75 4Hz 対応となっていますが この範囲内であっても入 力信号によっては表示できない場合があります その場合は コンピュータのリフレッシュレートまたは解像度を変更して ください 解像度 1024 768 以外の信号を入力した場合は 文字がにじんだり図形が歪んだりすることがあります パワーマネージメント機能 タッチモニタの電源を入れたままでも コンピュータを使用しないときにタッチモニタの消費電力を減少させる機能です タッ チモニタ本体の画面が暗くなるとともに電源ランプ P6 が橙色に点灯します この機能は VESA TM DPMS TM 対応パワーマネージ...

Страница 18: ...はキーボードの適当なキーを押すかマウスを動か してください P17 2 信号ケーブルを正しく接続してください 3 コンピュータの電源が 切 になっていないか確認してください 1 分配器を使用している場合は コンピュータに直接入力してくだ さい 1 液晶パネルの特性によるもので 故障ではありません 1 長時間同じ静止画面を表示すると このような現象が起こること があります 電源を切るか変化する画面を表示していれば像は 1 日程度で自然に消えます 電源ランプが緑色に点灯 している 電源ランプが橙色に点灯 している 7 困ったとき 画面に何も映らない 画面がちらつく 画面上に黒点 点灯しない点 や 輝点 点灯したままの点 が少数ある 数秒間画面が不安定になる タッチセンサが動作しない タッチセンサが正常動作しない 画面を切り替えても前の画面 の像が薄く残っている 画面が暗くなった ちらつく 表示...

Страница 19: ...ら操作してください 2 タッチセンサ用通信ケーブルを確実に接続してください 3 パソコン システム の立ち上げ時には 周辺機器の認識をおこ なっており タッチ操作をおこなうと正常な認識ができませんの で システムが完全に立ち上がったあとに操作をおこなってくだ さい 1 電源コードを AC100V 電源コンセントに接続してから約 5 秒間 はコントローラがイニシャライズ中のため正常に感知しないこと があります 5 秒間以上経ってから操作してください 2 水滴 ゴミ 汚れ等をきれいに拭き取ってから 電源をいれなお してください 3 キャリブレイションをおこなってください CD ROM 内の取扱 説明書をご覧ください P9 1 オーディオケーブルを本機およびコンピュータのコネクタに正し く接続してください 2 OSD メニューで音量を調節 または Mute を OFF にしてくだ さい 数秒間画...

Страница 20: ...間です 保証書の記載内容によりお買上げの販売店にご依頼ください その他詳細は保証書をご覧ください 保証期間経過後の修理については 販売店にご相談ください 修理によって機能が維持できる場合は お客様のご要望により有料修理いたします その他 アフターサービスについてご不明の場合は お買上げの販売店へご相談ください お手入れ 1年に一度は内部の掃除を 販売店におまかせください 定期的な掃除は火災 故障を防ぎます 特に梅雨 期の前におこなうのが効果的です 内部掃除費用については販売店にご相談ください タッチモニタをより良い状態でご使用いただくため 定期的にタッチセンサの お手入れをおこなってください お手入れの際は電源スイッチを 切 にし 電源プラグを抜いてから 柔らか い布で軽くふき取ってください 電源を入れたままお手入れをおこなうと タッチセンサが反応し 故障の原因 となります 汚れがひどいと...

Страница 21: ... 0kHz 61 0kHz 垂直 55 0Hz 75 4Hz 表示色 最大 1677 万色 輝度 200cd m2 標準 コントラスト比 450 1 標準 表示サイズ 水平 垂直 304 1 H 228 1 V mm 入出力信号コネクタ 映像信号 ミニ D Sub15 ピン メス DVI D メス タッチ通信信号 D Sub9 ピン オス USB type B メス 音声入出力 入力コネクタ 3 5 Φ ステレオミニジャック スピーカー 1W 1W ステレオ 使用環境条件 周囲温度 5 35 湿度 10 80 RH 結露なきこと 供給電源 AC100 240V 50 60Hz 消費電力 25W 標準 適合規格 安全 UL c UL 電磁妨害 VCCI B プラグ プレイ VESA DDC2B 外形寸法 幅 352mm 高さ 366mm 奥行き 178mm スタンド含む 質量 約 6 5kg...

Страница 22: ...6mmとしてください チルトスタンドの取付けに使用していたネジは使用できません M4 首下長さ10mmのネジを準備してください 指定以外のネジを使用した場合はケガや故障の原因になります 本機にはVESA規格に準拠した市販のアームを取り付けることができます チルトスタンドの取り外し方 アームの取り付け方 アームは本機を支えるのに十分なものを選んでください 本機のディスプレイ部の質量は4 0kgです モニターは 机など平らな場所に柔らかいシートなどを敷き 画面を下に向けて静かに倒して下さい タッチセンサの表面は傷つきやすいので 硬いものでこすらないよう注意してください アームの取付部 上記アームの取付部形状は参考例です 75mm 7 5 m m ネジを外す ネジを外す しっかりささえる しっかり ささえる 押す モニター背面のス タンドカバー ト ップ の下部を両 手で広げながらゆ っくり引き...

Страница 23: ...上に黒点 点灯しない点 や 輝点 点灯したままの点 が少数ある 18 画面調節 12 画面に何も映らない 18 画面の調節 12 画面を切り替えても前の画面の像が薄く残ってい る 18 き 輝度 21 機能 17 供給電源 21 く グループメニュー 16 け ケーブルの接続 8 こ 工場プリセットタイミング 17 故障かな と思ったら 18 ご使用の前に 2 困ったとき 18 コントラスト比 21 さ サイズ 21 残像について 5 し 湿度 21 質量 21 自動画面表示 17 自動調節 12 市販のアームを取り付けるとき 22 視野角 21 周囲温度 21 出力 21 使用環境条件 21 消費電力 21 シリアル接続の場合 11 す 数秒間画面が不安定になる 19 スピーカー 21 スピーカーから音が出ない 19 せ 接続 8 そ 走査周波数 21 た タッチ OSD 機能 13 1...

Страница 24: ...40D871064A10 ᢏ ࡀᨭ ࡿ ᮍ᮶ ...

Страница 25: ... 8 Power supply cord connection 8 Connecting the Cables 8 Software Installation for Touch Sensor 9 5 Image Adjustment 12 Image Adjustment 12 Touch OSD Function 13 6 Functions 17 Automatic image display 17 Power management function 17 7 Troubleshooting 18 Cleaning instructions 20 8 Appendix 21 Specifications 21 Mounting Commercial Arms 22 Read all of the instructions in this user s manual before yo...

Страница 26: ... Corporation All other brand name and product names are trademarks or registered trademarks of their respective companies Marks and their meanings in this user s manual are as follows Risk and its degree in case of failure operation are classified and described with following marks Glossary Items that require particular attention Information you will find informative Reference page Easy explanatio...

Страница 27: ...gnated power voltages may cause fire or electric shock This device comes with a power cord AC100V compatible with the power outlets in general households When operating at voltages other than AC100V max AC240V be sure to use a power cord appropriate for that voltage The power cord that comes with this device is for this device only For your safety do not use this power cord with other devices Proh...

Страница 28: ...e or electric shock Check that you have unplugged the power cable and disconnected the cables connecting the device to other machines before you move it Prohibited Hold the power plug firmly to unplug it Pulling on the cord can cause tearing fire and electric shock Hold the plug Do not insert or remove the power plug with wet hands May cause electric shock Wet hands prohibited Disconnect the plug ...

Страница 29: ...y with Screen Saver etc Wipe the dust etc from the power plug regularly May cause fire Clean and inspect connection of your power plug once a year Remove dust For use in Japan only This Touch Monitor is manufactured and sold for use in Japan only Our company shall not be liable for any matters related to use in any other countries of Japan Furthermore technical consultation and after service etc f...

Страница 30: ...e Power Input Connector Connect the Power Cord Power Switch I On Off Digital Signal Input Connector Connects the DVI D cable The DVI D cable is not provided Purchase a recommended DVI D cable for use Analog Signal Input Connector Connects the mini D Sub 15 pin cable Touch Sensor Communication Connector Type B Connects the USB cable Touch Sensor Communication Connector RS232C Connects the D Sub 9 p...

Страница 31: ...ontained or damaged contact your supplier Video signal cable with 2 ferrite core Touch sensor communication cable without ferrite core Power Supply Cord Touch sensor Communication Connector USB TypeA TypeB Guarantee Customer Service Guide CD ROM including the software Connectors D sub 9 pins D sub 9 pins ...

Страница 32: ...g used This socket outlet shall be installed near the equipment and shall be easily accessible Connecting the cables Fix the cables surely with each fixed screws Before connecting the signal cable please turn off the power to this device your computer and peripheral devices The connection of USB is recommended as for the direct connection to the computer without the USB hub etc Grounding lead wire...

Страница 33: ...e CD ROM Unacceptable operating software For example Windows 3 1 OS 2 Macintosh and so on Please contact your dealer if you use Windows 95 98 Me NT By clicking each item on this Menu screen you can start and install main software and display the document kept in Touch Monitor Accessory Item buttons are displayed on the right half of the screen Click a desired item The following execution items wil...

Страница 34: ...tep Click その他 button Step The kind of touch sensor driver is displayed Please select the driver exists your operating system of computer Install the software according to the following steps Step After clicking the button OK the menu as shown in Figure will appear Click the green アナログ抵抗膜方式 button that selects the type of this product Analog Resistance ...

Страница 35: ...ction Start the Install Wizard Select the Controller USB USB and click the インストール install button Step At the Serial Connection Select Controller Serial Serial and click of serial port and select the COM port you use Click the インストール install button Step After the installation of software is completed click the buttons 閉じる to close the menu When a driver does not work just after installation normall...

Страница 36: ...mage at the OSD menu it starts automatic screen adjustment of Display Width Phase H Position and V Position by detecting input signal The character of Auto Adjust is displayed while adjusting the screen automatically If the used image has no picture like DOS prompt this function may not operate correctly This function may fail to operate depending on the used PC type and or video cards In such cas...

Страница 37: ...D mode and OSD appeares after you touch bottom left corner If you do not touch correctly according procdure not change to Touch OSD Mode OSD is not indicated mark disappears when touching while the mark appears places other than bottom left corner of the screen Under such a condition even if four is executed OSD is not indicated Neither indication of OSD nor indication of and touch when disappears...

Страница 38: ...y touching following key area Position Key Action Bottom Left Menu Move to Exit while OSD menu is indicated Or return to previous screen while OSD function is operating Bottom Right Select Decide adjustment groups and items Upper Right Move to adjustment items or groups Or adjust increase the value of selected item Upper Left select to adjustment items or groups Or adjust decrease the value of sel...

Страница 39: ... upper right C lower right D lower left 1 Click Touch OSD of UPDD Console then following window is open 2 Please change the touch sequence by touching it in a letter part of A B C D of the figure of monitor 3 Save the touch sequence by touching Save 2 Valid Invalid of Touch OSD function Default is Valid checked OSD operation is available by installing optional OSD PCB though set to invalid touch O...

Страница 40: ...on Adjusts the horizontal display position only for analog connection V Position Adjusts the vertical display position only for analog connection Exit End the adjustment of this group Tool Sharpness Adjusts the sharpness of the display Audio Volume Adjust volume of speaker Mute The mute muffle set is released Change Input Changes the signal input connector LCD Direction The direction where LCD is ...

Страница 41: ... in rectangular with some input signals If no image appears when specified frequency Horiz 30 0 to 61 0kHz Vert 55 0 to 75 4Hz is used change the refresh rate or resolution of your PC When signals other than resolution 1024X768 are input the letter blots and the figure is distorted Power management function By this function the monitor shifts to a lower power consumption level when on but not in u...

Страница 42: ...17 7 Check to make sure that the signal cable should be completely and correctly connected 8 The PC connected with the monitor should be on If a distributor is used directly connect this product with your PC Every LCD panel has such spots by nature The monitor has no problem If a fixed pattern is displayed for a long time it may occur picture persistence To alleviate image persistence turn off the...

Страница 43: ...during your PC is starting up as it is under recognition of its peripheral equipments If you operate it the PC may fail in the recognition 1 The controller located within the monitor may not respond for initialization for approx 5 seconds soon after turning on the DC power supply to the monitor Allow more than 5 seconds for optimum performance 2 Check to make sure that there should be no waterdrop...

Страница 44: ...egarding cleaning fee Periodic cleaning is recommended To keep the monitor s optimum performance it is recommended to clean the touch sensor periodically Turn the power off and unplug from the outlet before cleaning to prevent product failure Use a soft cloth when cleaning If the monitor is too soiled soak a cloth in mild detergent and give it a wring before cleaning Finish it with a dried soft cl...

Страница 45: ... Contrast ratio 450 1 Standard Active display area 304 1 H X 228 1 V mm Input output signal connectors Video Signal Mini D sub 15 pins female DVI D female Touch sensor communication signal D sub 9 pins male USB Type B female Audio Input Output Input Connector 3 5Φ Stereo mini jack Speaker 1W 1W Stereo Environmental consideration Surrounding temperature 5 C to 35 C Humidity 10 to 80 RH Non condensi...

Страница 46: ...rews When the screws other than specification are used it causes the injury and damage How to detach the tilt stand How to attach an arm Select the arm that is strong enough to support this device The mass of the display section is approx 4 0kg Lay the monitor on its panel on a soft cloth and flat surface Handle the monitor with care so as not to scratch it as its panel is sensitive Above figure i...

Страница 47: ......

Страница 48: ...40D871064A10 Nihonjisho 1st Building 1 13 5 Kudan kita Chiyoda ku Tokyo 102 0073 Japan Tel 81 3 3288 1108 Fax 81 3 3288 1575 ...

Отзывы: