Medit Identica hybrid Скачать руководство пользователя страница 109

108

Identica Hybrid


User Guide

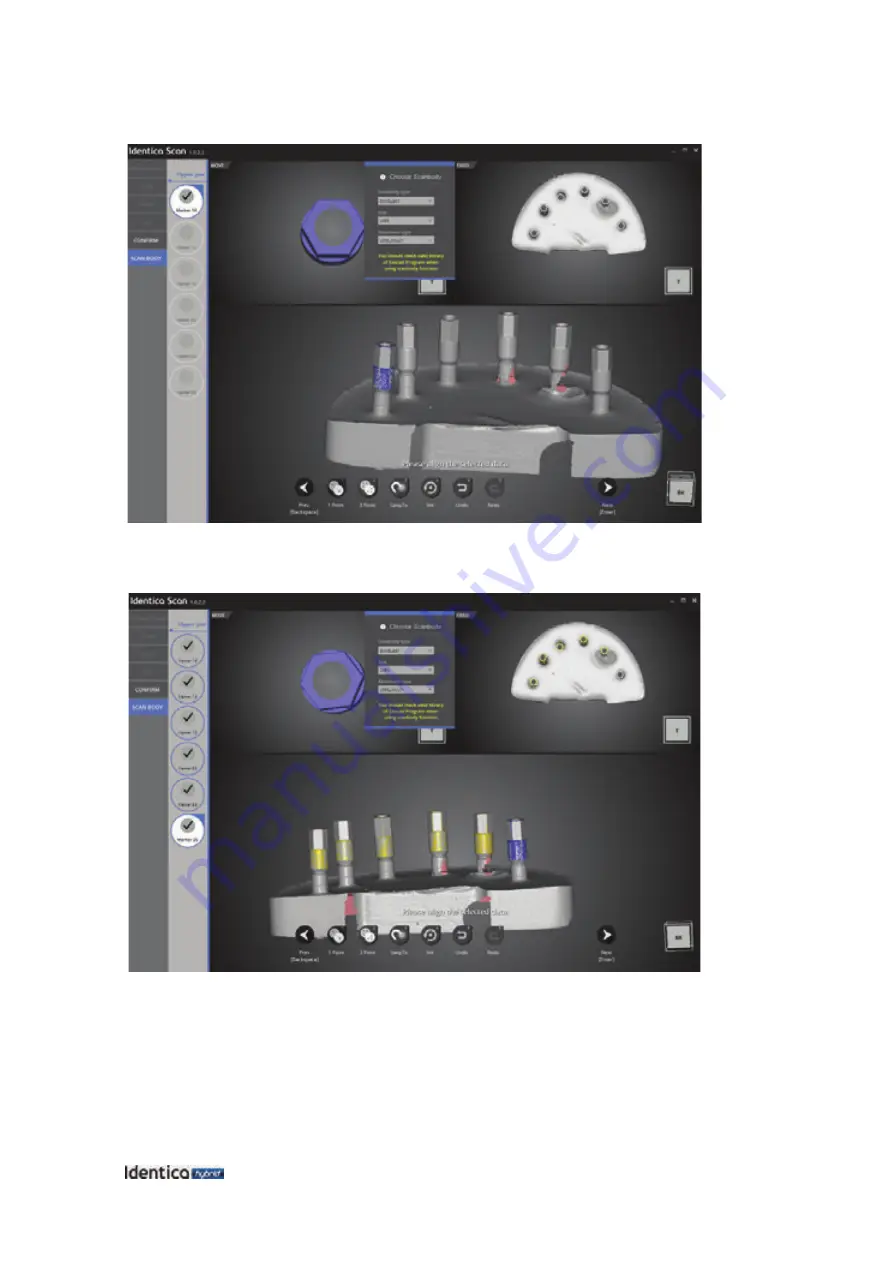
Check the results of the alignment. If you are not sure of the alignment of the scan body, re-align using the "

Paste

function. When all libraries are aligned, you can see the overall status on the screen.

Align all the libraries and scan data by applying the same job to each bar.

Содержание Identica hybrid

Страница 1: ...User Guide 02855 23 Inchon ro 22 gil Seongbuk gu Seoul Korea TEL 02 2193 9600 E mail identica meditcompany com www meditcompany com Optimized for impression model scanning ENG 3 2016...

Страница 2: ...Identica Hybrid User Guide...

Страница 3: ......

Страница 4: ...on 12 Product specifications 15 PC requirements 15 Product installation 17 Step 1 Software installation 18 Step 2 Hardware installation 20 Precautions for use 21 Pr cautions d utilisations 25 Using Id...

Страница 5: ...4 Identica Hybrid User Guide...

Страница 6: ...ntica Hybrid scanner can be used to quickly and easily generate high quality 3D data in open STL format helping to increase your productivity and efficiency Also Medit s scanners are easy to use for a...

Страница 7: ...6 Identica Hybrid User Guide...

Страница 8: ...7 General information General information Indications Workflow Scanner andScanningSoftware...

Страница 9: ...ica Hybrid s intuitive and user friendly software gives users the ability to finish scans quickly and easily Scanning with Identica Hybrid s specialized impression scanning feature makes it possible t...

Страница 10: ...in only 16 seconds Identica Hybrid maximizes convenience by improving existing work flows with new innovative technologies In addition Identica Hybrid s new 3 axis armmakes it easy to scan impressions...

Страница 11: ...10 Identica Hybrid User Guide...

Страница 12: ...11 Before use Beforeuse Unpacking and Installation Product Information Product Specifications PC requirements...

Страница 13: ...accessories are there and if any are missing please contact your dealer Product Information Basic composition 1 Identica Hybrid scanner 2 Screw jig 2EA 3 Gumbase jig 4 Multi die 5 Half block jig 2EA 6...

Страница 14: ...ig 2EA 3 Gum jig 4 Multi die 5 Half Block jig 2EA 6 Impression jig 7 Calibration panel 8 USB cable 9 Power cord external adapter 10 3 axis arm impression 11 Flexiblemulti die Including 8 SIngle dies 1...

Страница 15: ...14 Identica Hybrid User Guide Options Separately sold 13 Artex jig 14 KAVO jig 15 SAM jig 16 Articulator plate 17 Medit Articulator...

Страница 16: ...tionwith a PC that does notmeet theminimumPC requirements Caution It is designed for USB 3 0 port Itmust be connected to a USB 3 0 port Caution Cannot run onWindows 32 bit andMac OS Caution Before ins...

Страница 17: ...16 Identica Hybrid User Guide...

Страница 18: ...t installation Product installation First install Identica Software on your computer before connecting Step1 Software installation Step2 Hardware installation Precautions for use Precautions for use i...

Страница 19: ...User Guide Step1 Software installation Insert the installation CD into the PC and run setup exe Read and approve the license agreement and select I agree to the Specify the installation location defau...

Страница 20: ...Software and other necessary software programs are automatically installed Restart your computer after installation Caution To uninstall Identica Software v2 0 simply delete the folder where you inst...

Страница 21: ...and install the hardware Caution Securely connect the cables to the PC Identica Hybrid requires a USB cable and power cord Caution Identica Hybrid requires a USB 3 0 connection 1 Connect the power ca...

Страница 22: ...21 Product installation Confirmhardware installation ConfirmMEDIT USB Remote NDIS Network Device Check the camera Check to see if 3 cameras are registered...

Страница 23: ...onent is correctly connected and fixed Make sure that themachine is correctly recognized in your computer s DeviceManager Do notmove your machine by applying force to its scanning arm Cautions when us...

Страница 24: ...power when checking the inside of themachine Do not use a spray can or spray anymaterial toward the scanner Do not touch themirror inside the scanner Instructions for storage Lightlywipe the surfacewi...

Страница 25: ...s et de vibrations lorsqu il est enmarche Ne pas teindre l appareil lorsqu il est enmarche Ne pas obstruer la sortie d a ration lorsque l appareil est enmarche En cas de d tection de fum e ou d odeur...

Страница 26: ...ions pour le pour le prot ger du contact avec des substances trang res tels que l eau ou autres types de liquide Apr s utilisation conserver l appareil dans un endroit s r pour viter tout d g t caus p...

Страница 27: ...26 Identica Hybrid User Guide...

Страница 28: ...27 Using Identica Hybrid Using IdenticaHybrid How touse Identica How touse Identica Scan...

Страница 29: ...die Toothnumber usewhen setting up the teeth Tooth numbers can be converted in option setup 3 Job setup Select Tooth type Anatomic AnatomicCrown Full abutment crowns complete replacement of tooth sha...

Страница 30: ...preparation tooth for inlay Usually complete a jobwith ceramic Select Tooth type Basic structure Bar Pillar the portion of a bar that connects to the implant Bar Segment the portion of a bar that prov...

Страница 31: ...ulator and its plate Etc Use Articulator plate Select when using an articulator platewith a large articulator Notes Project ID Enter project ID Clinic Enter clinic information Patient Enter patient in...

Страница 32: ...e added to the database and a folder will be created All thework and related informationwill be saved into a folder Once thework is saved the Scan buttonwill be activated You can start scanning if cli...

Страница 33: ...ontic base Notes Project ID Enter the project ID Clinic Enter clinic information Patient Enter patient information Technician Enter technician information Memo Enter any special notes Register job and...

Страница 34: ...s and their corresponding functions can vary depending on the type of operation Configure LOAD screen If you click the LOAD button youwill see the screen below Buttondescriptions 1 Thumbnail Show list...

Страница 35: ...34 Identica Hybrid User Guide 1 Select the dentalProject file 2 Click Save after modifying the information...

Страница 36: ...35 Using Identica Hybrid 3 After clicking OK the scan jobwill be activated 4 If youwant to return to the original screen click Reset...

Страница 37: ...ge the original settings of Identica Software program About Current information about Identica Software Troubleshooting Should you have problems with Identica Software go here for help Setting Setup D...

Страница 38: ...37 Using Identica Hybrid Scan If you click the Scan button you will see the screen below Check the Scan strategy setting window for more information...

Страница 39: ...theMedit logowill turn to a blue light After installation check the scanner connection The followingmessage appears during the first connectionwhen running the program The first time you connect your...

Страница 40: ...Check the status of the equipment according to the message The image below shows a successfully connected scanner If your computer cannot find the connected scanner youwill see themessage below Check...

Страница 41: ...ck the USB cable connections If the projector and computer cannot connect the followingmessagewill appear Check the projector connection check the network adapter inDeviceManager Calibration Click cal...

Страница 42: ...heck the serial number on the back of the calibration panel and match it with the PNL file Press OK to start calibration Set the calibration panel on top of two half jigs as seen in the image above Ca...

Страница 43: ...42 Identica Hybrid User Guide When the scanner is connected properly it will automatically move to Preparation Strategy page Scan strategy will determine the progress of the scan 1 2 3 4 5...

Страница 44: ...ng If you use a multi die and the number of preparations is over 8 divide them into two group and start scanning Normally use of multi die is recommended as it saves time 3 Set the same scanmethod for...

Страница 45: ...r plate 6 Enter specific details about the order not required Identica S WUser Interface p 28 7 Click the Save button 8 Click the Scan button to begin scanning When the scanner is connected properly i...

Страница 46: ...ng Identica Hybrid Scan As in the image above follow the instructions in the center and insert the model Click Auto Scan 1 to proceedwith the full model scan As in the image above themodel scan is fin...

Страница 47: ...scan in different angles 3D rotation to change the 3D viewing angle of the scan image Right click drag Pan Move the scan image horizontally Click mousewheel drag or mouse left right click drag Zoom i...

Страница 48: ...to capture 3Ddata through reading the projected pattern However it can be hard tomeasure if the pattern is not clearly projected onto the toothmodel If scanning is difficult use a scan spray 3 Scan s...

Страница 49: ...Place a jig the direction thatmatches the grooved underside it will automatically click to connect The front of themodel should be facing the user as you can see in the picture below If scan data is...

Страница 50: ...ton tomove to the next step Prep Experienced users can skip to their desired location Prep Place only No 11 toothmodel attached to a base onto the scanner as the instruction from left above Then click...

Страница 51: ...Hybrid User Guide Once the scanning of No 11 preparation is finished check the data by rotating themodel image If additional scans are needed click Add scan or keyboard shortcut 2 The area needs addit...

Страница 52: ...scans are complete click button 4 and move to the lower base step Click Next to proceed to the next step or for skilled users can go to any step and proceed scanning Follow the instructions in the up...

Страница 53: ...f additional scans are needed If needed click Add scan or keyboard shortcut 2 Normally there is no need of additional scan for antagonist When the additional scans are complete click keyboard shortcut...

Страница 54: ...he articulator plate and articulator onto the scanner Place the articulator plate as seen in the image below As seen in the image below place the articulator on the articulator plate Then scanningwill...

Страница 55: ...is completed click Next to proceed to the alignment step In the first step of alignment alignment of the base and tooth No 11 is automatically done If you click Next again you canmove to the upper jaw...

Страница 56: ...e upper alignment click align 1 and choose 1 point align or 3 point align This casewill use the 1 point alignmentmethod Click 1 points in the upper left image and then click 1 points in the right imag...

Страница 57: ...r Guide The upper align is complete Click next to proceed the lower jawalign Experienced users canmove to any step theywish To align the upper and lower jaw the one pointsmust the same on each scan us...

Страница 58: ...57 Using Identica Hybrid When the lower jawalignment is finished click Next tomove to the Edit stage Scan data can be edited in the Edit stage...

Страница 59: ...an select different views bymaking themodel or preparation teeth visible or invisible Icon descriptions at bottomof screen Init go back to initial data keyboard shortcut 1 Undo undo latest edit keyboa...

Страница 60: ...rt selects data outside of the current selection keyboard shortcut 8 Delete erases data keyboard shortcut 9 Edit the data using the features above After editing the data click Next and the softwarewil...

Страница 61: ...60 Identica Hybrid User Guide...

Страница 62: ...61 Appendix Scan case Appendix Scancase 8Unit Bridge Waxup Single Impression Double Impression Implant scan adapter Flexiblemulti die...

Страница 63: ...canning It will take around 30 seconds to install your scanner for the first time After the first installation it will take only around 3 5 seconds each time you begin Also during the scanner connecti...

Страница 64: ...for the lower base scan in plaster models for articulators scan usingMedit Click OK to start scanning See the Single coping scan p 43 step for more details Scan As in the image above insert the upper...

Страница 65: ...64 Identica Hybrid User Guide Click and drag the blue arrow to set the scan depth and click OK tomove to the next step for scanning Scanning...

Страница 66: ...le to see if additional scans are needed If needed simply rotate the data image to the desired location and click Add scan Inmost cases additional scans are not necessary If the scanning is completed...

Страница 67: ...d User Guide Secure the preparation teeth on themulti die as shown in the image in the top left corner and then click the Auto Scan Press Next to proceedwith the scan When scanning themulti die 2 base...

Страница 68: ...rogress Scanning can progressmore easily if the buccal surface of the prep teeth are facing outward Scanning of multi die prep teeth has completed Check the scan data and proceedwith additional scans...

Страница 69: ...id User Guide Following the instructions on the screen place the lower basemodel in the scanner and click Auto scan Adjust scan depth by dragging the blue arrow to the desired height Click Next to pro...

Страница 70: ...e as seen in the image above check the scan data to see if additional scans are needed If needed simply rotate the data image to the desired location and click Add scan Following the instructions on t...

Страница 71: ...Guide Use a screw jigwhen scanning two upper lower basemodels Be sure that the prep teeth are not needed to scan the bite relationship When the articulator scan is finished click the Next button tomov...

Страница 72: ...Appendix Scan case Align preparation teeth 14 to 24 using amulti die Click 1 point in the upper left image and then click the similar spot in the right image Inmost cases 1 point alignment is sufficie...

Страница 73: ...72 Identica Hybrid User Guide Successful alignment for preparation tooth 14 Click Next tomove to the next step Pontic alignment of preparation tooth 13...

Страница 74: ...ck one point and then find and click the similar spot in the upper right data image Pontic alignment of preparation tooth 13 completed Click Next tomove to the next step Using the same steps as above...

Страница 75: ...ator alignment stage select 1 or 3 point alignment and select similar points in the left and right data images for alignment This casewill show1 point alignment Upper base alignment complete Articulat...

Страница 76: ...75 Appendix Scan case To align the lower jaw use 1 point alignment in the samemanner as above Lower base alignment complete Articulator alignment complete...

Страница 77: ...Next tomove to the next step In the Edit stage check or un check the data images on the left to see themon the screen Use the icons at the bottomof the screen to continue editing the scan data Refer...

Страница 78: ...tangle to select a rectangular area Click Delete to remove the selected data or Invert Delete to remove the data outside of the selection When finished editing the data image click Next for data proce...

Страница 79: ...78 Identica Hybrid User Guide Scan file production is complete Editing is still possible in this stage Rectangle is selected on the screen...

Страница 80: ...e data image After selecting the desired area click Delete to delete the selected part When finished with editing click Next for data processing and STL file production When the scanning is completely...

Страница 81: ...80 Identica Hybrid User Guide 3 unit bridge for teeth 35 37 is complete The data can be checked in the folder Documents Medit Identica v 2 0 MeditProjectData...

Страница 82: ...e button Press the Scan Menu button and scanningwill begin The first time you connect your scanner it will take around 30 seconds to boot After the first installation it will take around 3 5 seconds A...

Страница 83: ...Bridge and upper crownmodel and click OK tomove to the next stage See Single scan coping p 43 step for more information Scan As in the image above follow the directions in the upper left corner insert...

Страница 84: ...ed to scan the entire model The picture above shows the completion of the upper teeth basemodel scanning If the scanning data does not meet the desired result proceed with extra scanning Rotate the da...

Страница 85: ...instructions in the upper left corner and Put Pontic 12 14 and prep teeth 16 into the upper base and click Auto Scan When the Prep 1 model scan is complete rotate the data image to see if additional s...

Страница 86: ...uctions in the upper left place the prep teeth from the Upper jaw 11 13 15 26 into the scanner click Auto Scan to proceedwith the scan When the Prep 2 model scan is complete check the data image and c...

Страница 87: ...all single dies into the upper base and proceedwith the scan When the waxup scan is complete check the scan data to see if additional scans are needed Click Add Scan to process additional scans and t...

Страница 88: ...ent between the model and dies As in the image above alignment is automatic Click Next to move to the next step Edit stage Check the appropriate model numbers on the left to select the model to edit U...

Страница 89: ...brid User Guide Use the editing features at the bottomof the screen to edit the data Refer to Single coping scan p 41 for more information When editing is complete click Next to process data and produ...

Страница 90: ...e has been produced Editing is still possible as shown in the previous step After editing is complete click Next to end the scan job Apopupwill notify the user of the programending Click Yes to save t...

Страница 91: ...90 Identica Hybrid User Guide Wax up scanning operation has been completed successfully The data can be checked in the folder Documents Medit Identica v 2 0 MeditProjectData...

Страница 92: ...button Click the Scan button to start scanning The first time you connect your scanner it will take around 30 seconds to boot After the first installation it will take around 3 5 seconds Also during...

Страница 93: ...92 Identica Hybrid User Guide Preparation Strategy Select impression scanning Scan Insert the impression according to the instructions...

Страница 94: ...er to Single coping scan p 41 for more detailed information Click Next tomove to the next step andmerge the data Open the 3 axis connection button manually Connect the 3 axis armwith the scanner Put t...

Страница 95: ...94 Identica Hybrid User Guide Select Free icon to drawyour cropmargins Select Invert icon to invert the selected area...

Страница 96: ...95 Appendix Scan case Click Delete icon to delete the data of the selected portion When editing is complete click Next icon and data processingwill begin and produce an STL file...

Страница 97: ...on is complete Editing is still possible as in the previous step Click Next to save the scanned data and exit the program Single Impression scanning is completed The data can be checked in the folder...

Страница 98: ...ck the Save button Click the Scan button to start scanning The first time you connect your scanner it will take around 30 seconds to boot After the first installation it will take around 3 5 seconds A...

Страница 99: ...axis Impression scanning can be conducted easily by using the 3 axis scan Click Confirm tomove to the next step For more details see Single coping scanning Scan As in the image above follow the instr...

Страница 100: ...e upper and lower bite tray impression scan is complete Click Next tomove to the next step Experienced users canmove to any stage Edit Use the icons at the bottomof the screen to edit the data Refer t...

Страница 101: ...100 Identica Hybrid User Guide Select Free icon and select the portions to be edited...

Страница 102: ...101 Appendix Scan case Select Invert icon to invert the selected area Click Delete icon to delete the selected part...

Страница 103: ...102 Identica Hybrid User Guide Click Next icon to save the scanned data and exit the program The scan job is completed The data can be checked on the Settings folder...

Страница 104: ...Scan No 3 Bar Segment 17 15 13 11 21 23 25 27 4 Implant type None Situ scan No Gingiva Scan No 5 Antagonist type None 6 Enter the order details not required Refer to the Identica S WUser Interface p 2...

Страница 105: ...a Hybrid User Guide Preparation Strategy On the left menu check that Scanbody entry has been created and press the OK button to begin the program After this step proceed as with regular scanning fromS...

Страница 106: ...ion Scan Align Edit After editing the data image merging data can begin When themerge is complete Scanbody will appear on the leftmenu After editing press the Scanbody button or the Next button and de...

Страница 107: ...Hybrid User Guide Click yes tomove to the Scanbody Align step Scanbody Library Align Scanbody In this step setup the Scanbody Library andmatch the scan data 1 Bar Pillar 16 14 12 22 24 26 2 Scanbody s...

Страница 108: ...pendix Scan case Select the Scanbody type and check that it is displayed properly in the upper left corner Afterwards the Align step is the same as the sorting the scan data and library One point alig...

Страница 109: ...the alignment If you are not sure of the alignment of the scan body re align using the Paste function When all libraries are aligned you can see the overall status on the screen Align all the librarie...

Страница 110: ...109 Appendix Scan case When all libraries are aligned you can see the overall status on the screen...

Страница 111: ...Identica Hybrid User Guide Click Next to save the scanned data and exit the program Implant Position files and scanned data of 16 14 12 22 24 26 has been created Verify stored data in the storage fol...

Страница 112: ...set a strategy Running Identica Software Enter the order details not required Refer to the Identica S WUser Interface p 26 Using flexiblemulti die Select the flexible multi die scan and check the sub...

Страница 113: ...e not possible to be selected and the scanning is available only for flex iblemulti die and bite Flexiblemulti die scanning When scanningwith flexiblemulti die users can set their own scan strategy Th...

Страница 114: ...113 Appendix Scan case Check that themodel appears fully in the camera s viewand click Next to continue Click Auto Scan to begin scanning Check the data image and click Next to continue...

Страница 115: ...id User Guide Click the Next button and select the appropriate button 1 Reset reset the specified tooth elements 2 Confirm Confirmthe specific elements 3 Cancel Cancel all the job and return to the pr...

Страница 116: ...uld be within the circle You can adjust size of circle by scrolling the mouse wheel while mouse cursor is on the number in the middle You can also adjust the position of the circle by drag drop with t...

Страница 117: ...ica Hybrid User Guide PressOK after selecting all of the data On the leftmenu select each data image that should appear on the screen Or select the data to be deleted and click Delete Scan the rest of...

Страница 118: ...117 Appendix Scan case Place the lower jawmodel and the upper jaw single dies on the flexiblemulti die and then start scanning On the leftmenu each selected datawill appear and be checked...

Страница 119: ...118 Identica Hybrid User Guide You can confirmthe scan data fromall of the items except for the occlusion Continuewith the articulator scan...

Страница 120: ...119 Appendix Scan case All scanning is complete Proceed to the next step to align the data The preparation teethwere aligned automatically as shown above...

Страница 121: ...ybrid User Guide The next step is the vestibular alignment step Align the data using the 1 point alignment function Click one point in the top left data image and click the similar spot in the top rig...

Страница 122: ...121 Appendix Scan case Upper vestibular alignment has been completed The next step is the lower vestibular alignment step...

Страница 123: ...Guide Like the upper model align the data using 1 point alignment Click one point in the upper left data image and click a similar spot in the top right data image The lower occlusal relationships ali...

Страница 124: ...clusal relationship alignments have been completed Proceed to the next step after checking the data for errors Editing stage Select the parts of the data to delete and click Delete Click Next after ed...

Страница 125: ...124 Identica Hybrid User Guide Proceed to the next step tomerge data Merging data has been completed...

Страница 126: ...125 Appendix Scan case Use the Rectangle function to select only the necessary parts of the data image Use the Invert Selection function to invert the selected data...

Страница 127: ...126 Identica Hybrid User Guide Delete the data by using the Delete function...

Страница 128: ...127 Appendix Scan case All scanning jobs are complete Click Next to save data and end the program...

Страница 129: ...128 Identica Hybrid User Guide Scan data has been saved in the selected folder properly...

Отзывы: