background image

13

EN

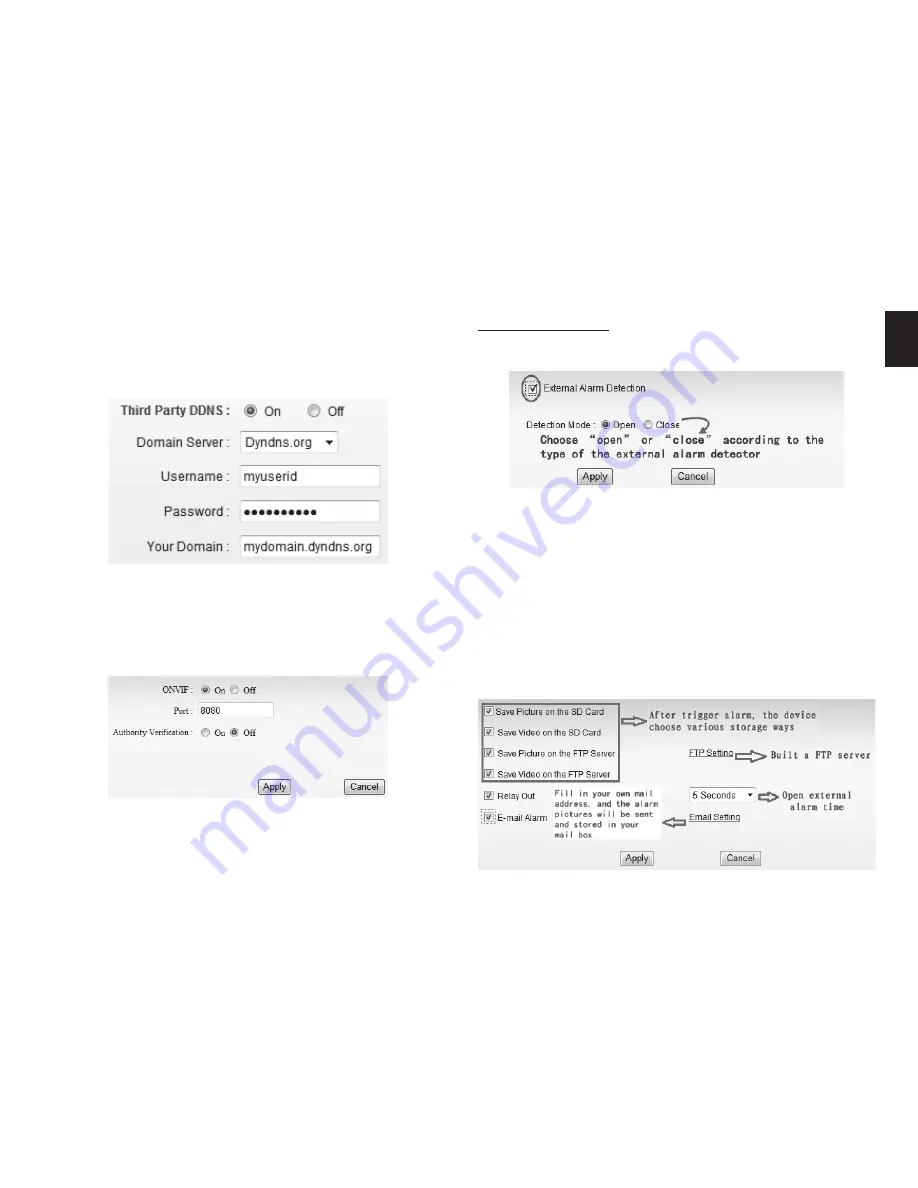
User can also use third party DDNS, such as www�dyndns�

com� User applies a free domain name from this website 

and fills the info into below blanks and saves the settings� 

Then the domain name can be used�

The camera should have external alarm input port for en-

able this functions� Connect external alarm detector to the 

input port, the detector will output switching signal when 

it detects any abnormal, input port of the camera will de-

tect the level change, so it will detect the alarm, therefore 

the detector should be switching sensor (same as switch) �

Alarm mode setting

After camera detects any change, it will alarm as several 

mode�

The camera supports ONVIF protocol, so it can be intercon-

nected with other factory camera with ONVIF�
Tips: The device supports ONVIF 2�0�1 at present�

Notice: Using the third party DDNS, if the http port is not 

80, the port number should be adding to the domain name 

with colon� Example: http://mydomain�dyndns�org:81�

ONVIF setting

Alarm setting

External Alarm Input

Содержание INDOOR SECURECAM HD MT4051

Страница 1: ...User Manual INDOOR SECURECAM HD MT4051 ...

Страница 2: ... by PC client software 10 View Video by other way 10 Other Web Browser 10 Other common software 10 All settings 11 Video setting 11 Video parameters 11 Audio parameters 11 Image parameters 12 Index Web setting 12 Basic web setting 12 WIFI setting 12 WAN access setting 12 ONVIF setting 13 Alarm setting 13 External Alarm Input 13 Alarm mode setting 13 Motion Detection Setting 14 Alarm time setting 1...

Страница 3: ... for operation humidity is below 85 RH Operation temperature is 10 50 Please install it horizontally or wall mount avoid strenu ous vibration and do not place other items on top of the unit Transport and Handling Please handle the item with care Do not use in areas around condensation Please disconnect the item from the mains before mov ing 3 Do not aim the camera directly into the sun or at other...

Страница 4: ...eam Support two way intercom function and G 711 and G 726 audio encoding Support 802 11b g protocol build in WiFi module to perform wireless monitoring Support up to 32GB SD TF card for storing the alarm video and pictures timing snapshot and recording Built in web server use one port to send all the data us ers can facilitates network setting Support ONVIF and RTSP protocol easy to integrate it t...

Страница 5: ...r external alarm system connection SD card socket for recording storage Overview IR LED Work status LED Power status LED MIC Lens Photoresistor Antenna SD Card Socket Power RJ45 Audio Out Alarm In Alarm Out Reset Audio In Work status LED indicate Flash normally 1 time per second means the device runs normally it means the camera was connected to wired network Always on it means the camera is searc...

Страница 6: ...attached CD to computer driver double click H MSearch_en exe in the CD will pop up the interface please operate as the following steps 1 Click Search Please make sure your firewall will not block up the item to be searched 2 Choose a camera 3 Change the IP address of the IP camera according to the information in the red frame on the left The numbers in the red circle should not be the same The Htt...

Страница 7: ...rface as below 1 Status bar 1 2 3 5 6 4 1 Display connection status 2 Display record status if click Record it will show REC which stands for recording click record button again it will stop 3 Zoom out zoom in and restore digital zoom 4 Set saving file path set the location for recording and capturing file storage 5 Talk button Click this button to hear what the person at the side of computer talk...

Страница 8: ... camera is changed to other direction click CALL can move the camera to the position you have set 4 Snap record SD card playback Click Snap button to save the picture to the specified path Click Record button to start recording Click again to stop recording Click Check TF SD card can browse the files in the SD card If the SD card already inside the camera you can select file to download it Click P...

Страница 9: ...then you can use the wireless connect function Notice The camera will automatically stop the function when the matching is unsuccessful after continuing 50 seconds Due to difference in the working of the routers we don t guarantee that WPS function can be used suc cessfully 1 Please go to the setting interface of Router and choose Port Forwarding 2 Choose Add custom Service 3 Input IP camera http ...

Страница 10: ...rogram to access the QuickTime Preferences dialog box from Edit Menu example as below Click Ad vanced select custom in the Transport Setup It pops up the Streaming Transport dialog box Please select HTTP for transport protocol and 80 as port ID click ok and then return to Transport Setup to change Custom to Auto Finally click ok at the bottom After finishing these settings run the Firefox or Safar...

Страница 11: ...tsp ip port 13 View video by third stream The port is RTSP port JPEG stream is for some views by non windows platform for example click mobile view in first page it will transmit JPEG stream actually The camera supports G 711 and G 726 audio encoding for mat The sound of the G 711 is better but it occupies more bandwidth If you click On of the audio capture so it will transmit audio in correspondi...

Страница 12: ...d to enter user name and password when invoke video by RTSP protocol WIFI setting Please refer to chapter View video by WiFi connection in LAN WAN access setting In chapter View video by WiFi connection in LAN you have known how to do port forwarding After the success of the port forwarding you can also visit camera by DDNS The manufacturer has established a DDNS system and al lotted a DDNS to eve...

Страница 13: ... abnormal input port of the camera will de tect the level change so it will detect the alarm therefore the detector should be switching sensor same as switch Alarm mode setting After camera detects any change it will alarm as several mode The camera supports ONVIF protocol so it can be intercon nected with other factory camera with ONVIF Tips The device supports ONVIF 2 0 1 at present Notice Using...

Страница 14: ... authority It can do any settings The factory default password 123456 User user can only operate the device but can t do any settings The default password is user Guest User can view the video but can t operate the device The default password is guest Advanced setting User management Alarm time setting The device will trigger the alarm only during the scheduled time period you can select the sched...

Страница 15: ...Example set recording time from Mon 8 30 to 9 30 Tips Please insert TF SD card when the device power off The SMTP server name It is mailbox server for example of SOHU mailbox it is smtp sohu com Please fill all blanks which we filled above as example Otherwise the settings will fail Please click Test to test if the E mail setting is successful Auto Capture Setting E mail Setting Timer recording ...

Страница 16: ...ore the video or pictures Notice The password should not contain special charac ters Multiple settings Please set multiple devices here first to view 4 or 9 split screen System setting Device information SD status shows the free capacity if SD card is installed Notice the device supports up to 32GB SD card Please format the SD card to FAT32 before use the card on camera ...

Страница 17: ...ll create a file you can store it to your computer and you can directly call this file to restore the settings The func tion helps to manage the cameras and no need to do all the settings again The firmware upgrade is for updating system firmware and web UI Due to continuous development specification and appear ance of product are subject to change without prior notice For technical support please...

Отзывы: