background image

9

Capturing Sequences in Trigger Mode

Deep sky imaging typically requires capturing several exposures which will later be stacked in software 
(such as freeware Deep Sky Stacker or the MaxIm DL software suite).  So instead of taking an individual 
image, we should sequence several images. SkyCapture allows you to capture a sequence of images au-
tomatically. Follow the basic procedure below to capture a sequence of images for deep sky objects.

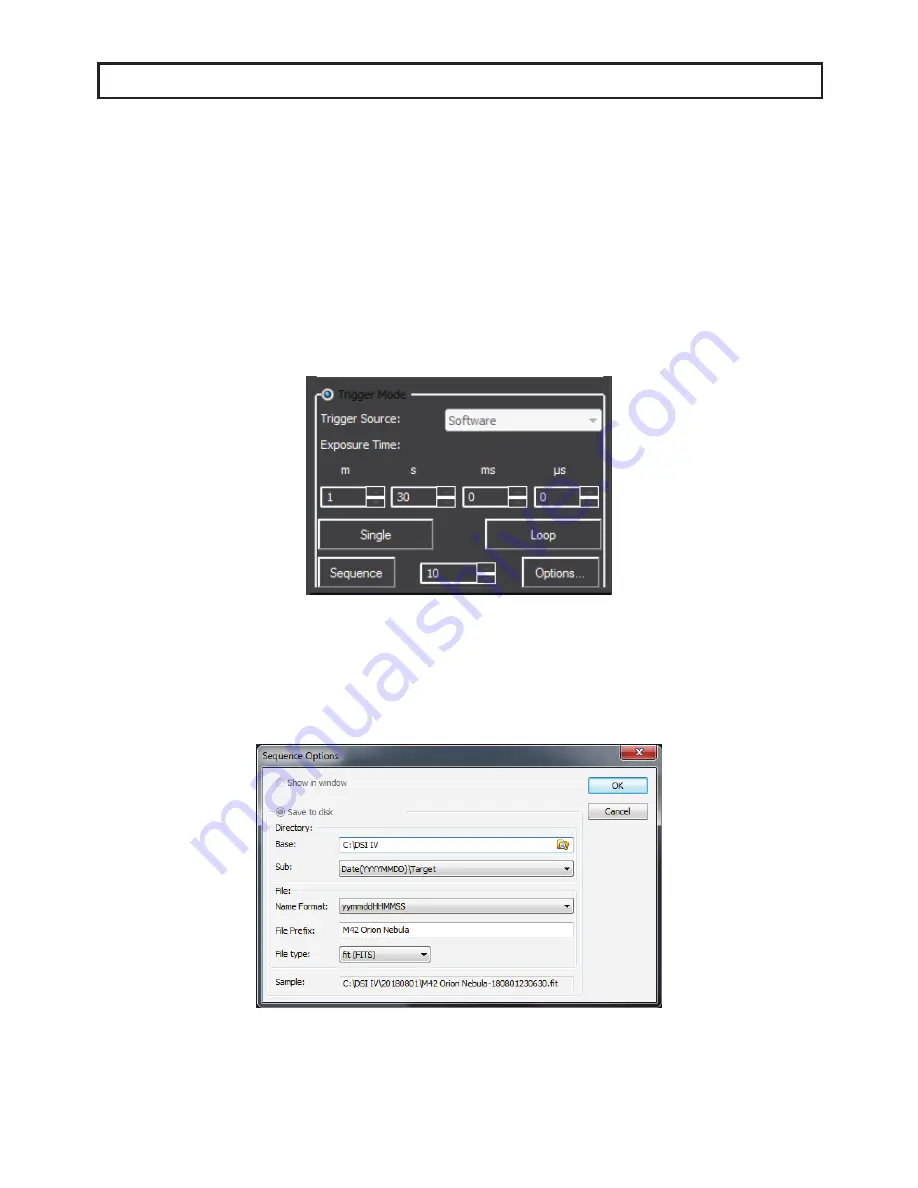
1. Select “Trigger Mode” on the menu bar on the left hand side of SkyCapture. This will stop capturing live 
video. If you have not already done so, your object should be centered and focused.  

2. Enter the desired exposure time for the deep sky object you wish to capture. If the TEC is on, you can 
extend the exposure to several minutes to capture faint details. Enter the exposure time in “m” Minutes, 
“s”, seconds, “ms” Milliseconds, and µs “Microseconds”. You do not typically have to specify the expo-
sure time any more finite than seconds unless your imaging project requires it.  

3. Enter the number of exposures you wish to capture next to the “Sequence” button. The more exposures 
you capture to stack later on, the better. Consider a practical limit depending on how much time you wish 
to spend on your deep sky target.   

4. Click “Options”. Enter the save path on your PC to save the images.  

5. Click Sequence and SkyCapture will automatically run through the sequence of images with your speci-
fied exposure time.  

Содержание Deep Sky Imager Color IV Series

Страница 1: ...Deep Sky Imager IV Series Quick Start Guide 633001 DSI IV Color 633002 DSI IV Monochrome...

Страница 2: ...is recommended for fastest download speed and video frame rate CD ROM drive or connection to the internet is required to install the software and drivers Compatible Operating Systems Windows XP 32 bi...

Страница 3: ...ry ASCOM Drivers Many third party software uses the ASCOM platform to interface with cameras and telescope equipment If auto guiding imaging in RAW format or wanting plug and play compatibility with t...

Страница 4: ...4...

Страница 5: ...on found on the CD ROM startup screen Follow the on screen instructions to complete the installation Connecting the Camera 1 Connect the Meade DSI IV to the computer using the included USB cable Wait...

Страница 6: ...suggest first selecting a bright target such as the Moon or star cluster to more easily acquire your first target You can adjust the Gain and Exposure Time slider bars to get the brightness to the des...

Страница 7: ...ing to Options Preferences under the Record tab The default recording file format is SER You can switch to AVI in the Preferences screen which is found under the Options tab at the top of the screen V...

Страница 8: ...one so This is used to power the TEC 2 Locate the Bit Depth menu on the left menu bar of SkyCapture and Select 12 Bits This setting captures all of the available information from the camera which is r...

Страница 9: ...and focused 2 Enter the desired exposure time for the deep sky object you wish to capture If the TEC is on you can extend the exposure to several minutes to capture faint details Enter the exposure t...

Страница 10: ...Party Software Example using PHD2 software Select Windows WDM style webcam camera in the camera selection drop list box and click Connect button Choose MeadeCam in the pop up Camera choice box Choose...

Страница 11: ...11 Go back to the main interface and click the loop button to start the exposure as the following...

Страница 12: ...m DL and click the Camera Control Window Icon Click the Setup Camera button in the pop up Camera Control Window Select ASCOM and click the Advanced button NOTE Do not select the Meade DSI camera model...

Страница 13: ...SCOM Meadecam Driver in the drop list box and click the Properties button Adjust the camera settings as appropriate or use the default settings then click OK Click the Connect button to accomplish the...

Страница 14: ...d click the Camera Control Window Icon Select the Video DS in the pop up dialog and click OK Click the Setup Camera button in the pop up Camera Control Window NOTE Do not select the Meade DSI camera m...

Страница 15: ...15 Click Connect to start the video...

Страница 16: ...16 Using the ASCOM Driver in SharpCap Select ASCOM Meadecam item in the ASCOM cameras section of the Cameras menu Change settings or not and click OK to start the video...

Страница 17: ...17 Using the DirectShow Driver in SharpCap Select MeadeCam item in the DirectShow cameras section of the Cameras menu to start the video...

Страница 18: ...body so that it s finger tight Ensure that the rubber O ring on the desiccant plug is in place to form a seal The desiccant plug may occasionally need to be removed and dried out to keep the inside o...

Отзывы: