15
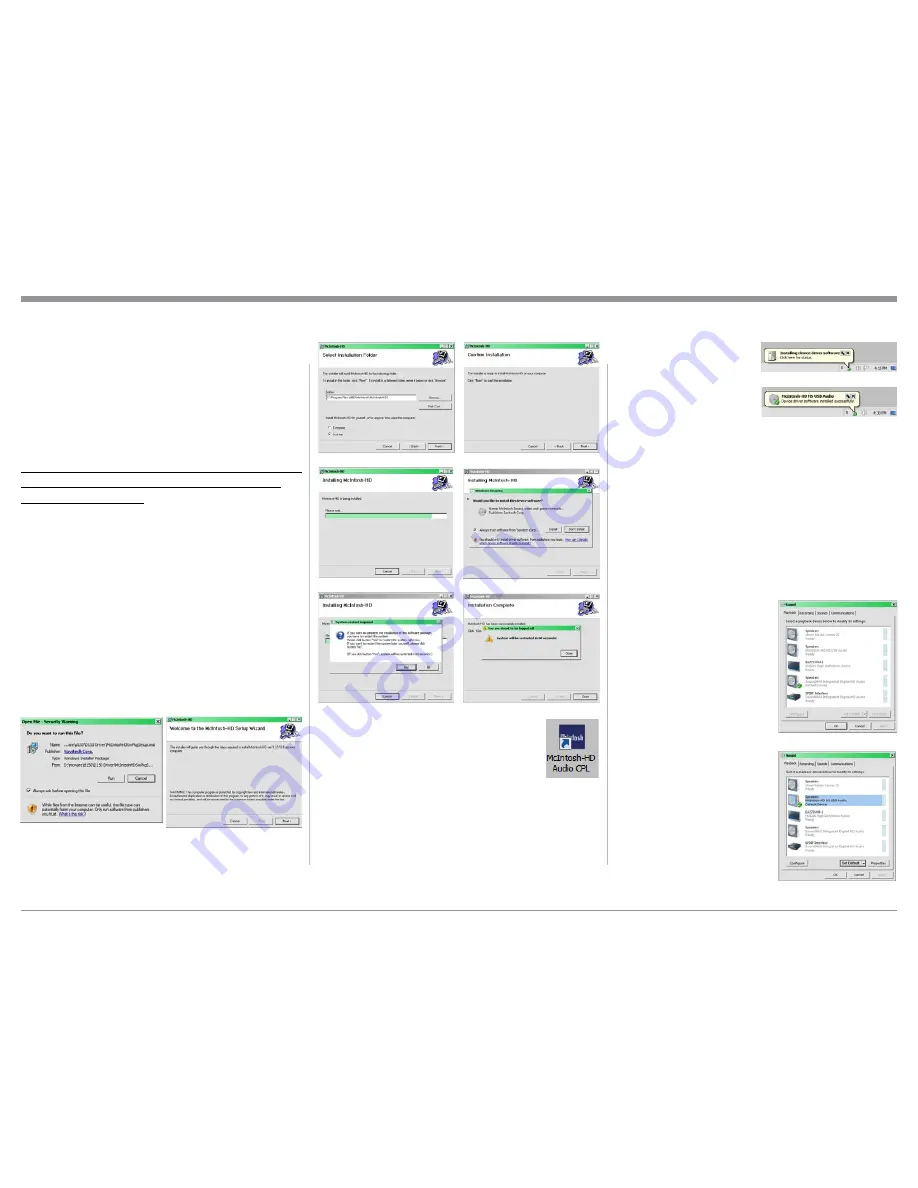
After rebooting, a McIntosh-HD icon
will appear on the desktop. Refer to
figure 79.
USB Connection
Connect the USB Cable with Type A to Type B con-
nectors between the PC Computer and the McIntosh
Product with the USB-Digital Audio Input. An Icon
will appear On-Screen indicating Windows has found
Requirements:
1. A PC Computer with a
functioning
USB Port.
2. Windows 7 (SP1 or greater) or
Windows 8 (8.1) Operating System.
3. An USB Cable with Type A to
Type B Connectors.
Installing the Software
It is important to first install the downloaded software
on your computer before connecting the McIntosh
Product to the computer. The USB Driver is included
in the downloaded software package.
Note: Before installing this software, please check to see
if the McIntosh Product(s) with the USB-Digital
Audio Input has the latest firmware version, if not
update the firmware first.
1. Unzip the downloaded McIntosh Windows USB
Driver Software Package.
2. Run
“McIntoshHDSwPkgSetup.msi”
. Refer to fig-
ures 71 thru 76.
3. When the Windows Security window appears
check the
Always trust software from “Savitech
Corp.”
box and then the Install button. When the
software has been installed it is necessary to re-
boot the computer. Refer to figures 76 thru 79.
How to Operate the D150
new hardware. Refer to
figure 80.
Upon completion of in-
stalling the driver, figure
81 will appear.
Windows Sound Settings
For proper operation of the McIntosh Product via the
Computer USB Connection, it is required to make
changes to Windows Sound Settings:
1. From the Windows START button, click on
“CONTROL PANEL” followed by selecting
“SOUND”. Refer to figure 82.
2. Referring to figure 83, first select “McIntosh-
HD HS USB Audio” and than click on the “Set
Default” button.
Notes: 1. When the McIntosh USB Audio Product is
not connected
to your comput-
er, the previous
default Audio
Device will be
selected.
2. If other McIn-
tosh Products
with USB Audio
Connections are
also connected
to the computer,
an additional
“McIntosh USB
Audio” play-
back device will
appear in the
listing. Make
sure to select the
Figure 71
Figure 72
Figure 73
Figure 74
Figure 75
Figure 76
Figure 77
Figure 78
Figure 79
Figure 80
Figure 81
Figure 82
Figure 83


