background image

14

11.

 When the dryer has been running for 5 minutes, open the 

dryer door and feel for heat. If you feel heat, cancel cycle and 

close the door.

If you do not feel heat, turn off dryer, and check the 

following:

There may be 2 household fuses or circuit breakers for 


the dryer. Check that both fuses are intact and tight, or 

that both circuit breakers have not tripped. If there is still 

no heat, contact a qualified technician.

noTE:

 You may notice an odor when the dryer is first heated. 

This odor is common when the heating element is first used.  

The odor will go away.

Reverse Door Swing (optional)

You can change your door swing from a right-side opening to a 

left-side opening, if desired.

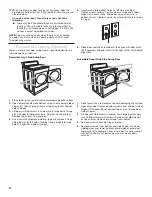
Reversible large Side-Swing Door

A

B

C

D

1.

  Place towel (A) on top of dryer to avoid damaging the surface.

2.

  Open dryer door. Remove bottom screws from cabinet side of 

hinges (C). Loosen (do not remove) top screws from cabinet 

side of hinges.

3.

  Lift door until top screws in cabinet are in large part of hinge 

slot. Pull door forward off screws. Set door on top of dryer. 

Remove top screws from cabinet.

4.

  Use a small, flat-blade screwdriver to gently remove 4 hinge 

hole plugs (D) on left side of cabinet. Insert plugs into hinge 

holes on right-hand side of cabinet.

5.

  Insert screws into bottom holes on left side of cabinet. 

Tighten screws halfway. Position door so large end of door 

hinge slot is over screws. Slide door up so screws are in 

bottom of slots. Tighten screws. Insert and tighten top screws 

in hinges.

6.

  Close door and check that door strike aligns with door catch 

(B). If needed, slide door catch left or right within slot to adjust 

alignment.

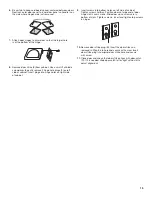
Reversible Super Wide Side-Swing Door

A

C

B

D

F

E

1.

  Place towel (A) on top of dryer to avoid damaging the surface.

2.

  Open dryer door. Remove bottom screws from cabinet side of 

hinges (D). Loosen (do not remove) top screws from cabinet 

side of hinges.

3.

  Lift door until top screws in cabinet are in large part of hinge 

slot. Pull door forward off screws. Set door (handle side up) 

on top of dryer. Remove top screws from cabinet.

4.

  Remove screws attaching hinges to door.

5.

  Remove screws at top, bottom, and side of door (4 screws). 

Holding door over towel on dryer, grasp sides of outer door 

and gently lift to separate it from inner door. Do not pry apart 

with putty knife. Do not pull on door seal or plastic door 

catches.

Содержание Centennial MEDC500

Страница 1: ...m 13 Level Dryer 14 Connect Vent 14 Complete Installation 14 Reverse Door Swing Optional 14 Electric Dryer Installation Instructions 29 Wide Models U S A Only Para obtener acceso al manual de uso y cuidado en español o para obtener información adicional acerca de su producto visite www whirlpool com Tenga listo su número de modelo completo Puede encontrar el número de modelo y de serie dentro de l...

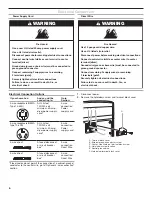
Страница 2: ...instructions are not followed Your safety and the safety of others are very important We have provided many important safety messages in this manual and on your appliance Always read and obey all safety messages This is the safety alert symbol This symbol alerts you to potential hazards that can kill or hurt you and others All safety messages will follow the safety alert symbol and either the word...

Страница 3: ... supply cord rated 120 240 volt minimum The cord should be type SRD or SRDT and be at least 4 ft 1 22 m long The wires that connect to the dryer must end in ring terminals or spade terminals with upturned ends A UL listed strain relief Location Requirements You will need A location allowing for proper exhaust installation See Venting Requirements A separate 30 amp circuit If you are using power su...

Страница 4: ...his dryer is suitable for mobile home installations The installation must conform to the Manufactured Home Construction and Safety Standard Title 24 CFR Part 3280 formerly the Federal Standard for Mobile Home Construction and Safety Title 24 HUD Part 280 Mobile home installations require Metal exhaust system hardware which is available for purchase from your dealer Special provisions must be made ...

Страница 5: ...he terminal block the dryer cabinet is isolated from the neutral conductor A 4 wire power supply connection must be used when the dryer is installed in a location where grounding through the neutral conductor is prohibited Grounding through the neutral is prohibited for 1 new branch circuit installations 2 mobile homes 3 recreational vehicles and 4 areas where local codes prohibit grounding throug...

Страница 6: ...s gold Securely tighten all electrical connections Failure to do so can result in death fire or electrical shock Electrical Connection Options If your home has And you will be connecting to Go to Section 4 wire receptacle NEMA Type 14 30R A UL listed 120 240 volt minimum 30 amp dryer power supply cord 4 wire connection Power supply cord 3 wire receptacle NEMA type 10 30R A UL listed 120 240 volt m...

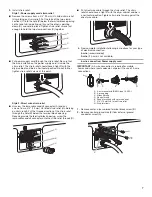
Страница 7: ...strain relief Put the threaded section of the strain relief through the hole B below the terminal block opening Reaching inside the terminal block opening screw the removable conduit connector onto the strain relief threads C A B C Put direct wire cable through the strain relief The strain relief should have a tight fit with the dryer cabinet and be in a horizontal position Tighten strain relief s...

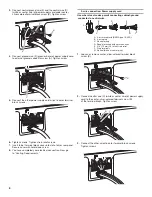
Страница 8: ...own screw 8 You have completed your electrical connection Now go to Venting Requirements 3 wire connection Power supply cord Use where local codes permit connecting cabinet ground conductor to neutral wire A B D C E F G A 3 wire receptacle NEMA type 10 30R B 3 wire plug C Neutral prong D Spade terminals with upturned ends E 3 4 19 mm UL listed strain relief F Ring terminals G Neutral white or cent...

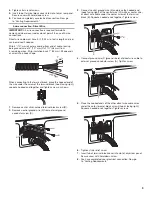
Страница 9: ...rew of the terminal block hook facing right squeeze hooked end together and tighten screw as shown 1 Remove center silver colored terminal block screw B 2 Remove neutral ground wire E from external ground conductor screw A E A B 3 Connect neutral ground wire E and place the hooked end hook facing right of the neutral wire C white or center wire of direct wire cable under the center screw of the te...

Страница 10: ...ew B hook facing right Squeeze hooked end together Tighten screw C B 3 Place the hooked ends of the other direct wire cable wires under the outer terminal block screws hooks facing right Squeeze hooked ends together Tighten screws 4 Tighten strain relief screw 5 Insert tab of terminal block cover into slot of dryer rear panel Secure cover with hold down screw 6 You have completed your electrical c...

Страница 11: ...g the toll free number listed on the cover of the Dryer User Instructions For more information see the Assistance or Service section of the Dryer User Instructions Rigid metal vent For best drying performance rigid metal vents are recommended Rigid metal vent is recommended to avoid crushing and kinking Flexible metal vent Flexible metal vents are acceptable only if accessible for cleaning Flexibl...

Страница 12: ...nstallations are possible A B B C D E F G H A Dryer E Clamps B Elbow F Rigid metal or flexible metal vent C Wall G Vent length necessary to connect elbows D Exhaust hood H Exhaust outlet Standard exhaust installation with rigid metal vent Alternate installations for close clearances Venting systems come in many varieties Select the type best for your installation Two close clearance installations ...

Страница 13: ...t and tight or circuit breaker has not tripped Dryer door is closed Determine vent path Select the route that will provide straightest and most direct path outdoors Plan the installation to use the fewest number of elbows and turns When using elbows or making turns allow as much room as possible Bend vent gradually to avoid kinking Use as few 90 turns as possible Determine vent length and elbows n...

Страница 14: ...rom cabinet 4 Use a small flat blade screwdriver to gently remove 4 hinge hole plugs D on left side of cabinet Insert plugs into hinge holes on right hand side of cabinet 5 Insert screws into bottom holes on left side of cabinet Tighten screws halfway Position door so large end of door hinge slot is over screws Slide door up so screws are in bottom of slots Tighten screws Insert and tighten top sc...

Страница 15: ...hinge holes on right side of cabinet 9 Insert screws into bottom holes on left side of cabinet Tighten screws halfway Position door so large end of door hinge slot is over screws Slide door up so screws are in bottom of slots Tighten screws Insert and tighten top screws in hinges 10 Remove door strike plug B Insert the door strike you removed in Step 8 into hole and secure with screw Insert door s...

Страница 16: ...16 W10300459A W10296137A SP 2009 12 09 All rights reserved Printed in U S A ...

Отзывы: