background image

Installation and Operational Instructions for 
EAS

®

-Compact

®

 overload clutch, 


Type 49_._ _4._  Sizes 4 and 5


(B.4.14.6.GB)


25/01/2013 GC/NH/GH/SU  

Chr. Mayr GmbH + Co. KG 

Tel.: +49 8341 804-0


Eichenstraße 1 

Fax: +49 8341 804-421 


D-87665 Mauerstetten 

www.mayr.com 

Page 

11

 of 

21


Germany 

E-Mail: 

[email protected]


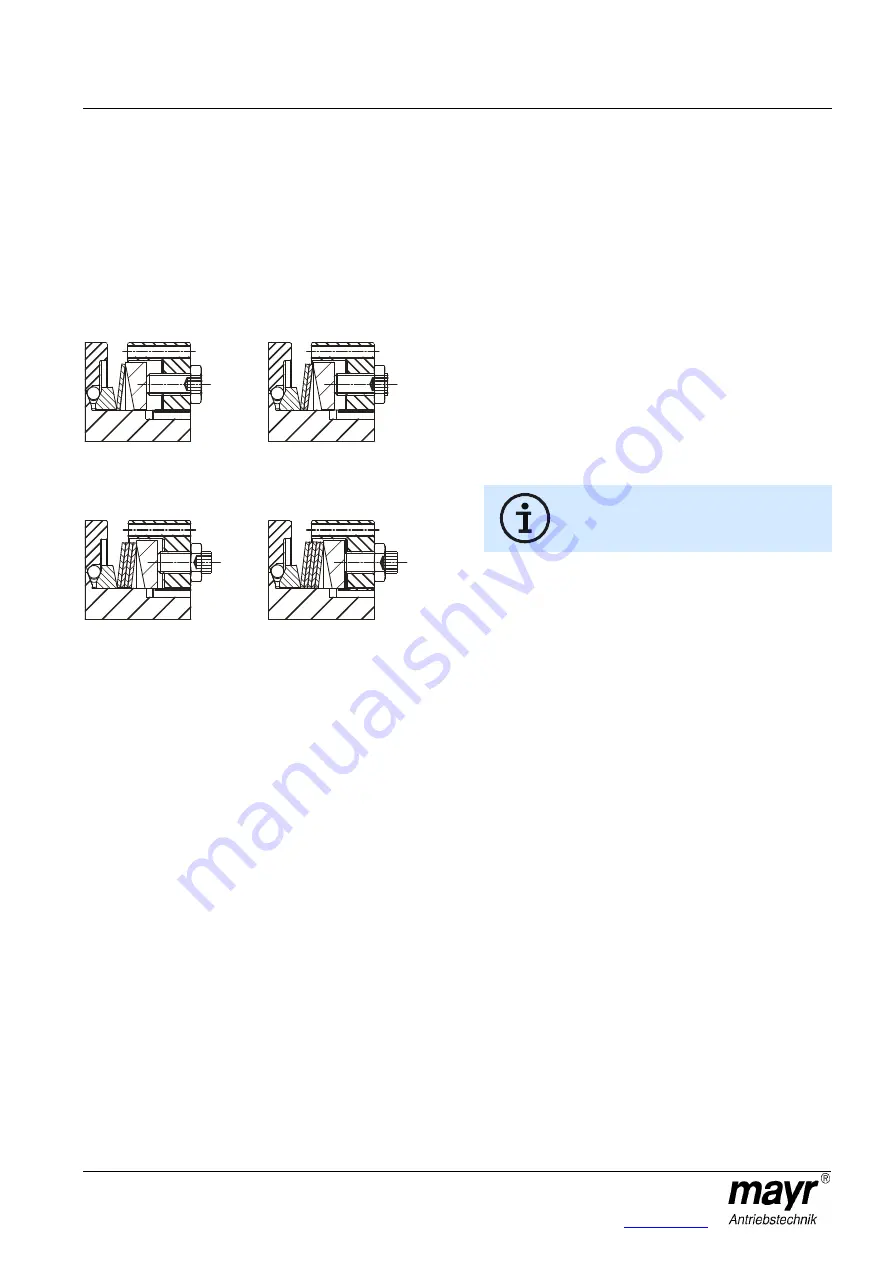
Cup Spring Layering (Fig. 12) 

Correct cup spring layering is a prerequisite for problem-free 
clutch function and torque adjustment. 

For the lower torque range, 

one

 cup spring  

(Type 49_.

5

_ 4._),  

for the medium torque range, 

two

 cup springs  

(Type 49_.

6

_ 4._),  

for the high torque range, 

four 

cup springs  

(Type 49_.

7

_ 4._) 

and for the maximum torque range  

five 

cup springs (Type 49_.

8

_ 4._) are installed. 


1x layered 

2x layered 


Type 49_.5_4._ 

Type 49_.6_4._ 


4x layered 

5x layered 


Type 49_.7_4._ 

Type 49_.8_4._ 


Fig. 12 


Mounting onto the Shaft 

EAS

®

-Compact

®

 clutches include cone bushings or keyways as 

part of the standard delivery. 

Please observe the following when mounting cone 
bushings: 

  Shaft tolerances from h8 to k6 are permitted. 

  Shaft surface: finely turned or ground  

(Ra = 0,8 µm) 

  Shaft material: yield point at least 400 N/mm

2

,  

e.g. St 60, St 70, C 45, C 60. 

  Degrease or remove preservation layers on the shafts and 

bores before installing the clutch. 


Greasy or oily bores or shafts do not transmit the 
torques defined in the catalogue.


  Mount the clutch or clutch hubs onto both shaft ends using a 

suitable device and bring it / them into the correct position. 

  Tighten the tensioning screws (Item 14) in 2 steps cross-

wise and then in 3 to max. 6 tightening sequences evenly 
using a torque wrench to the torque stated in Table 2. 

  The transmittable torques of the shaft-hub connection are 

dependent on the bore diameter and the quality of the drive 
shafts used. Please observe the respective transmission 
tables in the valid and applicable product catalogue. 


The clutch or the clutch hub carries out an axial 
movement in the direction of the cone bushing 
(13) when tightening the cone bushing (13). 


De-installation 

In the cone bushing (13), tapped extracting holes are located 
next to the tensioning screws (14). 

1)  Loosen all tensioning screws (14). 

2)  Screw out the tensioning screws (14) located next to the 

tapped extracting holes and screw them into the tapped 
extracting holes up to their limits.  
Then tighten these screws until the tensioning connection 
loosens. 


Содержание EAS-Compact

Страница 1: ...rigid Type 496 _ _ 4 2 Clutch Illustrations Parts List Page 7 Technical Data Page 8 Technical Data Page 9 Design State of Delivery Function Re engagement General Installation Guidelines Page 10 Instal...

Страница 2: ...on this product is not suitable for use in areas where there is a high danger of explosion This statement is based on the ATEX directive CAUTION If the EAS clutches are modified If the relevant standa...

Страница 3: ...g Item Name 1 Hub 2 Pressure flange 3 Thrust washer 4 Thrust ring FRSH 5 Thrust ring 6 Steel ball 7 Adjusting nut 7 1 Set screw 7 2 Set screw 7 3 Hexagon nut 8 Deep groove ball bearing 9 Locking ring...

Страница 4: ...yway Only use mayr original parts EAS side Keyway Item Name 1 Hub 2 Pressure flange 3 Thrust washer 4 Thrust ring FRSH 5 Thrust ring 6 Steel ball 7 Adjusting nut 7 1 Set screw 7 2 Set screw 7 3 Hexago...

Страница 5: ...List Only use mayr original parts Item Name 1 Hub 2 Pressure flange 3 Thrust washer 4 Thrust ring FRSH 5 Thrust ring 6 Steel ball 7 Adjusting nut 7 1 Set screw 7 2 Set screw 7 3 Hexagon nut 8 Deep gr...

Страница 6: ...nut 8 Deep groove ball bearing 9 Locking ring 10 Steel ball 11 Cup spring 12 Locking ring 13 Cone bushing 14 Hexagon head screw 15 Adjustment table 16 Type tag 17 Limit switch 18 Cap screw 19 Flange...

Страница 7: ...8 25 5000 7500 50 5 8 x M12 20 3 x M8 71 7700 11500 70 1 Torques which put strain on the deep groove ball bearings due to the non centric axial forces having an effect on the pressure flange Table 3 S...

Страница 8: ...2 Elastomeric element Pb 82 Sh A Axial Ka mm Radial Kr mm Angular Kw TKN Nm TK max Nm TKN Nm TK max Nm 5 2400 4800 3700 8650 2 0 3 0 07 Table 8 Size Torsionally rigid shaft misalignment compensation c...

Страница 9: ...tor shaft via the EAS Compact overload clutch pressure flange 2 If the set limit torque overload is exceeded the clutch disengages The input and the output are separated residual torque free An instal...

Страница 10: ...itional bearing for the output element is not necessary No appreciable axial forces see Table 2 should be transferred from the output element onto the clutch pressure flange 2 On very small diameters...

Страница 11: ...ft material yield point at least 400 N mm2 e g St 60 St 70 C 45 C 60 Degrease or remove preservation layers on the shafts and bores before installing the clutch Greasy or oily bores or shafts do not t...

Страница 12: ...stalled state Please observe the distance dimension E 35 mm see Fig 3 Fig 13 Joining Both Clutch Parts on EAS Compact Type 494 _ _4 2 Size 5 Figs 6 and 7 The flexible intermediate ring 31 is pre tensi...

Страница 13: ...nditions please contact the manufacturers Example Type 496 _ _ 4 2 Size 4 Axial displacement occurrence Ka 0 6 mm equals 40 of the permitted maximum value m Ka max 1 5 mm Angular misalignment in the d...

Страница 14: ...and Fig 20 You should be facing the adjusting nut 7 as shown in Fig 18 Changing the Torque The torque is changed exclusively via the set screws 7 2 and not via the adjusting nut 7 a Loosen all hexagon...

Страница 15: ...imit run out times after overload has taken place a limit switch must be mounted onto the overload clutch The contactless limit switch is to be mounted onto the switching edge of the clutch Fig 21 so...

Страница 16: ...ed can be disposed of under Code No 160214 mixed materials or components under Code No 160216 or can be disposed of by a certified disposal firm All steel components Steel scrap Code No 160117 All alu...

Страница 17: ...pling alignment 3 Tighten the tensioning and clamping screws for axial hub securement to the required torque or tighten the locking set screw and secure it against self loosening using sealing lacquer...

Страница 18: ...her physical changes in the elastomeric element can be excluded The ambient or contact temperatures permitted for the elastomeric element are exceeded see Table 4 1 Set the system out of operation 2 D...

Страница 19: ...stem out of operation 2 Check the balance condition of the system components and correct if necessary 3 Check the coupling parts for wear 4 Check the alignment and correct if necessary Loose connectio...

Страница 20: ...and replace if damaged 4 Insert new elastomeric element mount the coupling parts 5 Check the alignment and correct if necessary 6 Make sure that further physical changes in the elastomeric element ca...

Страница 21: ...and secure it against self loosening using sealing lacquer 4 Check the coupling for wear Disk pack breakage Disk pack breakage due to high load impacts overload 1 Set the system out of operation 2 Di...

Отзывы: