background image

Installation and Operational Instructions for 
EAS

®

-Compact

®

 overload clutch, 


Type 49_._ _4._  Sizes 4 and 5


(B.4.14.6.GB)


25/01/2013 GC/NH/GH/SU  

Chr. Mayr GmbH + Co. KG 

Tel.: +49 8341 804-0


Eichenstraße 1 

Fax: +49 8341 804-421 


D-87665 Mauerstetten 

www.mayr.com 

Page 

9

 of 

21


Germany 

E-Mail: 

[email protected]


Design 

The EAS

®

-Compact

®

 overload clutch is designed as a 

mechanical disengaging overload clutch according to the ball 
detent principle. 


State of Delivery 

The clutch is manufacturer-assembled and set to the torque 
stipulated in the order.   
Unless the customer requests a particular torque setting, the 
clutch will be pre-set to approx. 70 % of the maximum torque. 
The adjusting nut (7) is marked with dimension "a" (70% of the 
maximum torque, see Figs. 1 and 18). 

Please check state of delivery! 


Function 

The clutch protects the drive line from excessively high, 
unpermitted torque impacts which can occur due to unintentional 
blockages. After overload has taken place, the transmitting 
mechanism is completely disconnected. Only the bearing friction 
continues to have an effect.  
This means that no re-engagement impacts or metallic sliding 
movements occur on the clutch torque transmission geometries 
when using this clutch variant.  
When in operation, the set torque is transmitted backlash-free 
onto the output from the motor shaft via the EAS

®

-Compact

®


overload clutch (pressure flange (2)). If the set limit torque 
(overload) is exceeded, the clutch disengages. The input and the 
output are separated residual torque-free.  
An installed limit switch registers the disengagement movement 
and switches off the drive.  

After-acting masses can run free

.


CAUTION 

The clutch has no load-holding function after 
overload occurrence! 


Re-engagement 


Re-engagement must only take place when the 
device is not running or at low differential 
speeds (< 10 rpm). 

 
EAS

®

-Compact

®

 overload clutch re-engagement is carried out by 

applying axial pressure to the thrust washer (3).  
For this, the following procedures are possible: 


By evenly screwing three screws M8 (not included in 
delivery) into the adjusting nut (7). 

CAUTION 

After re-engagement has taken place, the three 
hexagon head screws must be removed 
immediately, as they could stop the clutch 
functioning (blockage). 


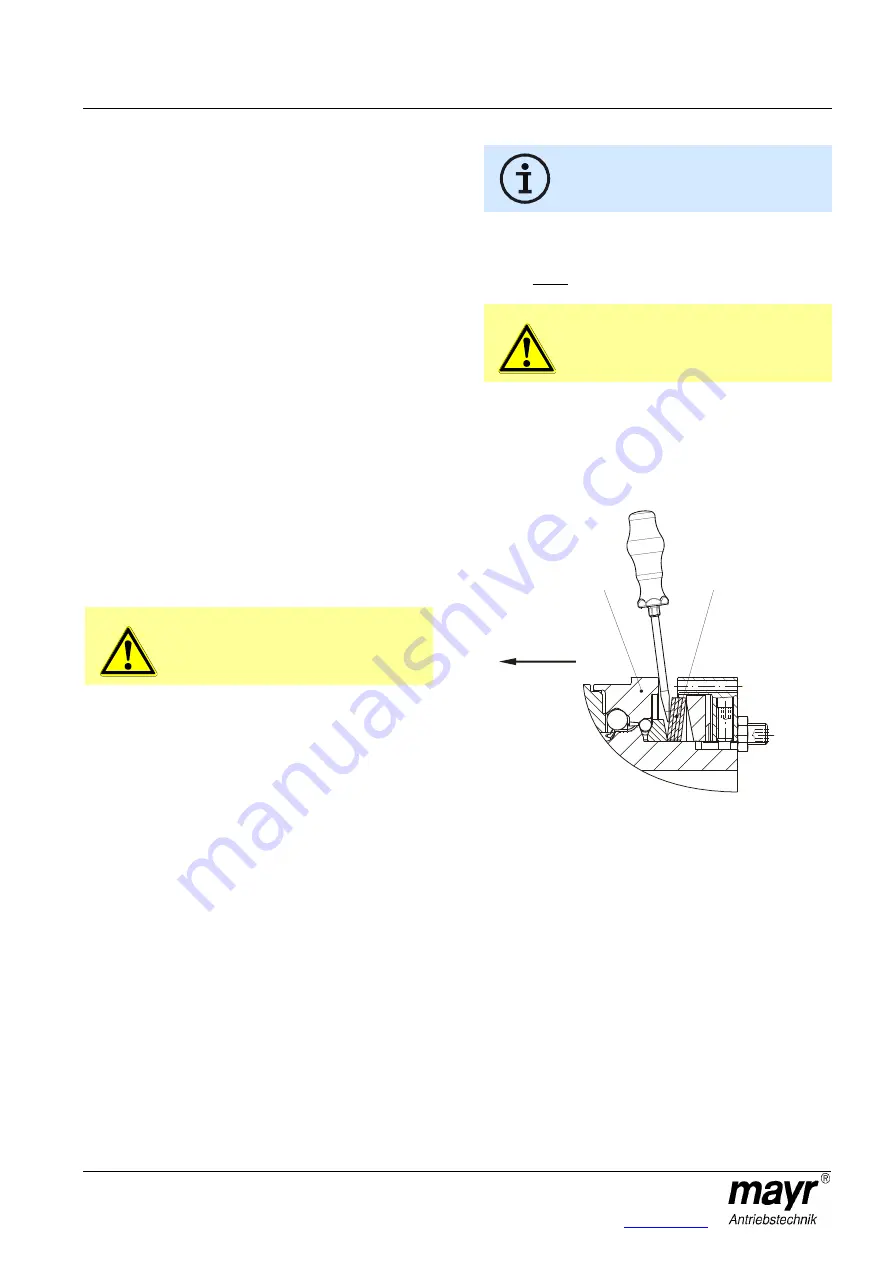
By using two screwdrivers, applied opposite each other 
and supported by the cup springs (11), see Fig. 10. 


By using an engagement mechanism.  
The engagement procedure can also be automated using 
pneumatic or hydraulic cylinders. 

On all variants, it may be necessary to turn between the clutch 
input and output sides slightly. 


Fig. 10 


General Installation Guidelines 

As a standard, the bores in the hubs (1, 23, 26, 32, 36, 39) are 
produced with H7 tolerances, the bores in the clamping hubs  
(21) with F7 tolerances.  
The surface roughness depth in the bores is produced with  
Ra = 1,6 µm. 


11

3

Re-engagement 

direction


Содержание EAS-Compact

Страница 1: ...rigid Type 496 _ _ 4 2 Clutch Illustrations Parts List Page 7 Technical Data Page 8 Technical Data Page 9 Design State of Delivery Function Re engagement General Installation Guidelines Page 10 Instal...

Страница 2: ...on this product is not suitable for use in areas where there is a high danger of explosion This statement is based on the ATEX directive CAUTION If the EAS clutches are modified If the relevant standa...

Страница 3: ...g Item Name 1 Hub 2 Pressure flange 3 Thrust washer 4 Thrust ring FRSH 5 Thrust ring 6 Steel ball 7 Adjusting nut 7 1 Set screw 7 2 Set screw 7 3 Hexagon nut 8 Deep groove ball bearing 9 Locking ring...

Страница 4: ...yway Only use mayr original parts EAS side Keyway Item Name 1 Hub 2 Pressure flange 3 Thrust washer 4 Thrust ring FRSH 5 Thrust ring 6 Steel ball 7 Adjusting nut 7 1 Set screw 7 2 Set screw 7 3 Hexago...

Страница 5: ...List Only use mayr original parts Item Name 1 Hub 2 Pressure flange 3 Thrust washer 4 Thrust ring FRSH 5 Thrust ring 6 Steel ball 7 Adjusting nut 7 1 Set screw 7 2 Set screw 7 3 Hexagon nut 8 Deep gr...

Страница 6: ...nut 8 Deep groove ball bearing 9 Locking ring 10 Steel ball 11 Cup spring 12 Locking ring 13 Cone bushing 14 Hexagon head screw 15 Adjustment table 16 Type tag 17 Limit switch 18 Cap screw 19 Flange...

Страница 7: ...8 25 5000 7500 50 5 8 x M12 20 3 x M8 71 7700 11500 70 1 Torques which put strain on the deep groove ball bearings due to the non centric axial forces having an effect on the pressure flange Table 3 S...

Страница 8: ...2 Elastomeric element Pb 82 Sh A Axial Ka mm Radial Kr mm Angular Kw TKN Nm TK max Nm TKN Nm TK max Nm 5 2400 4800 3700 8650 2 0 3 0 07 Table 8 Size Torsionally rigid shaft misalignment compensation c...

Страница 9: ...tor shaft via the EAS Compact overload clutch pressure flange 2 If the set limit torque overload is exceeded the clutch disengages The input and the output are separated residual torque free An instal...

Страница 10: ...itional bearing for the output element is not necessary No appreciable axial forces see Table 2 should be transferred from the output element onto the clutch pressure flange 2 On very small diameters...

Страница 11: ...ft material yield point at least 400 N mm2 e g St 60 St 70 C 45 C 60 Degrease or remove preservation layers on the shafts and bores before installing the clutch Greasy or oily bores or shafts do not t...

Страница 12: ...stalled state Please observe the distance dimension E 35 mm see Fig 3 Fig 13 Joining Both Clutch Parts on EAS Compact Type 494 _ _4 2 Size 5 Figs 6 and 7 The flexible intermediate ring 31 is pre tensi...

Страница 13: ...nditions please contact the manufacturers Example Type 496 _ _ 4 2 Size 4 Axial displacement occurrence Ka 0 6 mm equals 40 of the permitted maximum value m Ka max 1 5 mm Angular misalignment in the d...

Страница 14: ...and Fig 20 You should be facing the adjusting nut 7 as shown in Fig 18 Changing the Torque The torque is changed exclusively via the set screws 7 2 and not via the adjusting nut 7 a Loosen all hexagon...

Страница 15: ...imit run out times after overload has taken place a limit switch must be mounted onto the overload clutch The contactless limit switch is to be mounted onto the switching edge of the clutch Fig 21 so...

Страница 16: ...ed can be disposed of under Code No 160214 mixed materials or components under Code No 160216 or can be disposed of by a certified disposal firm All steel components Steel scrap Code No 160117 All alu...

Страница 17: ...pling alignment 3 Tighten the tensioning and clamping screws for axial hub securement to the required torque or tighten the locking set screw and secure it against self loosening using sealing lacquer...

Страница 18: ...her physical changes in the elastomeric element can be excluded The ambient or contact temperatures permitted for the elastomeric element are exceeded see Table 4 1 Set the system out of operation 2 D...

Страница 19: ...stem out of operation 2 Check the balance condition of the system components and correct if necessary 3 Check the coupling parts for wear 4 Check the alignment and correct if necessary Loose connectio...

Страница 20: ...and replace if damaged 4 Insert new elastomeric element mount the coupling parts 5 Check the alignment and correct if necessary 6 Make sure that further physical changes in the elastomeric element ca...

Страница 21: ...and secure it against self loosening using sealing lacquer 4 Check the coupling for wear Disk pack breakage Disk pack breakage due to high load impacts overload 1 Set the system out of operation 2 Di...

Отзывы: