Ventamatic, Ltd.
| P.O. Box 728, Mineral Wells, TX 76068 ▪ Phone: (800) 433-1626 ▪ www.MYMAXXAIR.com
7
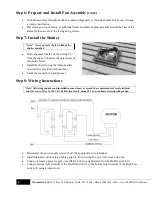
Step 8: Wiring Instructions
(cont.)
•
Connect High speed motor lead (BLACK) to the top right terminal of High/Low switch (HIGH).
•
Connect Low speed motor lead (RED) to the bottom left terminal of High/Low switch (LOW).
•
Connect incoming common wire (WHT) to the common wire (WHITE) from the motor.
•
Connect incoming ground wire (GND) to the grounding screw on each switch (4, 5) and to the ground
screw (GROUND) in the motor box.
•
Manually rotate fan blade to ensure no obstructions before turning on the power to the fan.
Operating Instructions
Whole House Fans cool your home by pulling in fresh, cooler air from outside through open windows and doors.
For best results in a multi-story home, windows should be opened on alternate levels for most efficient cooling.
NEVER operate fan without open windows or doors.
CAUTION:
If your home has a fireplace, be sure that the flue damper is closed to prevent chimney soot
from being drawn into the house by the fan
.
DO NOT operate the fan when a fire is burning in the
fireplace.
Common Installation Issues
Motor Stops after 10-20 Minutes
•
A tight belt tension can cause the unit to overheat.
•
Insufficient intake or exhaust Net Free Air. Open more doors and windows or increase the amount of ventilation in
the attic.
•
Check the bearing assembly for resistance on belt driven models to ensure there are no rough spots.
Unit is Noisy
•
If the unit is considered to be too noisy in general, install the additional frame between the fan and mounting frame.
•
Large fans will make noise while operating. Moving the fan further into the attic will reduce the apparent noise.
Make sure you still have 36” of clearance to the roof.
•
Make sure all screws and bolts are tightened.
•
Ensure enough clearance above the unit, minimum of 36” from fan blades to roof.
•
Verify Exhaust NFA. Inadequate NFA will result in the unit working harder and making more noise.
Not Enough Airflow
•
Verify NFA intake and exhaust requirements are being met. Lack of airflow can be the result of lack of fresh air and
lack of ventilation to expel the air. Try channeling the air by opening only doors and windows in a certain area to
funnel the wind flow.
Shutter is Hitting the Fan
•
Check to make sure there is enough space between the louvers and the fan. There should be around 6”-7 ½” between
the fan blade and the vent.
Fan Does Not Start on Low Speed
•
Verify that the fan will start on High Speed. Switch to Low Speed from the High setting. For additional
troubleshooting, please contact our customer support team.


