background image

PATENTS PENDING

45


11921 Slauson 

A

ve.  Santa Fe Springs, CA.  90670  (800) 227-41

16  F

AX (888) 771-7713

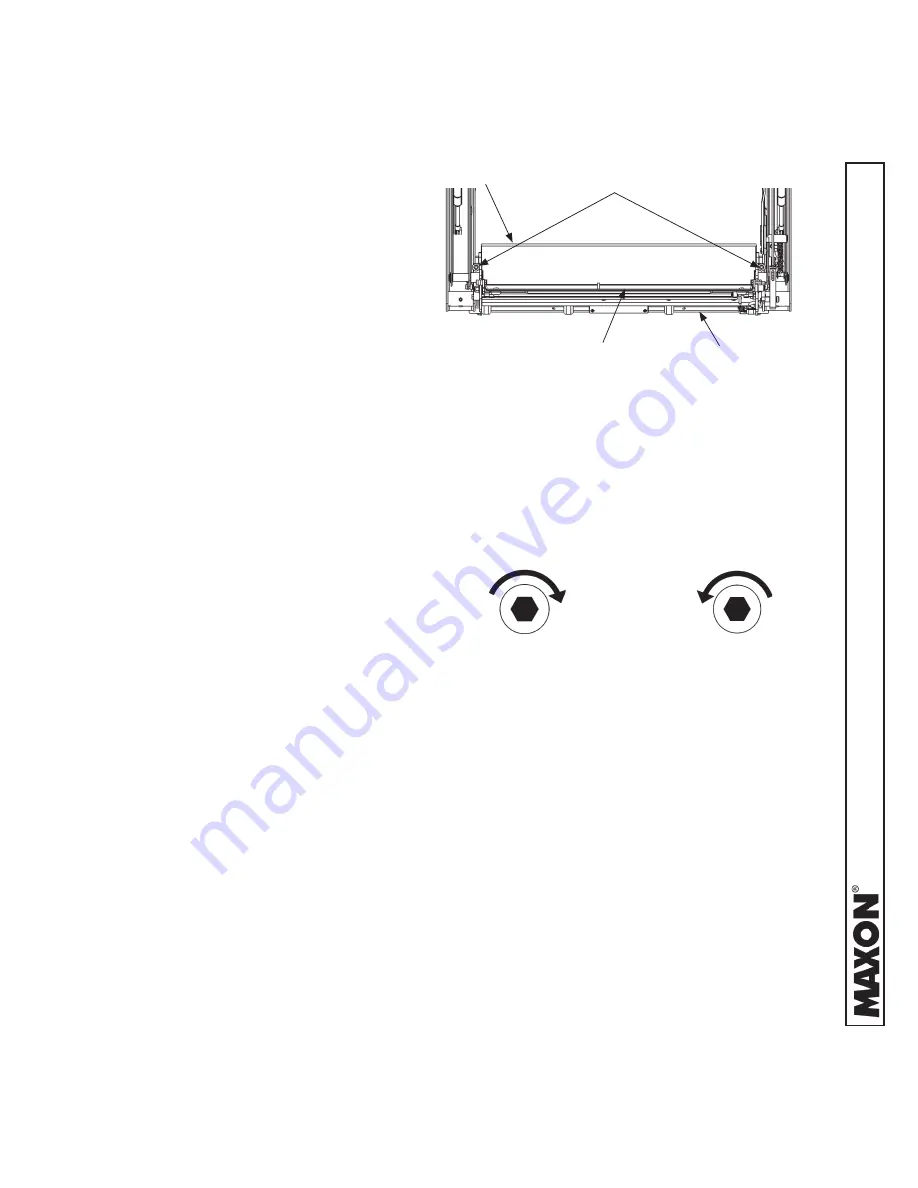
OUTBOARD ROLLSTOP

(REF)

4.

 Manually lower the inboard 

rollstop for access to the ad-
justment screws 

(FIG. 45-1)

To ensure proper leveling, turn 
platform tilt adjustment screws 

(FIG. 45-1)

 an equal amount 

on both sides of platform. Turn 
adjustment screws clockwise 

(FIG. 45-2)

 to tilt the platform 

up or counter-clockwise to tilt 
platform down.        

PLATFORM TILT ADJUSTMENT SCREW

(BACK VIEW OF PLATFORM SHOWN)

FIG. 45-1

PLATFORM TILT ADJUSTMENT SCREWS

FIG. 45-2

CW - PLATFORM 

TILT UP

CCW - PLATFORM 

TILT DOWN

PLATFORM

ADJUSTMENT

SCREW

INBOARD ROLLSTOP

Содержание WL7-vers. C

Страница 1: ...INSTALLATION INSTRUCTIONS FOR MP 06 09 REV A APRIL 2009 WHEELCHAIR LIFT MODEL NO WL7 vers C WL7 vers C 1K MAXON Lift Corp 2009 PATENTS PENDING DOT Public Use Lift FOR INSIDE VEHICLE INSTALLATION ONLY...

Страница 2: ...PATENTS PENDING...

Страница 3: ...PATENTS PENDING THIS PAGE INTENTIONALLY LEFT BLANK...

Страница 4: ...OLLER 19 ANTI SLIP SAFETY STRIPING 20 LIFT INSTALLATION 23 INSTALLATION KITS 23 PREPARING AND POSITIONING THE LIFT 23 USING TEMPLATE TO POSITION LIFT 25 MOUNTING THE LIFT 28 INSTALL MAIN CIRCUIT BREAK...

Страница 5: ...ings CA 90670 800 227 4116 FAX 888 771 7713 OUTBOARD ROLLSTOP TIME ADJUSTMENT IF REQUIRED 50 FLOOR POSITION ADJUSTMENT MANDATORY 52 SYSTEM DIAGRAMS 57 HYDRAULIC SYSTEM DIAGRAM 57 ELECTRICAL SYSTEM DIA...

Страница 6: ...perating instructions contained in the Operator s Manual 3 Comply with all WARNING and instruction decals attached to both the Lift and the ve hicle 4 Keep decals clean and legible If decals are illeg...

Страница 7: ...instruction decals attached to both the Lift and the ve hicle 4 Keep decals clean and legible If decals are illegible or missing free replacement de cals are available from MAXON Lift Corp Customer S...

Страница 8: ...by the Lift are within the limits prescribed by body manufacturer BODY STRENGTH The minimum vehicle requirements for installing the WL7 Wheelchair Lift are described below Installing the Lift in accor...

Страница 9: ...r the applicable interlock electrical connections on the Lift refer to the ELECTRICAL SYSTEM DIAGRAM in this manu al For more information about the interlock connections call Prevent the Lift from dep...

Страница 10: ...TIONS WHEELCHAIR DOOR WIDTH MINIMUM WHEELCHAIR DOOR HEIGHT MINIMUM 30 WIDE PLATFORM RH PUMP 39 56 30 WIDE PLATFORM LH PUMP 33 WIDE PLATFORM RH PUMP 42 33 WIDE PLATFORM LH PUMP 34 WIDE PLATFORM RH PUMP...

Страница 11: ...EL SHOWN FIG 11 1 D C 25 39 18 3 4 TABLE 11 1 13 3 18 9 2 9 1 4 0 5 C D E F MODEL DESCRIPTIONS LIFT WIDTH AT WARNING BEACONS LIFT WIDTH AT HANDRAILS LIFT WIDTH AT BASE PLATE OVERALL LIFT WIDTH INCLUDI...

Страница 12: ...lauson Ave Santa Fe Springs CA 90670 800 227 4116 FAX 888 771 7713 WHEELCHAIR DOOR CLEARANCE FLOOR HEIGHT ON TYPICAL VEHICLE WITH SIDE DOOR FIG 12 1 48 MAX WHEELCHAIR DOOR 18 3 4 APPROX 0 75 MIN VEHIC...

Страница 13: ...4116 FAX 888 771 7713 BODY CLEARANCE POINTS 32 40 42 46 48 FLOOR HEIGHTS FIG 13 1 BASE PLATE OUTBOARD EDGE REF TYPICAL VEHICLE REAR BUMPER BUS GND LVL BUS GND LVL VAN GND LVL 3 75 48 FLOOR LEVEL REF 1...

Страница 14: ...ING 14 11921 Slauson Ave Santa Fe Springs CA 90670 800 227 4116 FAX 888 771 7713 LIFT COMPONENTS TERMINOLOGY INBOARD LEFT OUTBOARD 5 12 3 12 LIFT COMPONENTS SEE TABLE 13 1 FIG 14 1 6 4 10 2 6 7 9 1 8...

Страница 15: ...teel tube and rod pressurized by hydraulic fluid that folds and unfolds the Lift and moves the Lift up and down 7 HYDRAULIC POWER UNIT COVER IS SHOWN Contains motorized hydraulic pump manually operate...

Страница 16: ...4116 FAX 888 771 7713 E mail cservice maxonlift com All WARNING CAUTION and OPERATION de cals provided with Wheelchair Lift must always be in place on the Lift and vehicle see FIG 36 1 and must alway...

Страница 17: ...PATENTS PENDING 17 11921 Slauson Ave Santa Fe Springs CA 90670 800 227 4116 FAX 888 771 7713 DECAL SET P N 268302 01 FIG 17 1 DECALS FOR WL7 vers C...

Страница 18: ...PATENTS PENDING 18 11921 Slauson Ave Santa Fe Springs CA 90670 800 227 4116 FAX 888 771 7713 DECALS AND DECAL PLACEMENT Continued DECAL SET P N 268302 03 FIG 18 1 DECALS FOR WL7 vers C 1K...

Страница 19: ...PATENTS PENDING 19 11921 Slauson Ave Santa Fe Springs CA 90670 800 227 4116 FAX 888 771 7713 SERIAL PLATE P N 905246 8 FIG 19 1 CONTROLLER OVERLAY P N 2667630 01 FIG 19 2 SERIAL PLATE CONTROLLER...

Страница 20: ...TAPE ROLLSTOP P N 096020 13 YELLOW TAPE BOTTOM ROLLSTOP P N 905293 17 YELLOW TAPE INBOARD OUTBOARD P N 905293 13 YELLOW TAPE P N 905293 11 YELLOW TAPE P N 905293 14 YELLOW TAPE OUTBOARD P N 905293 11...

Страница 21: ...SLIP TAPE ROLLSTOP P N 096020 14 YELLOW TAPE BOTTOM ROLLSTOP P N 905293 18 YELLOW TAPE INBOARD OUTBOARD P N 905293 15 YELLOW TAPE P N 905293 11 YELLOW TAPE P N 905293 14 YELLOW TAPE OUTBOARD P N 9052...

Страница 22: ...SLIP TAPE ROLLSTOP P N 096020 15 YELLOW TAPE BOTTOM ROLLSTOP P N 905293 18 YELLOW TAPE INBOARD OUTBOARD P N 905293 15 YELLOW TAPE P N 905293 11 YELLOW TAPE P N 905293 14 YELLOW TAPE OUTBOARD P N 9052...

Страница 23: ...eet included with the installation kit for specific instructions to fit the Lift to your vehicle LIFT INSTALLATION NOTE Keep shipping straps on Lift until Lift is bolted to vehicle and power is connec...

Страница 24: ...the Lift 5 Using an appropriate lifting device that can safely lift 500 pounds raise Lift to the wheelchair doorway Place the Lift inside doorway FIG 24 1 Align outboard edge of Lift threshold plate p...

Страница 25: ...icate template for base plate hole pattern according to the dimensions shown in FIGS 25 1 25 2 26 1 and 26 2 Use a suitable material that maintains correct shape and dimensions BASE PLATE HOLE PATTERN...

Страница 26: ...ta Fe Springs CA 90670 800 227 4116 FAX 888 771 7713 BASE PLATE HOLE PATTERN FOR LIFTS WITH 30 WIDE PLATFORM LH PUMP FIG 26 1 USING TEMPLATE TO POSITION LIFT Continued BASE PLATE HOLE PATTERN FOR LIFT...

Страница 27: ...IR DOOR TOP VIEW SIDE DOOR SHOWN FIG 27 1 CENTER 3 75 VEHICLE BODY CUTAWAY BASE PLATE TEMPLATE HOLE PATTERN 1 2 3 4 9 BACK FRONT 5 6 7 8 10 CAUTION For vehicles with 48 floor height If the front edge...

Страница 28: ...1 2 3 4 9 are required for correct installation Also the 3 front holes should be selected to give a symmetrical bolt pattern i e holes 5 10 8 or holes 6 10 7 3 Temporarily secure Lift to vehicle with...

Страница 29: ...each of the battery as follows Find a place to attach bracket FIG 29 1 Note The power cable must be able to reach between 90 amp circuit breaker and battery terminal without straining the con nections...

Страница 30: ...cable to 90 amp main circuit breaker FIG 30 1 Do not connect battery end until instructed to connect the battery 1 4 20 LOCK NUT 2 PLACES 1 4 FLAT WASHER 2 PLACES BATTERY 2 AWG POWER CABLE SHORT CABL...

Страница 31: ...AUTION ROUTE CONNECT CABLES HAND PENDANT 1 Locate and drill a 1 5 16 hole through the vehicle floor FIG 31 1 Drill the hole in a location that will be hidden by the pump cover and that will allow powe...

Страница 32: ...r and through the grommet and up to the Lift FIG 32 2 If possible use the same cable routing as the long power cable installed in previ ous steps Secure the interlock cable every 8 10 6 Make sure inte...

Страница 33: ...al lug FIG 33 2 VEHICLE FRAME 3 8 LOCK WASHER GROUND CABLE 3 8 16 X 1 LG CAP SCREW 3 8 16 HEX NUT BOLTING GROUND CABLE TO VEHICLE FRAME FIG 33 2 7 Uncoil the ground cable from the bottom of the pump c...

Страница 34: ...with or bind against moving parts CAUTION 10 Connect the hand pendant cable as follows Feed the cable through the hole located in the main frame FIG 34 1 Secure cable strain relief to main frame with...

Страница 35: ...00 227 4116 FAX 888 771 7713 11 Find accessible place on vehicle wall or wheelchair door near Lift to place the hand pendant hanger and cable hook FIG 35 1 TYPICAL LOCATION INSIDE VEHICLE FOR STOWING...

Страница 36: ...in FIG 36 1 Make sure decals are visible to operator when Lift is being operated DECALS AND HAND PENDANT MOUNTING ON VEHICLE FIG 36 1 DOOR HAND PENDANT HANGER MOUNTING CABLE HOOK DECAL A P N 268303 0...

Страница 37: ...TING POWER TO LIFT TYPICAL FIG 37 1 POSITIVE BATTERY TERMINAL SHORT POWER CABLE BOLT NUT 14 Turn ON power ON OFF switch on pump cover to power the Lift FIG 37 2 The POWER light on hand pendant should...

Страница 38: ...s that follow in this manual are completed 17 Install the remaining bolts lock nuts and under vehicle supports supplied with your installation kit Use the instruction sheet Kit item for information to...

Страница 39: ...ines wipe off contaminants that can get in the openings Also protect the openings from accidental contamination 2 If needed add fluid to the reservoir as follows Unbolt the pump cover as shown in FIG...

Страница 40: ...filler cap FIG 40 1 4 Bolt on the pump cover as shown in FIG 39 2 Tighten the 5 16 18 cover screws until snug TABLE 40 1 RECOMMENDED HYDRAULIC FLUID BRAND PART NUMBER ROSEMEAD THS FLUID 17111 EXXON U...

Страница 41: ...PATENTS PENDING 41 11921 Slauson Ave Santa Fe Springs CA 90670 800 227 4116 FAX 888 771 7713 THIS PAGE INTENTIONALLY LEFT BLANK...

Страница 42: ...OWER SWITCH HEIGHT MEASUREMENT RH SIDE SHOWN FIG 42 1B 1 Make sure power switch FIG 42 1A is turned on Lower Lift to the ground FIG 42 1A HEIGHT ADJUSTMENT SCREWS FIG 42 3 3 Set edge of the threshold...

Страница 43: ...r clockwise FIG 43 2 ap proximately 1 1 2 turn Warning alarm and beacons should turn off 5 Step on threshold plate Warning alarm and beacons should activate If the warning alarm and beacons do not act...

Страница 44: ...angle of platform on the ground PLATFORM LOWERED TO GROUND LEVEL FIG 44 2 PLATFORM GROUND LEVEL POWER SWITCH PLATFORM LOWERED TO GROUND LEVEL FIG 44 1 PLATFORM POWER SWITCH GROUND LEVEL 2 Measure dist...

Страница 45: ...proper leveling turn platform tilt adjustment screws FIG 45 1 an equal amount on both sides of platform Turn adjustment screws clockwise FIG 45 2 to tilt the platform up or counter clockwise to tilt...

Страница 46: ...cedure if the Controller reads IBRS SW when Inboard Rollstop is locked in the up position The adjustment is done correctly if the Controller does not read IBRS SW when the Inboard Rollstop is locked i...

Страница 47: ...lockwise until the switch activates with an audible click Then tighten screws 1 and 2 securely 6 Turn ON power switch on pump cover FIG 47 2A Then raise UP the platform to floor level FIG 46 1 Verify...

Страница 48: ...r switch OFF FIG 48 2 HAND PENDANT ENTERING SETUP FIG 48 1 UP FOLD POWER SWITCH TURNING POWER SWITCH ON OFF LH PUMP SHOWN FIG 48 2 CONTROLLER REF 2 Enter SETUP by holding both the UP and FOLD switches...

Страница 49: ...IG 49 3 3 Push and release the FOLD switch FIG 49 1 Con troller should be in the LANGUAGE mode FIG 49 2 UP DOWN 4 Push the UP switch or DOWN switch to change from ENGLISH to SPANISH or from SPANISH to...

Страница 50: ...this adjustment 1 Turn power switch OFF FIG 50 2 HAND PENDANT ENTERING SETUP FIG 50 1 POWER SWITCH TURNING POWER SWITCH ON OFF LH PUMP SHOWN FIG 50 2 CONTROLLER REF 2 Enter SETUP by holding both the...

Страница 51: ...ng FIG 51 2 4 Push the UP switch FIG 51 3 to increase the OUTBD TIME from 7 to 10 Push the DOWN switch FIG 51 3 to decrease the number from 10 to 7 NOTE A larger number for the OUTBD TIME setting allo...

Страница 52: ...1A 2 Inspect the threshold plate The edge of the inboard rollstop should line up with the edge of the base plate as shown in FIG 52 1B EDGE OF INBOARD ROLLSTOP INBOARD ROLLSTOP LINES UP WITH BASE PLA...

Страница 53: ...4 4 Turn power switch OFF FIG 53 3 TURNING POWER SWITCH ON OFF LH PUMP SHOWN FIG 53 3 POWER SWITCH CONTROLLER REF INBOARD ROLLSTOP OVERLAPS EDGE OF BASE PLATE FIG 53 1 INBOARD ROLLSTOP WITH GAP BETWEE...

Страница 54: ...NG SETUP MODE FIG 54 3 5 Enter SETUP by holding both the UP and FOLD switches on the hand pendant FIG 54 1 and turning the power switch ON at the same time FIG 53 3 Controller will read SETUP FIG 54 2...

Страница 55: ...erlap push the UP switch from 1 to 5 times FIG 55 1 The FLOOR POS number displayed on the controller FIG 55 2 will increase by 1 each time you push the UP but ton To close the gap push the DOWN switch...

Страница 56: ...ise the platform to floor level FIG 56 1A Verify that the inboard rollstop lines up with the edge of the base plate as shown in FIG 56 1B If necessary repeat this entire procedure INBOARD ROLLSTOP LIN...

Страница 57: ...7713 HYDRAULIC SYSTEM DIAGRAM SYSTEM DIAGRAMS FIG 57 1 FLOW CONTROL VALVE 5 GPM FLOW CONTROL VALVE 5 GPM 018 DIA S V 2 S V 1 FILLER BREATHER CYLINDER CYLINDER PRESSURE PORT PRESSURE TRANSDUCER MANUAL...

Страница 58: ...PATENTS PENDING 58 11921 Slauson Ave Santa Fe Springs CA 90670 800 227 4116 FAX 888 771 7713 FIG 58 1 ELECTRICAL SYSTEM DIAGRAM SYSTEM DIAGRAMS Continued...

Страница 59: ...is set as required for your vehicle interlock system Use the FOLD button to stow the Lift The Lift controller displays STOWED when Lift is stowed and interlock is working correctly 2 Turn ON power sw...

Страница 60: ...loor level Controller must display FLOOR Platform lights must still be illuminated 11 Make sure platform cannot be folded if occupied Place a 50 pound weight on the platform on the end closest to the...

Страница 61: ......

Отзывы: