Copyright 2016
Page
6
of 14
S161222
6.
Recheck the operation of this model airplane before every flight to ensure that all equipment is still
operating correctly and that the model remains structurally sound. Before every flight, check all electrical,
control and structural connections; do not fly without replacing any that you find damaged or worn.
7.
Before you begin assembly of this model airplane, study all the instructions and test-fit each part to
ensure you fully understand the instructions and that no parts are missing, damaged or unsatisfactory.
Temperature and/or humidity differences between the factory, our warehouse and your home or
workshop may dictate the need for slight adjustments to some mounting surfaces to ensure proper
alignment; we recommend you contact us before attempting any such adjustments.
8.
To help ensure the security of your servo connections, we recommend using optional
Maxford USA servo-extension safety clips as pictured at the right. (For information
about safety clips see
http://www.maxfordusa.com/servoextensionsafetyclip.aspx
9.
Assemble any included or optionally installed
EZ-Link connectors as shown at the far right.
When applying threadlock compound, do
NOT
glue the EZ-Link connector to the control arm
or mounting tab. Also be careful to not let the
pushrod bind against nearby surface.
10.
Use your radio or a servo tester to center your servos before installation. (You may be interested to learn
more about servo testers at
http://www.maxfordusa.com/servo.aspx
11.
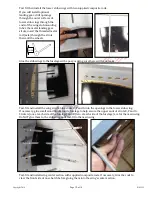
String may be supplied to pull your servo’s leads and/or servo
extensions through the wing; however, you may find it easier to
use masking tape to temporarily attach the connector to the end
of a length of coat hanger wire, then use the wire to pull the lead
through the airframe as shown at the right.
12.
After you determine each wood-screw’s location, drill a small guide hole and apply thin CA adhesive to
harden and strengthen the wood where the screws are to be installed.
13.
If Mylar hides a CA hinge’s slot, find and open the slot by carefully pressing with a fingernail or sharp
hobby knife.
14.
If you are not an experienced ARF assembler or R/C pilot, we strongly urge you to get assistance from an
experienced R/C assembler and pilot.
15.
Apply threadlock compound or CA adhesive to secure hardware from vibration.
16.
Use epoxy to permanently attach and reinforce critical airframe assemblies.
17.
If you have concern about the security of any factory fabrication procedure(s), you may apply extra epoxy
adhesive around the perimeter of such part(s) as a safety precaution.
18.
Production details (such as included hardware items and/or Mylar or paint colors) may vary.
19.
After adjusting a clevis, secure the clevis to its threaded rod with
threadlock compound, epoxy, or CA adhesive.
For additional safety, you may hold the clevis closed by adding a
small piece of tubing (not supplied) as shown at the right.
(NOTE: If included with this model, clevises may be made of plastic or metal.)
20.
Since this model includes some plastic, fiberglass and/or carbon-fiber-reinforced parts, be reminded that
if you ever drill, grind or sand any such part, wear safety goggles, a particle mask and rubber gloves to
guard yourself from eye, skin and respiratory-tract irritation; never blow into such a part as the dust may
blow back into your face.
21.
Periodically check the Mylar covering material’s joints and surfaces; if necessary, carefully use an iron
(do NOT set the iron’s temperature too high) to secure the edges and to tighten any loosened areas.
22.
Our extensive testing has shown the recommended Maxford USA Uranus 28309 motors and
Uranus 25A ESCs may be installed in the Dornier Do X’s nacelles with the LiPo flight batteries
mounted in the nose.
With this one exception, we recommend that you carefully read and consider the
full text of the remaining “IMPORTANT THINGS TO CONSIDER WHEN INSTALLING AND OPERATING
YOUR MODEL AIRPLANE’S ELECTRIC POWER SYSTEM” on the Maxford USA Website at
Clamping bolt
Connector body
Control arm (or tab)
Washer
Mounting nut


