background image

4

4

Building Your Double Trouble

1. 

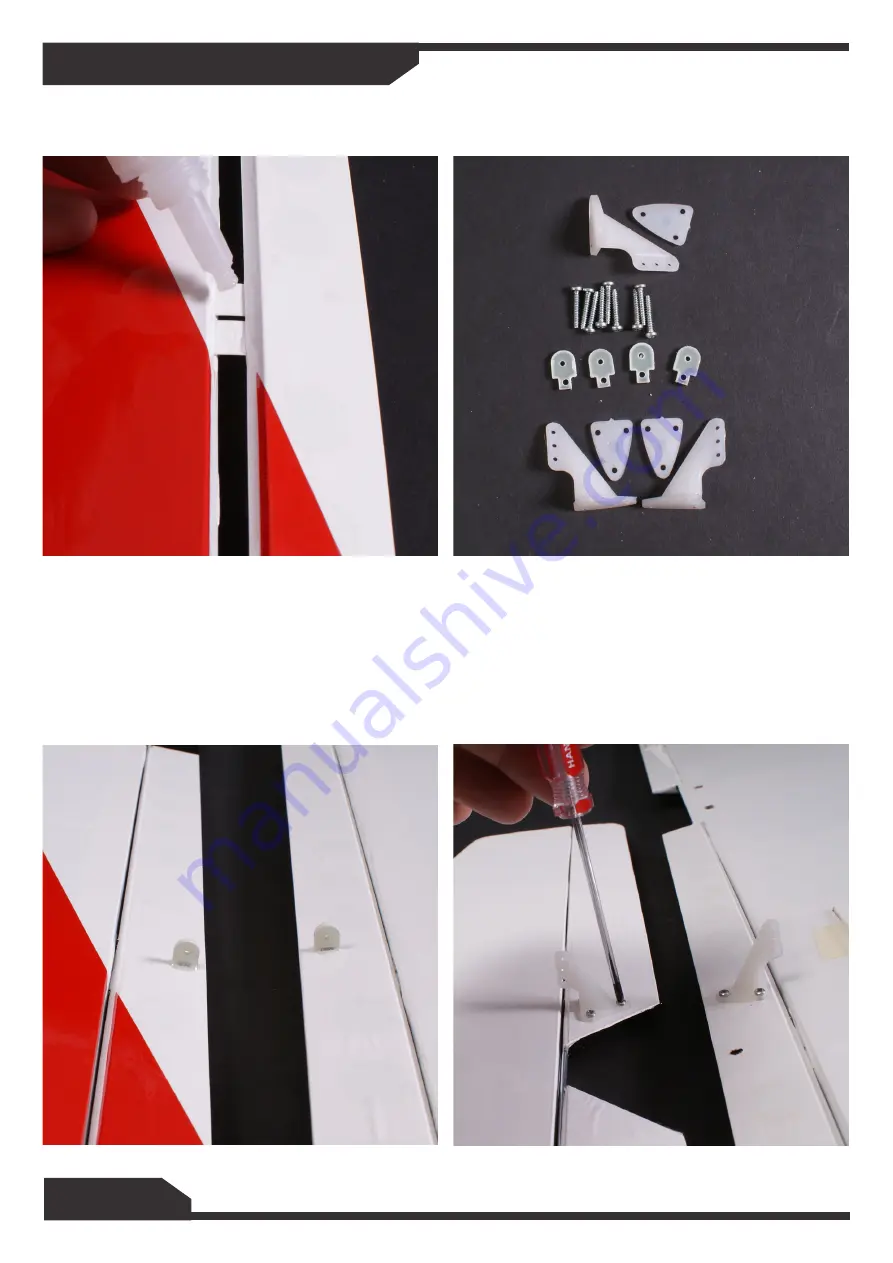
Start by glueing all of the hinges in place using CA Glue. Medium or Thick Slow set is best. 

2. 

Check for any wrinkles in the covering and using a film iron shrink these back so the film is tight. 

3.  

Install the control horns on to the Ailerons and also the upper and lower aileron connector plates. 

You can trim down the plates to make sure they do not protrude through the covering if you wish and also 

drill a small hole in the plate where it inserts in to the wing to give the 5 minute epoxy can grab through 

the connector. These connectors go under the top wing and on top of the bottom wing. Servo horns go on 

the under side of the bottom wing and under the elevator and are held in place with the M2 x 12mm self 

tapping screws. 

Содержание Double Trouble Balsa Pro-Built Series

Страница 1: ...Instruction Manual ...

Страница 2: ... from rotating propeller at all times 5 We strongly recommend that all fixings and fasteners used in the construction of this model are checked regularly for integrity Failure to do so could cause a crash injury to yourself or others around you 6 We only recommend the use of 2 4GHz radio equipment with this model Disclaimer 1 This radio controlled model is not a toy Used incorrectly it is capable ...

Страница 3: ...sion 2 x 200mm Servo Extension Leads 1 x 200mm Y Lead Electric Version 1 x Overlander 5045 10 Thumper or Equivalent 1 x Electronic Speed controller 1 x Suitable Propeller and Propeller Adapter 1 x Battery 14 8v 4s 3300 4250mAh 18 5v 5s 3300mAh IC Version 1 x 46 55 Size Model Engine 1 x Suitable Propeller 1 x Receiver Battery 1m Fuel Tube 1 x Fuel Filter Some pictures throughout this manual may be ...

Страница 4: ...also the upper and lower aileron connector plates You can trim down the plates to make sure they do not protrude through the covering if you wish and also drill a small hole in the plate where it inserts in to the wing to give the 5 minute epoxy can grab through the connector These connectors go under the top wing and on top of the bottom wing Servo horns go on the under side of the bottom wing an...

Страница 5: ...e plastic adaptor to the end of the screw and then run a 3mm nut followed by a washer to just past the middle of the screw Put the assembly through the whole in the rudder and then repeat the steps in reverse washer nut plastic adaptor Make sure it is centered and tighten the nuts together A small drop of thread lock or cyno will stop the nuts coming loose ...

Страница 6: ...al adjustments using the metal quick link 5 Installing the aileron servos Remove the cover and cut the servo area to fit your choice of servo Screw the servos in to the covers using the screws supplied with your servos Make sure you centre the servo and fit the servo control arm Use the string provided to pull the servo wires through the wing you may need servo extension leads depending on your se...

Страница 7: ...the threaded section and place the wheel inside the spat Push the axle thread though the landing strut making sure it is on the correct side and then add the other washer and nut and secure in place Make sure the wheel still spins freely and secure the nuts with a dab of cyno or thread lock to stop them coming loose 8 The landing gear is held in place on the fuselage by four M4 x 20mm cap head scr...

Страница 8: ...e this slightly smaller on the top to the bottom as the fin fairings are slightly smaller than the tail plane seat on the fuselage When cutting the film cut approx 1mm inside of your marked line so no wood shows and make sure not to cut the wood underneath as this could weaken the tailplane 10 Make sure the tail plane sits square on the fuselage and then glue in place using 5 or 30 minute epoxy an...

Страница 9: ...30 minute epoxy Make sure the lower rudder hinge is located in place before gluing the assembly in place 12 Offer the tail wheel assembly to the fuselage and mark the screw locations and pilot drill 2mm holes and then fit using the screws provided Fit the rudder cradle to the rudder and secure in place using the 2mm nut and bolt ...

Страница 10: ...rrule and loop it back through and tuck the end in to the ferrule and crimp the ferrule tight Do this for both sides but only at the rudder end for now 14 Thread the cables through the pre ftted tubes in the fuselage to the servo bay and then fit the links to the rudder You may need to use a sharp knife to trim the film carefully around the openings for both the rudder and elevator controls Fit th...

Страница 11: ...sition to suit your motor Use the M4 x 20mm cap head screws to secure the engine to the mount 2 Test mount the cowl and carefully cut out for the exhaust plug and carb needle valve Always cut the holes under size to start with and slowly make bigger to suit your engine 3 Install the throttle push rod assembly and then assemble and install the fuel tank use the Velcro straps to hold the tank in pla...

Страница 12: ...want you can add an additional cooling slot on the underside of the cowl to let the hot air out Fit your prop and the spinner to finish off the front section We used a 13x6 5 Gemfan prop and suitable spinner on the prototype model Building Your Electric Double Trouble 2 Test fit the cowl and adjust the motor position forwards or backwards to make sure the spinner and prop clear the cowl Temporally...

Страница 13: ...you can now install the throttle servo and switch to the non exhaust side of the model in the pre cut hole 17 Once the servos are installed you can finish of the rudder pull pull system by repeating the process in the same way as before make sure to pull them tight and try and get both sides the same length The elevator rod will need bending and cutting to suit your servo position and securing to ...

Страница 14: ... at this stage if you wish you could fit m3 nylock nuts for added security but this will add to the assembly time at the field but a good idea if you are leaving it assembled 19 Screw the outer wing struts in to place also using M3 x 12mm cap head bolts and washers but do not fully tighten until the bottom wing is in place These should rake backwards towards the tail ...

Страница 15: ... screws and washers You can now fully tighten all the bolts for the wing struts 21 Make sure the ailerons are all level and connect up the lower and upper ailerons with the control rods supplied Cut and bend to suit and secure in place using the swing keeper and metal quick link Make sure both sides match and adjust if necessary Prototype model shown with an uncovered lower wing ...

Страница 16: ... G is set between 11 and 12cm back from the leading edge of the top wing This can be adjusted to suit after initial flights If you need to add nose weight do this under the motor mount as far forwards as possible 16 16 22 The pilot screen and fairing are optional parts to fit The screen needs to be cut to suit and we added some red trim to the back of the screen to finish it off Secure the screen ...

Страница 17: ...17 17 Building Your Double Trouble Designed and Distributed by Century UK LTD 7 Anchor Business Park Castle Road Sittingbourne KENT ME10 3AE United Kingdom 01795 437056 MADEINVIETNAM ...

Отзывы: