Max Meyer LabelMax SP2 Скачать руководство пользователя страница 9


3.3  Loading the Ribbon 


The printer will detect if the ribbon is installed after switching power on and it will set 

printing  mode  to  thermal  transfer  or  direct  thermal  printing  mode  automatically.  If 

printer does not detect the ribbon, the ribbon-take-up-motor will be turned off. 


Make sure the printer top cover is engaged properly at both sides prior to powering 

up the printer. 


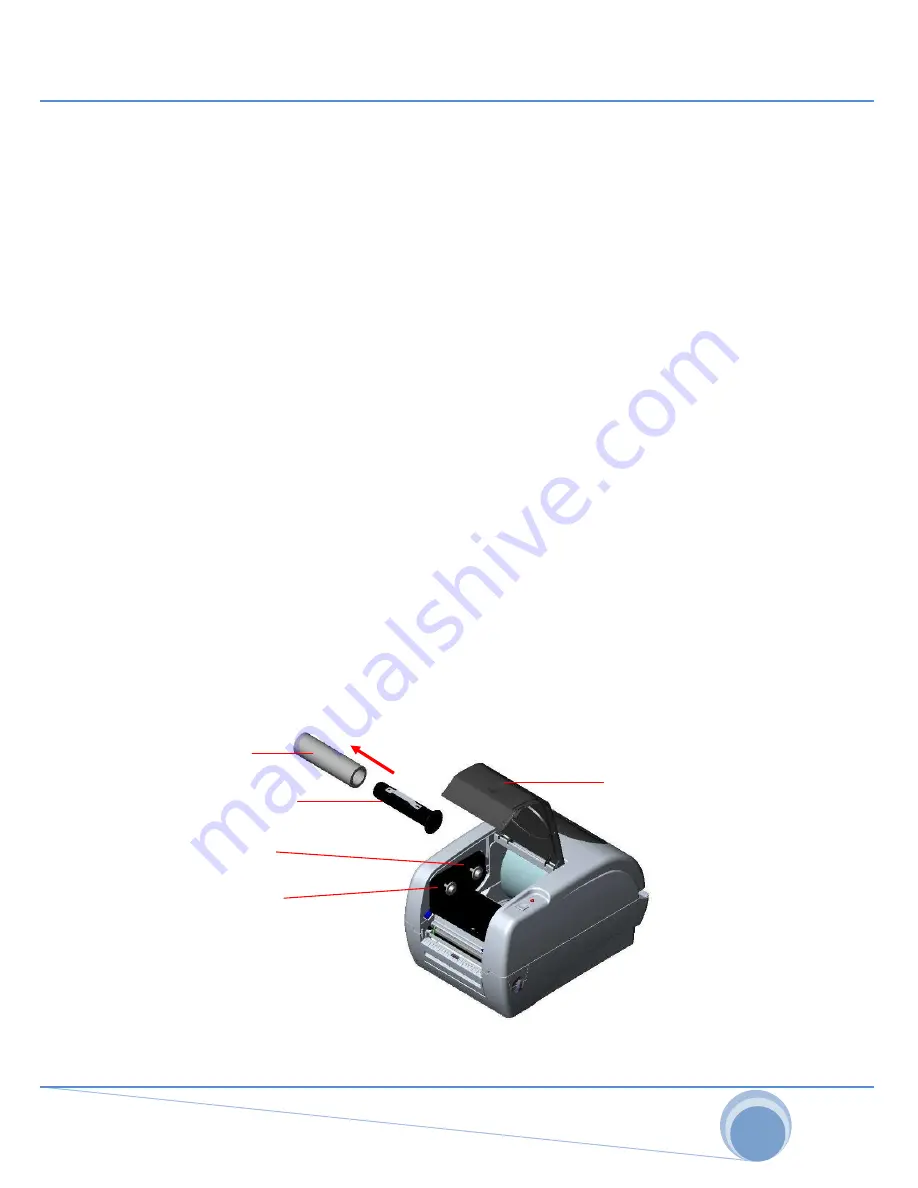
Please follow the steps below to install the ribbon into printer: 

  Push down the Ribbon Access Cover to unlatch and open the cover. 

  Place a paper core onto the Ribbon-Rewind-Spindle. 

  Mount the Ribbon-Rewind-Spindle paper core on the front hubs.


  Install a ribbon on the ribbon supply spindle. 

  Mount the

 ribbon 

supply spindle on the rear hubs

.


  Thread the ribbon leading tape downward pass the print head. 

  Attach the ribbon leader to the ribbon rewind paper core. 

  Rotate the ribbon rewind paper core until the ribbon leader is thoroughly, 

firmly encompassed by the black section of the ribbon. 

  Close the ribbon access window.


Fig. 4 Ribbon installation (I) 

Ribbon Spindle  

Front Hub 

Paper Core 

Back Hub 

Ribbon Access Cover 

Содержание LabelMax SP2

Страница 1: ...LabelMax SP2 User Manual...

Страница 2: ...LOADING LABEL STOCK 10 4 POWER ON UTILITIES 12 4 1 RIBBON AND GAP BLACK MARK SENSOR CALIBRATION 12 4 2 GAP BLACK MARK CALIBRATION SELF TEST AND DUMP MODE 13 4 3 SELF TEST 14 4 4 DUMP MODE 15 4 5 PRINT...

Страница 3: ...03 IEC 61000 4 Series EN61000 3 2 2006 EN61000 3 3 1995 A1 2001 FCC Part 15 Class B UL CUL C Tick CFR 47 Part 15 CISPR 22 3rd Edition 1997 Class B ANSI C63 4 2003 Canadian ICES 003 T V GS EN60950 2000...

Страница 4: ...aging and printer upon receiving the LabelMax SP2 Please retain the packaging materials in case you need to reship the printer 2 2 Equipment Checklist LabelMax SP2 SignMax DVD Dongle USB port cable Ex...

Страница 5: ...view 1 2 3 4 5 6 1 USB Interface 2 Centronics Interface 3 RS 232C DB 9 Interface 4 Power Jack 5 Power Switch 6 Rear Paper Guide Fig 2 Rear view Top Cover Open LED Indicator Feed Button Printer Top Rib...

Страница 6: ...itch is off Connect the printer to the computer with the USB cable Plug the power cord into the power supply connector at the rear of the printer and then plug the power cord into a properly grounded...

Страница 7: ...printer towards you Lift up the top gradually There are two stop positions for the top cover Position 1 and 2 are indicated on the label below Note To hold the cover open at position 1 you must lift t...

Страница 8: ...sides Note DO NOT place your hands between top cover and lower cover while close the top cover Fig 2 Top cover is fully open and ready to close Fig 3 Use both hands to close the top cover Do not forc...

Страница 9: ...r Push down the Ribbon Access Cover to unlatch and open the cover Place a paper core onto the Ribbon Rewind Spindle Mount the Ribbon Rewind Spindle paper core on the front hubs Install a ribbon on the...

Страница 10: ...y releasing the green top cover open levers located on each side of the printer and lifting the top cover A top cover support at the rear of the printer will hold the printer top cover open Fig 7 Pull...

Страница 11: ...printer top cover lift the cover to the ultimate open angle then use both hands to close the cover gently Close the printer top cover slowly and make sure the cover latches securely Note Make sure ha...

Страница 12: ...alibrate the gap sensor 4 1 Ribbon and Gap Black Mark Sensor Calibration Gap black mark sensor sensitivity should be calibrated at the following conditions A brand new printer Change label stock Print...

Страница 13: ...int job Please follow the steps below to calibrate the sensor 1 Turn off the power switch 2 Hold on the button while turning on the power switch 3 Release the button when LED becomes amber and blinkin...

Страница 14: ...er element printer configurations and available memory space Self test printout Print head check pattern Model name and F W version Printed mileage meter Firmware checksum Serial port configuration Co...

Страница 15: ...ng The left side characters are received from your system and right side data are the corresponding hexadecimal value of the characters It allows users or engineers to verify and debug the program Fig...

Страница 16: ...mber red 5 blinks amber 5 blinks green 5 blinks green amber 5 blinks red amber 5 blinks solid green Printer configuration will be restored to defaults as below after initialization Parameter Default s...

Страница 17: ...lowing Amber red 5 blinks amber 5 blinks green 5 blinks green amber 5 blinks red amber 5 blinks solid green 4 7 Set Gap Sensor as Media Sensor and Calibrate the Gap Sensor Please follow the steps as b...

Страница 18: ...head when changing a new label roll Platen Roller 1 Switch the power off 2 Rotate the platen roller and wipe it thoroughly with 100 ethanol and a cotton swab or lint free cloth Clean the platen rolle...

Страница 19: ...connections from the power cord to the power supply and from the power supply to the printer power jack if they are connected securely Solid Green ON The printer is ready to use No action necessary Gr...

Страница 20: ...ay go wrong Please do the initialization and gap black mark calibration Paper Jam Gap black mark sensor sensitivity is not set properly sensor sensitivity is not enough Calibrate the gap black mark se...

Страница 21: ...his illuminates that the system is downloading data from PC to memory and the printer is paused Amber This illuminates that the system is clearing data from printer Red Solid This illuminates printer...

Отзывы: