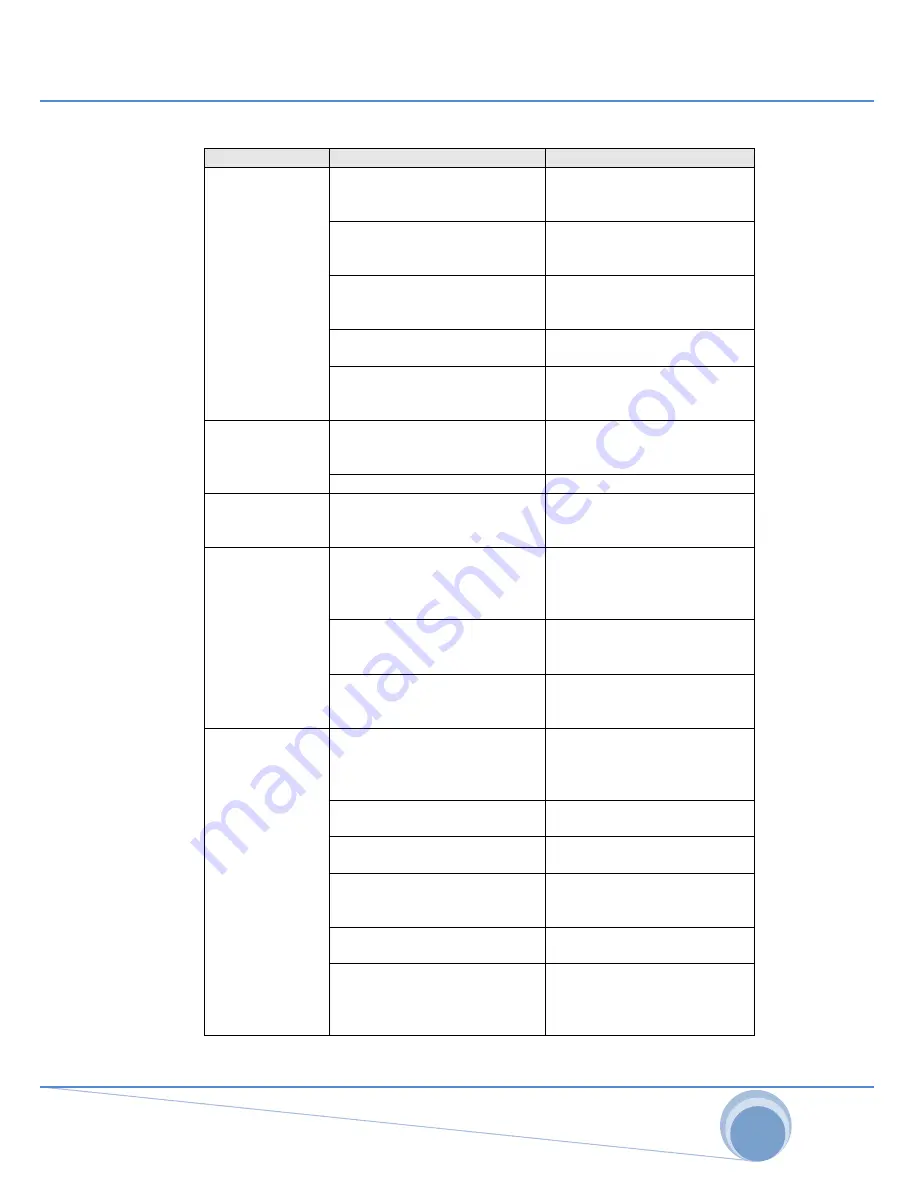
Max Meyer LabelMax SP2 Скачать руководство пользователя страница 20


20 

6.2  Print Quality 

Problem 

Possible Cause 

Recovery Procedure 

Not Printing 

Check if interface cable is well 
connected  to  the  interface 
connector. 

Re-connect 

cable 

to 

interface. 

The  serial  port  cable  pin 
configuration  is  not  pin  to  pin 
connected. 

Please replace the cable with 
pin to pin connected. 

The  serial  port  setting  is  not 
consistent  between  host  and 
printer. 

Please  reset  the  serial  port 
setting. 

The  port  specified  in  the 
Windows driver is not correct. 

Select the correct printer port 
in the driver. 

The Ethernet IP, subnet mask, 
gateway  is  not  configured 
properly. 

Configure  the  IP,  subnet 
mask and gateway. 

No  print  on  the 
label 

Label  or  ribbon  loaded  not 
correctly. 

Follow  the  instructions  in 
loading  the  media  or  loading 
the ribbon. 

Ribbon run out. 

Loading the ribbon. 

Continuous 
feeding labels 

The  printer  setting  may  go 
wrong.  

Please  do  the  initialization 
and 

gap/black 

mark 

calibration. 

Paper Jam 

Gap/black 

mark 

sensor 

sensitivity  is  not  set  properly 
(sensor 

sensitivity 

is 

not 

enough) 

Calibrate  the  gap/black  mark 
sensor. 

Make  sure  label  size  is  set 
properly. 

Set  label  size  exactly  as 
installed paper in the labeling 
software or program. 

Labels may be stuck inside the 
printer  mechanism  near  the 
sensor area. 

Remove the stuck label. 

Poor 

Print 

Quality 

Top  cover  is  not  closed 
properly. 

Close 

the 

top 

cover 

completely  and  make  sure 
the  right  side  and  left  side 
levers are latched properly 

Check  if  supply  is  loaded 
correctly. 

Reload the supply. 

Ribbon 

and 

media 

are 

incompatible. 

Change  the  ribbon  or  label 
combination. 

Check if dust or adhesives are 
accumulated  on  the  print 
head. 

Clean the print head. 

Check  if  print  density  is  set 
properly. 

Adjust  the  print  density  and 
print speed. 

Check print head test pattern if 
head element is damaged. 

Run  printer  self-test  and 
check  the  print  head  test 
pattern if there is dot missing 
in the pattern. 


Содержание LabelMax SP2

Страница 1: ...LabelMax SP2 User Manual...

Страница 2: ...LOADING LABEL STOCK 10 4 POWER ON UTILITIES 12 4 1 RIBBON AND GAP BLACK MARK SENSOR CALIBRATION 12 4 2 GAP BLACK MARK CALIBRATION SELF TEST AND DUMP MODE 13 4 3 SELF TEST 14 4 4 DUMP MODE 15 4 5 PRINT...

Страница 3: ...03 IEC 61000 4 Series EN61000 3 2 2006 EN61000 3 3 1995 A1 2001 FCC Part 15 Class B UL CUL C Tick CFR 47 Part 15 CISPR 22 3rd Edition 1997 Class B ANSI C63 4 2003 Canadian ICES 003 T V GS EN60950 2000...

Страница 4: ...aging and printer upon receiving the LabelMax SP2 Please retain the packaging materials in case you need to reship the printer 2 2 Equipment Checklist LabelMax SP2 SignMax DVD Dongle USB port cable Ex...

Страница 5: ...view 1 2 3 4 5 6 1 USB Interface 2 Centronics Interface 3 RS 232C DB 9 Interface 4 Power Jack 5 Power Switch 6 Rear Paper Guide Fig 2 Rear view Top Cover Open LED Indicator Feed Button Printer Top Rib...

Страница 6: ...itch is off Connect the printer to the computer with the USB cable Plug the power cord into the power supply connector at the rear of the printer and then plug the power cord into a properly grounded...

Страница 7: ...printer towards you Lift up the top gradually There are two stop positions for the top cover Position 1 and 2 are indicated on the label below Note To hold the cover open at position 1 you must lift t...

Страница 8: ...sides Note DO NOT place your hands between top cover and lower cover while close the top cover Fig 2 Top cover is fully open and ready to close Fig 3 Use both hands to close the top cover Do not forc...

Страница 9: ...r Push down the Ribbon Access Cover to unlatch and open the cover Place a paper core onto the Ribbon Rewind Spindle Mount the Ribbon Rewind Spindle paper core on the front hubs Install a ribbon on the...

Страница 10: ...y releasing the green top cover open levers located on each side of the printer and lifting the top cover A top cover support at the rear of the printer will hold the printer top cover open Fig 7 Pull...

Страница 11: ...printer top cover lift the cover to the ultimate open angle then use both hands to close the cover gently Close the printer top cover slowly and make sure the cover latches securely Note Make sure ha...

Страница 12: ...alibrate the gap sensor 4 1 Ribbon and Gap Black Mark Sensor Calibration Gap black mark sensor sensitivity should be calibrated at the following conditions A brand new printer Change label stock Print...

Страница 13: ...int job Please follow the steps below to calibrate the sensor 1 Turn off the power switch 2 Hold on the button while turning on the power switch 3 Release the button when LED becomes amber and blinkin...

Страница 14: ...er element printer configurations and available memory space Self test printout Print head check pattern Model name and F W version Printed mileage meter Firmware checksum Serial port configuration Co...

Страница 15: ...ng The left side characters are received from your system and right side data are the corresponding hexadecimal value of the characters It allows users or engineers to verify and debug the program Fig...

Страница 16: ...mber red 5 blinks amber 5 blinks green 5 blinks green amber 5 blinks red amber 5 blinks solid green Printer configuration will be restored to defaults as below after initialization Parameter Default s...

Страница 17: ...lowing Amber red 5 blinks amber 5 blinks green 5 blinks green amber 5 blinks red amber 5 blinks solid green 4 7 Set Gap Sensor as Media Sensor and Calibrate the Gap Sensor Please follow the steps as b...

Страница 18: ...head when changing a new label roll Platen Roller 1 Switch the power off 2 Rotate the platen roller and wipe it thoroughly with 100 ethanol and a cotton swab or lint free cloth Clean the platen rolle...

Страница 19: ...connections from the power cord to the power supply and from the power supply to the printer power jack if they are connected securely Solid Green ON The printer is ready to use No action necessary Gr...

Страница 20: ...ay go wrong Please do the initialization and gap black mark calibration Paper Jam Gap black mark sensor sensitivity is not set properly sensor sensitivity is not enough Calibrate the gap black mark se...

Страница 21: ...his illuminates that the system is downloading data from PC to memory and the printer is paused Amber This illuminates that the system is clearing data from printer Red Solid This illuminates printer...

Отзывы: