background image

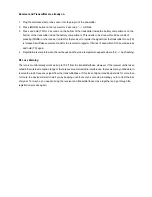
Receiver and Transmitter are already on.

RF Loss Warning

1.

Plug the stainless steel probe sensor into the plug in of the transmitter.

2.

Press (MODE) button on the receiver for 2 seco nds. “---“ will blink.

3.

Press and hold (TX) for 2 seconds on the bottom of the transmitter inside the battery compartment. on the 

bottom of the transmitter inside the battery compartment. This needs to be done within 60 seconds of 

pressing (MODE) on the receiver in order for the receiver to register the signal from the transmitter. Once (TX) 

is released it will take several seconds for the receiver to register. If it doesn’t beep within 5-10 seconds press 

and hold (TX) again.  

4.

Registration is complete when the unit beeps and the probe temperature appears where the “---“ was flashing.

The receiver unit normally works well up to 100 ft from the transmitter/base. However, if the receiver unit is taken 

outside the wireless reception range or there is severe external radio interference, the receiver may not be able to 

receive the radio frequency signal from the transmitter/base. If this loss of signal condition persists for more than 

1 minute, the device will start to alert you by beeping once for every 3 seconds, prompting you to correct the loss 

of signal. To re-sync, you need to bring the receiver and transmitter/base close together and go through the 

registration process again.

Содержание ET-77

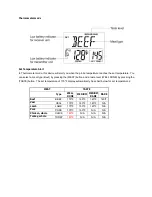
Страница 1: ...and temperature of food cooking in the ovenor outdoors from anywhere in your home 1 1 receiver unit 2 1 transmitter base unit 3 1 detachable stainless steel probe sensor 1 LCD Liquid crystal display Displays icons Food Taste Timer Received Set temperatures See LCD diagram for detailed information 2 CLIP Detachable clip for attaching the receiver unitto a belt or for standing on the transmitter bas...

Страница 2: ...ss once to clear the timer readingto zero In thermometer mode press to select temperature unit in Celsius or Fahrenheit 4 MODE Press to select Thermometer or Timer mode Press and hold for 2 seconds to enter RF registration mode The icon will appear in the place of the probe temperature and flash in 1Hz press Mode button again to stop the RF registration 5 START STOP Press to start or stop the time...

Страница 3: ...essing the ON OFF button on the bottom of the transmitter once This needs to be done within 120 seconds of turning on the receiver in order for the receiver to register the signal from the transmitter If it doesn t beep within 5 10 seconds press the ON OFF button again so it is OFF wait a few seconds and then press the button back ON 4 Registration is complete when the unit beeps and the probe tem...

Страница 4: ...egister If it doesn t beep within 5 10 seconds press and hold TX again 4 Registration is complete when the unit beeps and the probe temperature appears where the was flashing The receiver unitnormally works well up to 100 ft from the transmitter base However if the receiver unit is taken outside the wireless reception range or there is severe external radio interference the receiver may not be abl...

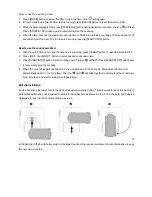
Страница 5: ...temperature reaches the set temperature You can select a meat type Beef by pressing the MEAT button and a taste level WELL DONE by pressing the TASTE button The set temperature of 170ºF display automatically See chart below for set temperatures BEEF 170ºF 160ºF 145ºF 140ºF VEAL 170ºF 160ºF 145ºF N A LAMB 170ºF 160ºF 145ºF N A PORK 170ºF 160ºF N A N A CHICK 180ºF N A N A N A TURKY 180ºF N A N A N A...

Страница 6: ... unitwill beep twice Whenthe probe temperature reaches your selected doneness temperature the unit will beep 3 timesper second for 5 seconds and then silentfor 5 seconds This beeping pattern will repeat and last for 10 minutes Note To stop the alert beep press the START STOP button You can use HR and MIN buttons to enter a manual temperature other than the above pre programmed temperature Count up...

Страница 7: ...esired count down time 3 Press START STOP button to start counting down the icon will flash Press START STOP button again to temporarily stop the counting 4 When the count down time reaches 0 00 the unit will beep for 20 seconds Meanwhile the timer will automatically switch to count up timer The icon and will blink together to display that the count down timer time is up and start counting the ela...

Страница 8: ...l temperature ofthe meat is lower than 14 F 10 C and HHH wi ll flash when the temperature is above 482 F 250 C 3 LLL will also appear when the stainless steel probe is disconnected or malfunctions 4 If the receiver and or the remote roasting thermometer display LLL or HHH instead of the probe temperature wait for probe to reach room temperature If LLL or HHH i s still displayed it is likely the in...

Страница 9: ... stainless steel probe in a microwave oven 8 The Remote roasting thermometerregisters temperatures as low as 14 F 10 C and as high 482 F 250 C LLL will be displayed below 14 F 10 C and HHH will be displayed above 482 F 250 C 9 Do not use the stainless steel probe sensor above 482 F 250 C Doing so will deteriorate the wire 1 Always wear a heat resistant glove to touch the stainless steel probe sens...

Страница 10: ...echnician for help This device complies with part 15 of the FCC Rules Operation is subject to the following two conditions 1 this device may not cause harmful interference and 2 this device must accept any interference received including interference that may cause undesired operation Maverick Industries Inc warrants this product to be free of defects in parts materials and workmanship for a perio...

Отзывы: