background image


Instruction Manual 

F-RA-001-3R2 

MODEL         

AK series 


(3kW, 4kW)


B/N 030.9.010


*030.9.010*


Rev. 1.0


Содержание AK Series

Страница 1: ...Instruction Manual F RA 001 3R2 MODEL AK series 3kW 4kW B N 030 9 010 030 9 010 Rev 1 0 ...

Страница 2: ...n Moreover because Matsusada Precision is constantly striving to improve its high quality products the information contained in this manual is subject to change without notice Every precaution has been taken in the preparation of this manual Nevertheless Matsusada Precision assumes no responsibility for errors or omissions Neither is any liability assumed for damages resulting from the use of the ...

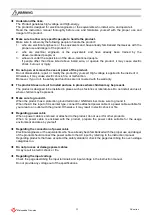
Страница 3: ...ducts Indicates a potentially hazardous situation which if not avoided may result in serious injury or death Indicates a potentially hazardous situation which if not avoided may result in minor or moderate injury or in property damage Indicates danger warning caution Refer to the instruction manual when this symbol appears on the unit Frame or chassis terminal Indicates the possible danger of elec...

Страница 4: ...y The product does not suit to install and use in places where children may be present The product is designed to be installed in places such as factories or laboratories Do not install and use it where children may be present Make sure to ground it When the product has a protection ground terminal or GND terminal make sure to ground it When the AC line input of it is an inlet type connect the att...

Страница 5: ...on Operate the product with the right hand Use only your right hand to operate the product and keep your left hand away from it which can reduce the risk of electric current flowing through the left hand to the vital organs of the body in the event of an electric shock Do not touch the wiring load connected to the output and any terminals connectors during the operation or just after turning outpu...

Страница 6: ...cure 30 cm space at least around the openings If they are blocked the product cannot show the rated performance due to the internal temperature increase Moreover components deteriorate and it may result in smoke or fire Remove wiring to and from the product when work like welding near it is done Do not wipe the equipment with a dust cloth wet with chemicals thinner or the like or water Otherwise i...

Страница 7: ...w Diagram 2 1 2 1 Front Panel 2 1 2 2 Display Panel Details 2 1 2 3 Rear Panel 2 2 2 4 Dimensions 1 to 60kV 2 3 2 5 Dimensions 80 to 120kV 2 4 3 Normal Operation 3 1 3 1 Operation 3 1 3 2 Protection 3 2 3 2 1 Over Voltage Protection O V P 3 2 3 2 2 Over Temperature Protection 3 2 3 2 3 External Voltage Limit Protection 3 2 4 Advanced Operation 4 1 4 1 Introduction 4 1 4 2 Function of TB1 Interface...

Страница 8: ...Control and Internal INT Cut off Current Control 4 4 4 6 Remote Switch ON OFF LS 4 4 4 7 Door switch LD Interlock 4 5 4 8 Output Current Monitor Output Voltage Monitor 4 6 4 8 1 Output Current Monitor L1 4 6 4 8 2 Output Voltage Monitor L2 4 6 4 9 HV Status Signal 4 6 5 Options 5 1 5 1 Floating Ground LF 5 1 5 2 Slow Start LW 5 2 5 3 Overload Trip LOc 5 2 5 4 AC Input 400V L 400V 5 2 5 5 Master Sl...

Страница 9: ...oltage For constant current mode 0 to 10Vdc external voltage Voltage Regulation Line 0 005 of maximum voltage for 10 input line change Load 0 005 of maximum voltage 400mV for 10 to 100 load change Current Regulation Line 0 05 of maximum current for 10 input line change Load 0 05 of maximum current 100μA for 10 to 100 load change Ripple Less than 0 1 p p 1Vrms Stability 0 01 Hr Temperature Coef 0 0...

Страница 10: ...ll have the same size of intake hole and exhaust space In case that the power supply is operated in the closed cabinet such arrangement as forced ventilation shall be required so that temperature by exhausted air will not be taken into air intake of power supply Make sure no liquid or metal piece is taken into the vent holes of power supply Do not put any object on the power supply unit Do not ope...

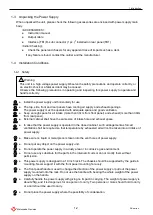
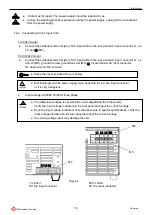
Страница 11: ...located below AC input connector Do not connect to NC terminal Place the cover enclosed for your safety Electrically ground the power supply main body with the AC line input connector or it is very dangerous Input voltage AC208V 50 60Hz three phase The rated input voltage is set when the unit is dispatched from the factory Verify the input voltage indicated on the rear panel and input the correct ...

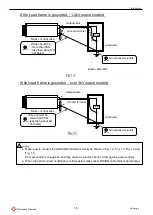
Страница 12: ...output models If the Load frame is grounded over 3kV output models MUST Black cable M6 Fig 1 2 Output cable Load frame Ground Ground terminal Rack mount case Wires should be more than 5SQ less than about 2m not bared Load MUST Ground at one point Fig 1 3 Output cable Load frame Ground Ground terminal Rack mount case Wires should be more than 5SQ less than about 2m not bared Load MUST Ground at one...

Страница 13: ...nd may cause an electric shock or damage the power supply When load short circuit or discharge is forecasted make the GROUND cable thicker and shorter Ground at one point Fig 1 4 Load Load frame Rack mount case Wires should be more than 5SQ less than about 2m not bared MUST MUST Black cable M6 Output cable Ground terminal Ground at one point Fig 1 5 Load Output cable Ground terminal Load frame Rac...

Страница 14: ... more than 10 seconds and use another high voltage meter to make sure that the voltage is zero Especially it is dangerous when capacitive load is applied or when long cable is attached 5 Touch the load with your right hand 1 5 Before Troubleshooting No output voltage 1 Check if the specified voltage is input Power supply input voltage Control voltage 0 to10V in external voltage controlling Control...

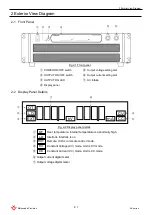
Страница 15: ...ock is on EXT Remote Unit is in remote control mode CV Constant Voltage CV mode Unit is CV mode CC Constant Current CC mode Unit is CC mode Output current digital meter Output voltage digital meter POWER ON OFF switch Output voltage setting dial OUTPUT ON OFF switch Output current setting dial OUTPUT ON LED Air intake Display panel Fig 2 1 Front panel Fig 2 2 Display panel details OT LD EXT kV mA ...

Страница 16: ... for LF option Ground terminal Interface connector TB1 Exhaust holes AC input connector Fig 2 3 Rear panel 1 to 60kV GND TB1 S2 OUTPUT OUTPUT TB1 S2 GND Output connector LF terminal for LF option Interface connector TB1 AC input connector P E Exhaust holes Ground terminal Fig 2 4 Rear panel 80 to 120kV ...

Страница 17: ...2 Exterior View Diagram 2 3 Matsusada Precision AK series 2 4 Dimensions 1 to 60kV ...

Страница 18: ...2 Exterior View Diagram 2 4 Matsusada Precision AK series 2 5 Dimensions 80 to 120kV Plastic foot ...

Страница 19: ...ect the POWER ON OFF switch to ON 1 and the meter lamp is lit for stand by 7 Turn the OUTPUT ON OFF switch to the ON position The red indicator OUTPUT ON LED will light up to indicate that the power supply is ready for operation In case of turning the OUTPUT ON OFF switch to the ON position wait 10 seconds or more and then operate the power supply 8 Turn the output voltage setting dial VOLTAGE to ...

Страница 20: ...ain to reset O V P Overvoltage Protection 3 2 2 Over Temperature Protection This unit is equipped with the built in circuit to cut off the high voltage output at the set internal temperature or higher After making sure that the OT LED is OFF select the OUTPUT ON OFF switch to OFF to reset 3 2 3 External Voltage Limit Protection This unit is equipped with the external voltage limit protection To pr...

Страница 21: ...e 5 Common GND of Power Supply For 1 2 3 14 15 6 Spare out of use 7 Door switch Interlock Short HV ON 8 Remote reset for Option LOc Short reset 9 Spare out of use 10 Spare out of use 11 Spare out of use 12 Spare out of use 13 Spare out of use 14 Reference voltage output Reference 10 24V 4mA MAX output 15 Output Voltage Monitor 0 to 10Vdc output 0 to 100 rated output 16 Spare out of use 17 Common G...

Страница 22: ...ON Select of INT EXT with control cable for GP IB or RS 232C option is done by sending commands When the GP IB and RS 232C control cable is attached to the rear TB1 the power supply cannot operate alone Precautions in using the open collector 1 Use the open collector according to the following List 4 2 Open collector Output Switch Open collector ON Short VCE Under 0 4V 10mA OFF Open VCE Over 2V Op...

Страница 23: ...o 100 External voltage fluctuation directly influences the output The external voltage should be stable 4 5 External Volume Control 4 5 1 External Volume Voltage Control LRv The external volume 5kΩ can control the output voltage within the range of 0 to 100 4 5 2 External Volume Current Control LRc The external volume 5kΩ can control the output current within the range of 0 to 100 TB1 Current cont...

Страница 24: ...al volume to Pin No 2 4 6 Remote Switch ON OFF LS The remote switch can select the output to ON OFF The open collector can also do When the output is ON the front panel OUTPUT LED is lit This function is effective regardless of selection of INT EXT Front panel CURRENT dial 14 15 16 17 18 19 20 25 1 2 3 4 5 6 7 8 13 CV ERROR AMP CC ERROR AMP 4mA max 10 24Vdc TB1 CV EXT CC INT Current control 10 24V...

Страница 25: ...l switch is selected to ON The open collector can be also used for the purpose Open the switch 3 and the front panel LD is ON Once select the OUTPUT ON OFF switch to OFF and next select to ON again to reset When LD is used open the switch S2 This function is effective regardless of selection of INT EXT When the door switch is not used Short circuit the switch S2 and the LD will not function Keep p...

Страница 26: ...imum output voltage The output impedance is 1kΩ The monitor output polarity is positive regardless of the high voltage output polarity 4 9 HV Status Signal When the OUTPUT ON OFF switch is ON the internally built in relay contact is ON Caution When the contact is open the voltage is 30Vdc MAX and the permissible current is 100mA MAX TB1 14 15 16 17 18 19 1 2 3 4 5 6 VOLTAGE MONITOR AMP Z out 1kΩ F...

Страница 27: ...onnect to each terminal See Fig 5 2 When this function is not used attach the short circuit fitting between the CASE terminal and the 0V terminal to connect See Fig 5 2 When this function is used the device connected to TB1 should be floating Fig 5 1 Main body Load and Ground of the unit equipped with this function Fig 5 2 Example of the unit equipped with this function CASE 0V A With this functio...

Страница 28: ...oltage can be attained in 10 seconds approximately 5 3 Overload Trip LOc When the output current exceeds value set by the CURRENT dial or external voltage the output is cut off During cutting off the CC LED is ON and the OUTPUT LED is OFF Once select the OUTPUT ON OFF switch to OFF and next select to ON again to reset The external switch can reset the cut off condition at output over current The o...

Страница 29: ...r unit and slave unit by connection of AK LMs cable The wire connection of attached AK LMs cable is shown above and standard local control of output voltage and current is available The setting dials are on the front panel of the master unit When monitoring the output or status connect measurement equipment to master unit Switch the of external Change 2 connections of connectors at master unit sid...

Страница 30: ...AK series Matsusada Precision Revision History Rev No Rev Date Revised contents 0 0 2015 06 First edition 1 0 2020 08 Changed the format ...

Страница 31: ...Matsusada Precision AK series ...

Страница 32: ......

Отзывы: