background image

z

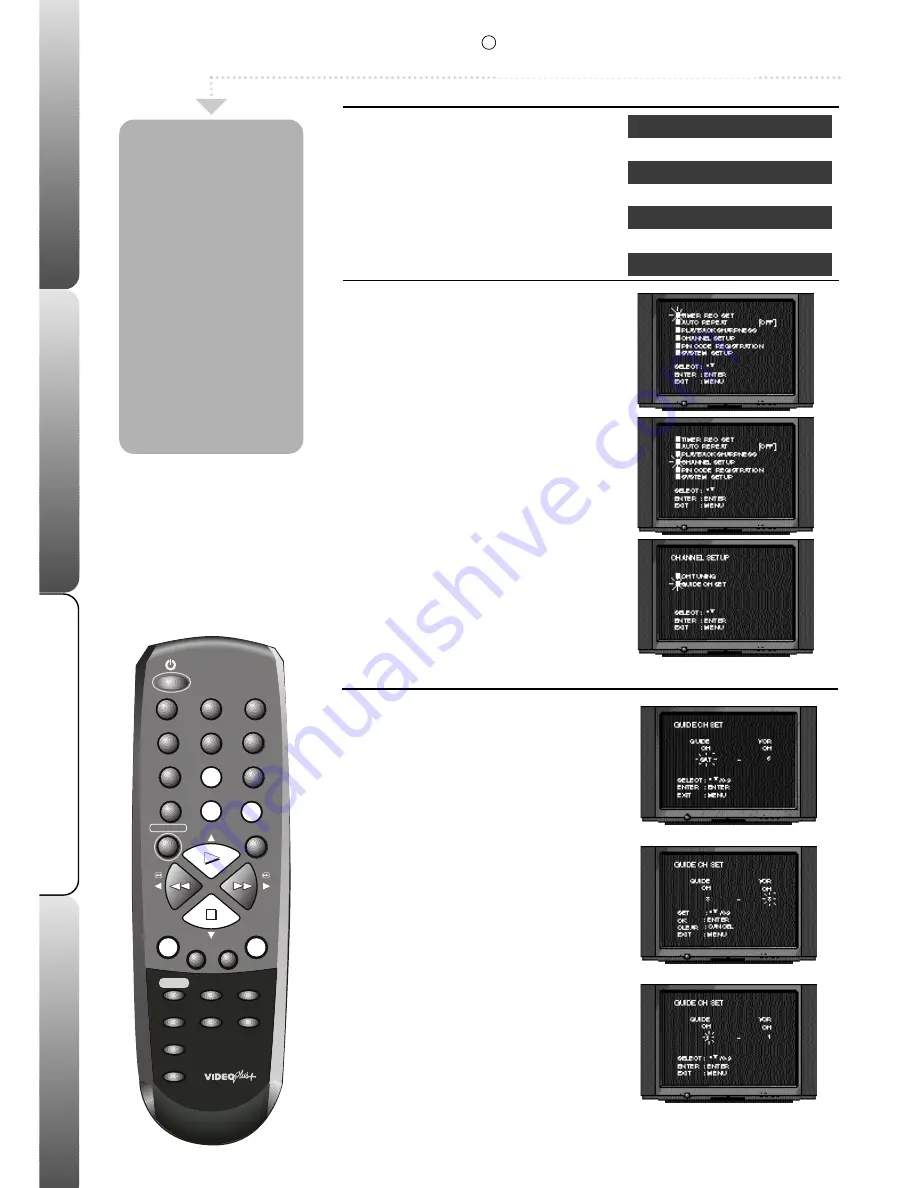
In order for the VIDEO Plus+ system to

work correctly your TV Station must be
in the positions in the table opposite.

z

Only follow the guidance on these

pages if the order is different.

z

See page 5 for more details on VIDEO
Plus+.

Advanced features

Help & specification

Recording

Basic VCR features

1

4

7

0

8

5

6

9

PAUSE

MENU

ENTER

CH  TR

/

AV

CANCEL

INDEX

2

3

REC/OTR

-

+

VIDEO PLUS +/

PROGRAM

CALL

CLOCK/

COUNTER

COUNTER

RESET

ZERO

RETURN

SPEED

SP/LP

EJECT

TIMER REC

1

Select the MAIN menu

In the following example the Satellite
channel has been incorrectly stored in
channel 8 in the VCR.

Press 

MENU

; the main menu will appear.

Press 

PLAY

or 

STOP

to select CHANNEL

SETUP.

Press 

ENTER

.

Press 

PLAY

or 

STOP

to select GUIDE CH

SET.

Press 

ENTER

.

2

Select the GUIDE CH

Press 

PLAY

or 

STOP

until 'SAT' flashes

under 'GUIDE CH'.

This indicates the Satellite.

Press 

ENTER

.

Press 

NUMBERED

button 8 to enter a

number 8 underneath 'VCR CH'.

This tells your VCR that the Satellite has been
stored in channel 8.

Press 

ENTER

to store the new setting.

If you have connected your satellite using the
SCART socket you must select AV underneath
'VCR CH'.

Repeat stage 2 to adjust any other
channels.

Press 

MENU

three times to remove the

menu.

Before VIDEO

Plus+ recordings

will work properly

BBC1 must be

stored in

channel 1, BBC2 in

channel 2, ITV in

channel 3 etc. If

your order is

different or you

are having

problems with

VIDEO Plus+

recordings, follow

the instructions on

this page.

Checking VIDEO Plus+

VCR Channel

Station

1

BBC1

2

BBC2

3

ITV

4

Channel 4

5

Channel 5

6

Decoder (if fitted)

10

R

Set-Up

This feature is only available on certain models.

Содержание VP9500

Страница 1: ...R How to use your video ...

Страница 2: ...ou do it may adversely affect the working of the unit causing erratic playback and distorted picture or sound Temperature Avoid extremes of temperature either hot or cold place your VCR well away from heat sources such as radiators or gas electric fires Ventilation The VCR must be well ventilated Do not cover your VCR or place inside a small confined space It is recommended that you leave a 10cm g...

Страница 3: ... pre recorded video tape with the tab removed for example a rented or bought film your VCR will start to play automatically If playback doesn t start press PLAY 2Stop or pause a tape Press the STOP button to stop the tape Press the PAUSE button while the tape is playing to pause the tape Press the PLAY button to resume playback 3Ejecting a tape Press the STOP button to stop the tape Press the EJEC...

Страница 4: ...TV is switched on and your VCR is in standby 2Select the VCR s test pattern Press and HOLD the ON button on the front of your VCR until RF 36 appears in the display If CH 1 stays in the display press the ON button once then press and hold the ON button until RF 36 appears 3Try changing output number Press the CH TR buttons on the front of your VCR to change the number Now tune your VCR channel on ...

Страница 5: ...tomatically when the index position is found Video indexing z The Video Index Search system will only work once several recordings have been made on a VCR tape z Occasionally when a recording starts at the very beginning of a VCR tape the index mark will be missed z When your VCR is searching for an index mark it will not fast forward or rewind as fast as normal because it is searching for the ind...

Страница 6: ...ion Insert a blank tape into your VCR Press the NUMBERED buttons or the CH TR buttons on the remote control to select the TV Station you wish to record 2Select the speed Press the SPEED button to select the recording speed standard play SP or long play LP 3Start recording Press the REC OTR button to start recording The VCR will start recording 4Stop recording Recording will end when either The STO...

Страница 7: ...ngs repeat stages 1 to 3 Press the TIMER REC button to set your timer recording If the record protection tab has been removed from your tape it will be ejected Your VCR will go into timer record mode this looks like standby but the timer set symbol will appear in the VCR display If you do not put your VCR into timer record mode your recording will not take place Your timer recording is now set At ...

Страница 8: ... further recordings repeat stages 1 to 2 Press the TIMER REC button to set your timer recording Your VCR will go into timer record mode this looks like standby but the timer set symbol will appear in the VCR display If you do not put your VCR into timer record mode your recording will not take place Your TIMER RECORDING is now set At the set time your VCR will switch on and record your programme t...

Страница 9: ...cording press CANCEL the timer recording details will be deleted If you only want to check the details of a timer recording repeatedly press the MENU button to clear the screen If you wish to amend a timer recording press the ENTER button See page 6 for details on setting the timer recording 4Reset Timer Set Press TIMER REC to put your VCR back into timer record mode if there are any more recordin...

Страница 10: ...O RETURN button the tape will rewind or fast forward until the counter reaches 00 00 automatically This feature is useful for returning to a point in a tape you wish to view again 4Counter Pause When you rewind or fast forward through blank sections of tape the counter will stop counting When the Auto Repeat feature is switched ON your VCR tape will play continuously When the end of the tape is re...

Страница 11: ...after 60 seconds if no buttons are pressed 1Manual Automatic Tracking If white lines appear during playback or the picture starts to shake you can try to adjust the tracking manually Press the TRACKING or buttons to obtain the best picture To return to automatic tracking eject the tape and play again 2Call When you press the CALL button the current time channel and any other relevant information e...

Страница 12: ...ect GUIDE CH SET Press ENTER 2Select the GUIDE CH Press PLAY or STOP until SAT flashes under GUIDE CH This indicates the Satellite Press ENTER Press NUMBERED button 8 to enter a number 8 underneath VCR CH This tells your VCR that the Satellite has been stored in channel 8 Press ENTER to store the new setting If you have connected your satellite using the SCART socket you must select AV underneath ...

Страница 13: ... or after the VCR has been unplugged from the mains for longer than 30 minutes the PIN code screen will appear when you switch your VCR on Enter your PIN code using the numbered buttons on the remote control then press ENTER If you enter the correct PIN code PIN CODE OK will appear and you can now use your VCR If you entered an incorrect PIN code PIN CODE ERROR will appear and you can try to enter...

Страница 14: ...is is normal and does not mean there is anything wrong with your VCR It is not facing the remote control sensor It is too far away or there is too much light in room bright direct sunlight Obstacle in path of beam Batteries are inserted incorrectly the and polarities are the wrong way around Batteries are weak TV not set to the VCR channel Your Stations have not been stored in the correct channel ...

Страница 15: ...ON into your VCR 3 3 3 3 Press the AV button to select the AV channel 4 4 4 4 Insert the tape you wish to record FROM into the video camera 5 5 5 5 Press the REC OTR button on your VCR 6 6 6 6 Press the play button on the video camera playback and recording will start How to connect your VCR to another VCR 1 1 1 1 Link the two VCR s with a SCART cable not supplied 2 2 2 2 Insert the tape you wish ...

Страница 16: ...e details If your VCR is connected to a TV using a SCART lead a video tape when played will automatically be displayed on the TV irrespective of the channel you are watching unlike normal RF aerial connection where you must use a nominated channel The AV button on your VCR provides a convenient method of switching between an appliance connected to the SCART socket e g a Satellite Receiver or TV st...

Страница 17: ...elp prevent video head clogging use only good quality VHS tapes Discard worn out tapes To prevent accidental erasure of a recording break off the record protection tab with a screwdriver If you need to record onto a tape on which the tab has been removed from cover the hole with a small piece of adhesive tape Warning If the mains plug is cut from the mains lead of this appliance the plug must be d...

Страница 18: ...o 1 0Vp p 75 ohm unbalanced Audio 500mV 50k ohm unbalanced Output level Video 1 0Vp p 75 ohm unbalanced Audio 500mV 1k ohm unbalanced RF output channel Channel 36 23 69 Adjustable Power supply AC 230V 240V 50Hz Power consumption 12W 4W Standby Dimensions 380mm W x 272mm D x 95mm H Weight 3 5kg Because we continually strive to improve our products we may change specifications and designs without pr...

Страница 19: ......

Страница 20: ...4D76801A V 01 03 ...

Отзывы: