background image

7

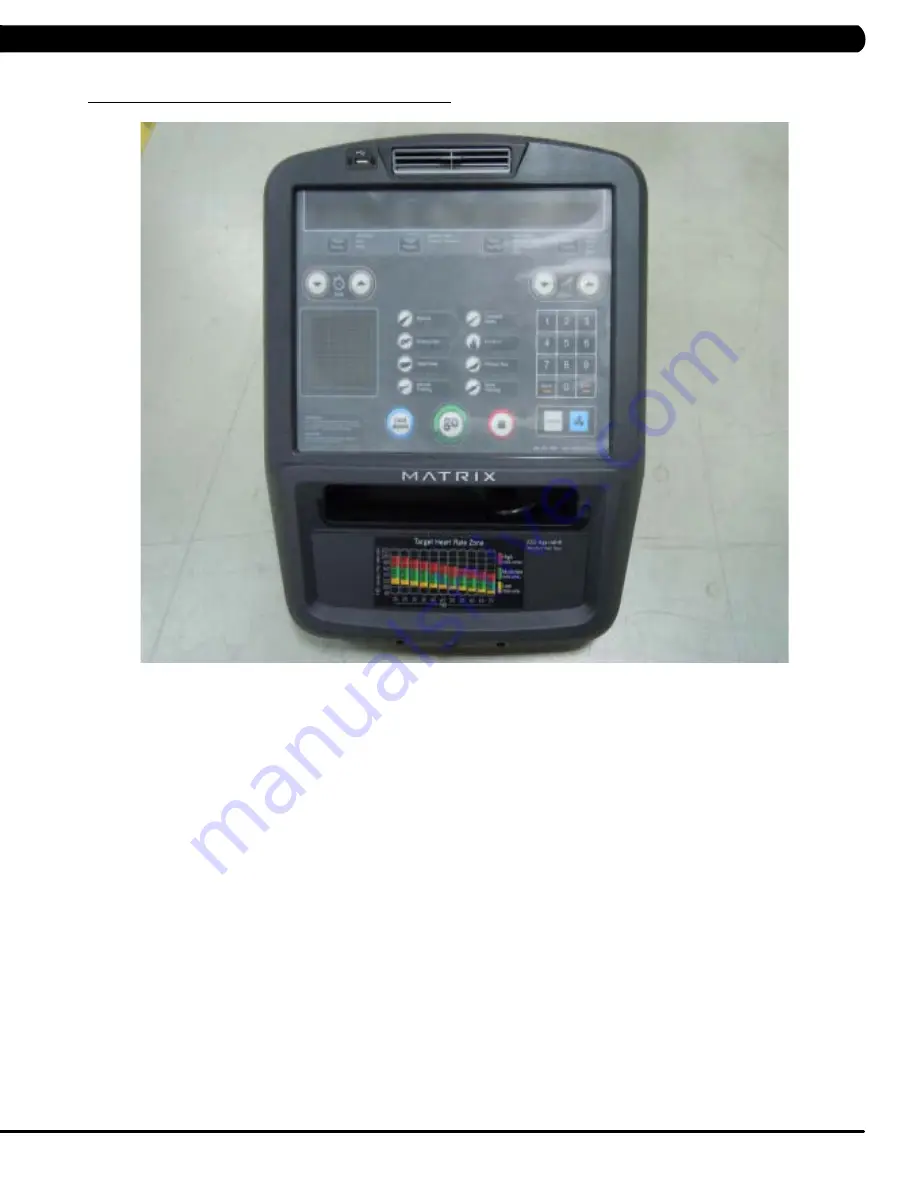
4.1 CoNSole DeSCRiPTioN

WORKOUT KEYS

:  Simple program view and selection buttons.  

GO:

  One touch Start.  

UP / DOWN LEVEL

:  Easy information and level selection.  

UP / DOWN TIME

:  Easy information and time adjustment.  

STOP

:  Ends workout and shows workout summary data.  

NUMBER KEYPAD:

  Workout data input for workout setup.  Level adjustment during workout.  

COOL DOWN:  

Puts bike into Cool Down mode.  

FAN:

  Allows for fan speed selection (fan has 3 operating speeds).  

TOGGLE DISPLAY:

  Allows user to select what information is displayed on the console.  

LANGUAGE: 

 Select language.

CHAPTeR 4: CoNSole oVeRlAy AND WoRkoUT DeSCRiPTioN

Содержание U5X-04 BIKE

Страница 1: ...U 5 x 0 4 B i k e S E R V I C E M A N U A l...

Страница 2: ...11 5 2 Manager Mode Overview 11 CHAPTER 6 ENGINEERING MODE 6 1 Using Engineering Mode 12 CHAPTER 7 SERVICE MODE 7 1 Using Service Mode 13 CHAPTER 8 TROUBLESHOOTING 8 1 Electrical Diagram 14 8 2 Error...

Страница 3: ...16 Generator Replacement 47 9 17 Pulley Axle Set Replacement 48 9 18 Crank Axle Set Replacement 50 9 19 Rear Stabilizer Replacement 51 9 20 Front Stabilizer Replacement 52 9 21 Testing the Bike 53 CHA...

Страница 4: ...ation A serial number plate is located below the bottom of the console mast beneath a rubber boot There is also a serial number tag on the middle of the main frame pointed towards the floor Chapter 1...

Страница 5: ...2 1 1 Serial Number Location chapter 1 Serial Number Location SN PLACEMENT...

Страница 6: ...hands away from moving parts If the item cannot be reached contact a Matrix authorized dealer for assistance Never operate the unit if it is damaged not working properly when it has been dropped or h...

Страница 7: ...outlet you plug Bikes into should not have anything else running on that same circuit besides other Bikes up to 3 per 15 amp circuit and 4 per 20 amp circuit The easiest way to verify this is to loca...

Страница 8: ...down the entire console area including the hand grips and hand rails MONTHLY 1 Vacuum under and around the Bike If you need to move it unplug the unit first 2 Remove the shrouds and use a vacuum to r...

Страница 9: ...lable on the Matrix web site at www matrixfitness com DAILY MAINTENANCE ITEMS 1 Look and listen for loose fasteners unusual noises and any other indications that the equipment may be in need of servic...

Страница 10: ...ment STOP Ends workout and shows workout summary data NUMBER KEYPAD Workout data input for workout setup Level adjustment during workout COOL DOWN Puts bike into Cool Down mode FAN Allows for fan spee...

Страница 11: ...display will read 3 2 1 Begin and then the program will start 4 3 workout setup steps fat burn ROLLING HILLS The Rolling Hills program is a level based program that automatically adjusts the resistan...

Страница 12: ...next level The test could take upwards of 30 minutes for very fit individuals Once the test ends a recovery period cool down will begin and the user s results are calculated and displayed Results are...

Страница 13: ...an grab these sensors in any program to view your current heart rate 1 Start pedaling and press the HEART RATE key Then press ENTER 2 Select Age by using the UP or DOWN LEVEL keys and press SELECT 3 S...

Страница 14: ...out time when GO is pressed or when no time is selected during program set up Default Level 1 1 30 Starting resistance when GO is pressed or when no resistance is selected during program set up Defaul...

Страница 15: ...MM nnnnn YY is the year 11 12 MM is the month e g 08 09 10 nnnnn is the actual serial number Use the UP DOWN LEVEL keys to navigate the layers and the number keys to input the serial number The produc...

Страница 16: ...ally sets the Accumulated Distance and Time Service 4 CSafe RF Test Press the ENTER key to test CSAFE Press the ENTER key again to test the RF Service 5 Error Log Shows the last 10 errors Press and LE...

Страница 17: ...14 8 1 Electrical Diagram chapter 8 Troubleshooting HURES5x C Electrical block diagram...

Страница 18: ...15 8 1 Electrical Diagram CONTINUED Chapter 8 Troubleshooting U5x F Electrical block diagram...

Страница 19: ...16 8 1 electrical diagramS CONTINUED Pulse Sensor Wire Chapter 8 Troubleshooting POWER RESISTANCE WIRE...

Страница 20: ...17 Digital Communication Wire Chapter 8 Troubleshooting 8 1 electrical diagramS CONTINUED Chapter 8 Troubleshooting ECB Wire...

Страница 21: ...or over 15V Check the wire connections at the battery Replace the battery 0x0441 b When the UCB implements a command the LCB is not receiving this command Check the machine type in Engineering Mode Ch...

Страница 22: ...ulate Status bright Normal LED8 UCB LCB Communication Status blinking OK Hardware definition LED1 AC plug in Status bright AC LED2 DC 5V Status bright OK LED3 AC plug in Status bright AC LED4 DC 12V S...

Страница 23: ...20 Chapter 8 Troubleshooting 8 4 LCB wiring connectionS...

Страница 24: ...ion disconnected 2 SOLUTION 1 The console cable is damaged or not properly plugged in Check the connection of the console cable at the UCB and LCB Also check the console cable for damage Replace if ne...

Страница 25: ...tion disconnected 2 SOLUTION 1 The console cable is damaged or not properly plugged in Check the connection of the console cable at the UCB and LCB Also check the console cable for damage Replace if n...

Страница 26: ...attery disconnection or fail When power is on LCB battery voltage is less than 6 VAC 2 SOLUTION 1 Check the battery wire connection between the battery and LCB Figure A 2 Check the battery voltage Fig...

Страница 27: ...r use on HUREA5x frame ERROR CODE 02B4 1 SYMPTOM 02B4 Resistance type error 2 SOLUTION 1 Check if the machine has the correct resistance system resistor or ECB Figures A B 2 Check if the console is ma...

Страница 28: ...bleshooting 8 9 troubleshooting Error 02AB Figure A ERROR CODE 02AB 1 SYMPTOM 02AB Machine type error 2 SOLUTION 1 Enter into Engineering Mode and verify that the Machine Type setting is correct shoul...

Страница 29: ...E 01AC 1 SYMPTOM 01AC Resistance over current 2 SOLUTION 1 Check if the resistance is short circuited by measuring amperage through the generator cable Figure A If the resistance value is under 10 ohm...

Страница 30: ...TING 1 SYMPTOM No resistance 2 SOLUTION 1 Check the power resistor wire connection between the power resistor and the LCB Figure A 2 Check if there is a resistance value by measuring amperage through...

Страница 31: ...onsole from the unit and verify continuity of the HR grip wiring With a multi meter set for ohms place one prong on the HR grip wiring coming up the console mast Figure C and the other on the appropri...

Страница 32: ...ess room power b If LED9 is still not lit check the incoming AC power to the LCB If the incoming power is not correct replace the power cord c Replace the LCB if all power components are OK and there...

Страница 33: ...ER c Test the affected keypad If the keypad works in the keypad test it may not be a functioning key in the program used for testing it 2 Check the connections of the keypad at the UCB a Remove the co...

Страница 34: ...console Figure B 3 Reinstall the wire connections to the new console 4 Carefully push the wires into the console and mast until they are clear of the console mast connection and attach the console to...

Страница 35: ...eful to support the handlebar Figure C 3 Carefully pull the wires from the console mast until the connectors are showing and then disconnect the 3 wires from the handlebar and remove the defective han...

Страница 36: ...in half Figure B 3 Disconnect the level key and HR plate wiring Figure C and remove the HR grip 4 Reverse Steps 1 3 to install a new HR grip NOTE When plugging in the HR plate wiring the red wire sho...

Страница 37: ...REPLACEMENT 1 Remove the 2 screws holding the cup holder to the console mast Figure A 2 Remove the cup holder Figure B 3 Reverse Steps 1 2 to install a new cup holder Figure A Figure B chapter 9 Part...

Страница 38: ...ay keypad is 1 Turn off power and disconnect the cord from the machine 2 Remove the console as outlined in Section 9 1 3 Remove the back cover of the console Figure A 4 Unplug and remove the faulty ov...

Страница 39: ...the console Figure G 10 Press down on the corners of the overlay to keep it in place then remove the protective film Figure H I 11 Once the overlay is in the correct position press down on the overlay...

Страница 40: ...move the 4 screws holding the console mast to the frame Figure B 4 Pull the wires out the bottom of the console mast and remove the mast Figure C 5 When installing a new console mast be sure to pull t...

Страница 41: ...ment Figure B Figure A 1 Remove the 4 screws holding the seat pad to the seat post Figure A 2 Lift the seat pad away from the seat post Figure B 3 Reverse Steps 1 2 to install a new seat pad chapter 9...

Страница 42: ...Pull the seat post upward until the stem comes away from the frame Figure B 3 Remove the 4 nuts holding the seat pad to the seat post and remove the seat pad Figure C 4 Reverse Steps 1 3 to install a...

Страница 43: ...away from the frame and set it aside Figure B 3 Remove the rubber boot that rests at the bottom of the seat post Figure C 4 Grab the lip of the seat post insert and remove it from the seat post Figur...

Страница 44: ...A NOTE For the right side pedal the threads are normal For the left side pedal the threads are reversed the pedal turns off counterclockwise 2 Remove the pedal Figure B 3 Reverse Steps 1 2 to install...

Страница 45: ...13 screws holding the left shroud in place Figure D 5 Remove the 13 screws holding the right shroud in place Figure E 6 Once the screws are removed from both side shrouds lift the shrouds away from th...

Страница 46: ...olding the lower board to the frame Figure B and remove the lower board 5 Reverse Steps 1 4 to install a new lower board Figure C shows the connections at the board 6 Test the bike for function as out...

Страница 47: ...oud as outlined in Section 9 11 2 Disconnect the 2 wires from the battery Figure A 3 Remove the 2 wing nuts on the battery bracket Figure B 4 Swivel the battery bracket out of the way and remove the b...

Страница 48: ...3 Remove the belt Figure B 4 Reverse Steps 1 3 to install a new drive belt NOTE Be sure to reattach the tension spring Figure C If more tension is needed on the drive belt multiple holes are availabl...

Страница 49: ...sion has been removed the generator belt can be walked off of the pulley Figure C 4 Pull the generator out of the frame towards the front of the unit and remove the generator belt Figure D 5 Reverse S...

Страница 50: ...ension has been removed the generator belt can be walked off of the pulley Figure C 4 Pull the generator out of the frame towards the front of the unit and remove the generator belt Figure D 5 Reverse...

Страница 51: ...lt as outlined in Section 9 14 3 Loosen the nuts holding the generator to the frame Figure A and remove the nuts putting tension on the generator belt Figure B 4 Once the tension has been removed walk...

Страница 52: ...60 mm nut holding in the pulley axle assembly with a large channel lock pliers or a pipe wrench Figure F 8 Once the 60 mm nut is removed the pulley axle set can be removed from the left side of the f...

Страница 53: ...h sides Figure C 5 Bend the tabs of the nut on the left side of the frame so that this nut will turn Figure D 6 Use a 32 mm wrench to remove the crank axle nuts Figure E NOTE This nut is reverse threa...

Страница 54: ...Lean the bike to one side and remove the 4 screws holding the rear stabilizer to the frame Figure A 2 Remove the rear stabilizer Figure B 3 Reverse Steps 1 2 to install a rear stabilizer Figure A Figu...

Страница 55: ...n the bike to one side and remove the 4 screws holding the front stabilizer to the frame Figure A 2 Remove the front stabilizer Figure B 3 Reverse Steps 1 2 to install a new front stabilizer Figure A...

Страница 56: ...press ENTER to save f Press and hold the STOP key for 3 5 seconds to return to normal function 2 If the unit has an add on TV program the TV channels see Entertainment Owner s Manual 3 Without hitting...

Страница 57: ...OR MILES CALORIES SPEED LEVEL RPM HEART RATE METS WATTS STATIC PROFILE DISPLAY User defined multi language display Yes English German French Italian Spanish Dutch Portuguese Swedish Finnish Japanese R...

Страница 58: ...ead screw M8 x 25L white 4 Z12 spring washer white 2 Z13 button head screw m5 x 10L white 8 Z21 Hex head screw M8 x 20l black 8 Z22 flat washer black 8 z23 spring washer black 4 z31 button head screw...

Страница 59: ...56 10 3 ASSEMBLY INSTRUCTIONS step 1 step 2 after these assembly steps are complete be sure to setup and test the unit as outlined in section 9 21 Chapter 10 Bike Specifications and assembly guide...

Страница 60: ...57 10 3 Assembly Instructions Continued step 3 step 4 chapter 10 Bike specification and assembly guide...

Страница 61: ...58 10 3 ASSEMBLY INSTRUCTIONS CONTINUED Step 5 Chapter 10 Bike Specifications and assembly guide...

Страница 62: ...59 final assembly 10 3 assembly instructions continued chapter 10 Bike specification and assembly guide...

Страница 63: ...on the pedals The user s knees should bend slightly when the pedal is at the lowest point of its rotation It should be possible to pedal without locking the knees or shifting in the seat The Matrix U...

Страница 64: ...ng indicates that your bike needs to be leveled Determine which leveler is not resting completely on the floor Loosen the nut with one hand to allow the leveler to rotate Rotate the left or right leve...

Страница 65: ...rogram the television 1 Remove the console from the unit as outlined in Section 9 1 2 Remove the 6 screws holding the console front to the back and split the console Figures A B 3 Remove the 2 screws...

Страница 66: ...ed in Step 3 Figure H NOTE Steps 8 13 should only be done if installing a MYE TV the PCTV does not use the entertainment overlay 8 Remove the existing heart rate overlay from the lower portion of the...

Страница 67: ...ack connector to the power wire coming up the console mast from the base of the unit 16 Plug the side of the controller wire labeled To Console into the CSafe board mounted on the console back Figure...

Страница 68: ...Figure U The small cover with the Matrix logo that makes up the top of the rear console cover is no longer used with a TV bracket 20 Mount the console back onto the unit making sure to make all the n...

Страница 69: ...racket being sure to tuck the tabs of the plate installed during Step 20 into the console plastic Figure BB 28 Mount the TV to the TV bracket using 4 screws sent with the TV Figure CC 29 Put the back...

Страница 70: ...e software files into the UCB folder on the USB flash drive the access should read MATRIX FW UCB Figure B 3 Insert the USB flash drive into the USB port on the console Figure C 4 With the display is i...

Страница 71: ...68 NOTES...

Страница 72: ...69 MATrix Fitness systems corp 1610 Landmark Drive Cottage Grove wi 53527 USA TOLL FREE 866 693 4863 www matrixfitness com FAX 608 839 1717 REV 01 KO...

Отзывы: