background image

Omni-Flow 380

5.12.3 Stitch folder setting 

1

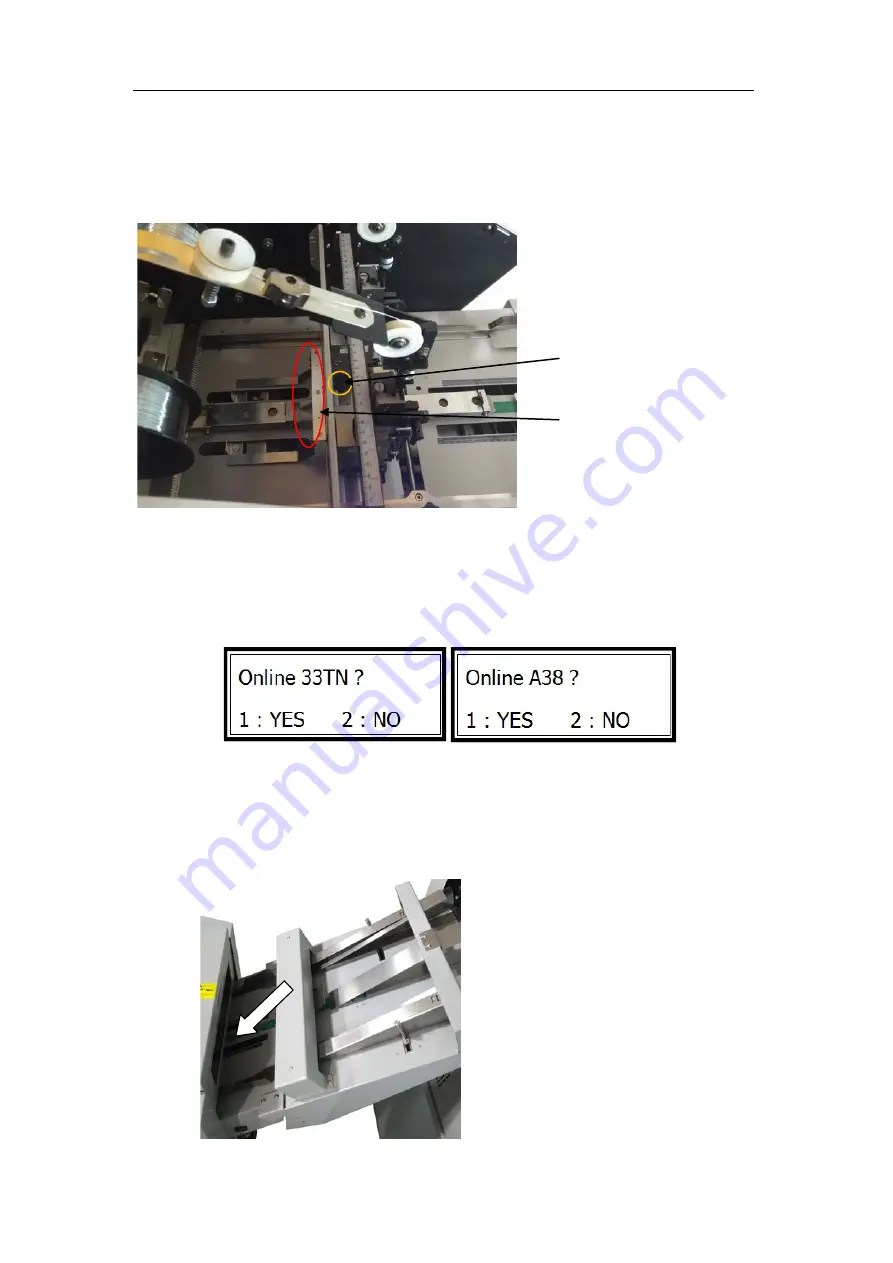
Set the paper deflector

As shown in the following picture, there is a rubber head screw to fix the paper
deflector.

2

Connection select

As shown in the pictures, if the stitch folder was connected to the 33TN and Aeolus
38, it will come up the warning message for the confirmation of connecting to 33TN
and Aeolus38.

3

Adjust the stitch position

After finish the connection, we can press the test button on the stitch folder and feed
one book manually to the stitch folder. Then adjust the big wheel on the stitch folder
to make sure it will stitch on the middle length of the book. After that press the test
button one more time to finish the job.

Paper deflector 

Rubber head screw. 

24 

Содержание OmniFlow 380

Страница 1: ...Product instruction manual OmniFlow 380...

Страница 2: ...4 6 Omni Flow 380 Transfer station Optional 9 Chapter 5 Operation 11 5 1 Key panel 11 5 2 Standby 12 5 3 Hardware setting 12 5 3 1 Segregator finger adjusting knob 12 5 3 2 Blowing adjusting knob 13...

Страница 3: ...folder 33TN Optional 22 5 12 1 Connection 23 5 12 2 Connect the wiring harness 23 5 12 3 Stitch folder setting 24 5 12 4 Side guides set on the Register 25 5 12 5 Paper deflector set on the Register 2...

Страница 4: ...0 148 5mm Paper thickness 100g 350g 0 1 0 35mm 70g 100g 0 07 0 1mm Paper waviness Less than 5mm Less than 5mm Max speed For A4 8400 sheets per hour 1300 books per hour 3 A4 sheets saddle stitching Tri...

Страница 5: ...achine Do make sure all safety covers are in place The top covers have an interlock switch which will disable the unit if removed Do contact the local maintenance center before you are about to move t...

Страница 6: ...g Don t shut down the machine while running Don t put heavy matter on machine or shock it Be careful of any metal or flammable thing in internal machine or it may cause fire or electronic shock If it...

Страница 7: ...er thickness 6 Blowing gate adjust knob Adjust the blowing air according to the paper thickness 7 Right side guide Hold the paper on the table 8 Top cover For security 9 Upper limit assembly Adjust th...

Страница 8: ...ease the feeding table 2 When the feeding table gets stuck at the bottom press the button together with the start button to release the feeding table 3 1 Inside No Name Description 1 Feeder belt Feedi...

Страница 9: ...g steps A B C and D No Name Qty No Name Qty Top bottom plate 1 Cross pan head shoulder screw M3X6 32 Front side plate 2 Castors with lock 2 Bottom plate assembly 1 Castor 2 Hexagon socket head cap scr...

Страница 10: ...transportation 4 3 Feeding extension table installation As shown in picture and there are three screws for the extension table Remember to tighten up the screws after you hang the extension table on...

Страница 11: ...for voltage not in the standard rang There are two 5 20 6A 250V fuses in side One is spare Power cord It can carry above 10A current 1 Do not unplug the power cord during operation It may cause electr...

Страница 12: ...Omni Flow 380 4 6 Omni Flow 380 Transfer station Optional Transfer station Transfer station installation 1 3 5 3 2 3 6 4 3 7 9...

Страница 13: ...edge in order to let the sheet go through smoothly 3 Side guide fix screws Use to tighten the side guides 4 Ball holding bracket Place steel balls 5 Ball holding bracket Place steel balls And if the p...

Страница 14: ...Page down It can be used to drive the side in standby mode 8 Page up It can be used to drive the side in standby mode 9 Mode Select different modes 10 Backward It can be used to drive the jam paper o...

Страница 15: ...standby interface we can use number keys for quantity preset and C button to clear the quantity The largest input is 999 5 3 Hardware setting 5 3 1 Segregator finger adjusting knob As shown in the fol...

Страница 16: ...smaller and thinner sheets we can try weakening the blowing to make it fed smoothly and stably 5 3 3 Upper limit height adjustment for feeding table Turn the shaft upward the table will rise higher If...

Страница 17: ...ding to the width of sheets Make sure the sheets can move smoothly in the feeding direction Usually about 0 5mm wider than the sheet width will be ok 5 3 5 Suction assisting fan setting Loosen the scr...

Страница 18: ...7 Blower adjustment As shown is the following picture turn the knob clockwise to increase the blowing We can try increasing the blowing for thicker and wider sheets while decrease the blowing for thin...

Страница 19: ...ne will stop Then after we place more sheets on the table it will continue the last job 5 5 Set Batch Pause Press M to enter the set batch pause interface In this interface we can set the batch delay...

Страница 20: ...nter the interface 1 is to open the suction fans and 2 is to close the suction assisting fan Notes This two fans are used when we run the thicker and larger sheets It can make this sheets fed more smo...

Страница 21: ...ns the total sheet count and the SN means the serial number of the machine This information is used for warranty service 5 11 Aeolus38 Register Stich folder Optional Aeolus38 can be connected to stitc...

Страница 22: ...Sum 100 means the current set is 100 sheets in total Pa 2 means each batch including 2 sheets Auto batch setting steps Input the Sum and Pa and then confirm In picture we set 50 sheets in total and 2...

Страница 23: ...tomatically turn to 10 4 Sum is not divisible by Pa 1 Sum Pa 2 the remainder is 1 It will do like the form Batches Pages Pa and Pa is an odd number Pages Pa and Pa is an event number Copi 1 1 Pa 1 2 P...

Страница 24: ...like the form Batches Pages Pa and Pa is an odd number Pages Pa and Pa is an event number Copi 1 1 Pa Pa Copi 2 1 Pa 1 2 1 Pa 2 1 Copi 3 1 Pa 1 2 Pa 2 1 Copi 4 0 0 0 9 Sum is not divisible by Pa 2 Sum...

Страница 25: ...divisible by Pa Sum Pa 3 the remainder is equal or larger than 3 It will do like the form Batches Pages Pa Copi 1 quotient 1 Pa Copi 2 1 Remainder Copi 3 1 Pa Copi 4 0 0 5 11 4 Set batch times Press M...

Страница 26: ...ou have set to the correct position Notes The connections for 33TN and stitch folder is shown in the operation manual of 33TN 5 12 2 Connect the wiring harness Connect the harness by following the pic...

Страница 27: ...38 it will come up the warning message for the confirmation of connecting to 33TN and Aeolus38 3 Adjust the stitch position After finish the connection we can press the test button on the stitch fold...

Страница 28: ...they are 2mm away from the paper edge 5 12 5 Paper deflector set on the Register As shown in the pictures set the paper deflectors like this It will help the feeding of stitch folder Notes Make sure d...

Страница 29: ...he sensor was covered by paper dust or the top and bottom sensors not toward to each other it will come up feed jam error So it needs regular cleaning 6 3 Double feed 1 No double feed detectors mounte...

Страница 30: ...utton at the same time to fix it And the upper limit assembly should not be adjusted too high 2 When the feeding table get stuck on the bottom press the release and start button at the same time to fi...

Страница 31: ...cially for the transfer rollers and sensors Unplug the power cord before any maintenance 7 1 Clean sensors As shown in the pictures there are some detect sensors on the machine 7 2 Clean rollers Clean...

Страница 32: ...a third party not approved by the manufacturer Vivid Laminating Technologies to carry out such alterations This product is marked with a crossed out wheelie bin symbol to alert customers to the fact t...

Отзывы: