


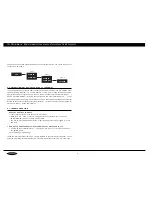


4) Maintenance
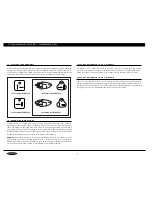
4.1 RECOMMENDED CLEANING TIPS
1.
Use a soft clean cotton cloth.
DO NOT
use paper towels to clean surfaces on the tr eadmill.
Paper towels are abrasive and can scratch surfaces.
2.
Use a mild soap and damp cloth.
DO NOT
use ammonia based cleaner. This will cause dis -
coloring of the aluminum and plastics it comes into contact with.
3.
Do not pour water or cleaning solutions on any surface. This could cause electr ocution.
4.
Wipe the console and side rails dry after every use.
5.
Brush away any wax deposits from the deck and belt area. This is a common occurrence until
the wax is worked into the belt material.
6.
Be sure to remove any obstructions form the path of the elevation wheels including power cor ds.
7.
Monthly unplug the treadmill and remove the motor cover. Check for debris and clean with
a dry cloth or small vacuum nozzle.
WARNING
Do Not plug the tr eadmill in until the motor
cover has been reinstalled.
CAUTION
This unit weighs 450 pounds. Be sur e to have proper assistance to install and move
the unit, to avoid injury to you and the unit.
4.2 DECK AND BELT REPLACEMENT
One of the most common wear and tear items on a treadmill is the Deck and Belt combination.
If these two items ar e not properly maintained they can cause damage to other components.
This product has been pr ovided with most advanced maintenance fr ee lubricating system on
the market.
WARNING
Do not r un the tr eadmill while cleaning the belt and deck. This can cause serious
injury and can damage the machine.
Maintain the belt and deck by wiping the sides of the belt and deck with a clean cloth. The user
can also wipe under the belt 2 inches on both sides r emoving any dust or debris.
The deck can be flipped and reinstalled with a new belt by only by an authorized service technician.
Please contact Matrix Fitness Systems for mor e information.
4.3 ADJUSTING THE BELT
After locating the treadmill in the position it will be used, the belt must be checked for pr oper
tension and centering. The belt might need to be adjusted after the first two hours of use.
Temperature, humidity, and use cause the belt to str etch at different rates. If the belt starts to
slip when a user is on it be sur e to follow the directions below.
STEP 1
Locate the two hex head bolts on the r ear of the tr eadmill. The bolts ar e located at
each end of the frame at the back of the treadmill. These bolts adjust the rear belt roller. Do
not adjust until the treadmill is on. This will pr event over tightening of one side.
STEP 2
The belt should have equal distance on either side between the frame.
If the belt is
touching one side, do not start the treadmill. Turn the bolts counter clockwise approximate-
ly one full turn on each side. Manually center the belt by pushing the belt fr om side to side.
Tighten the bolts the same amount as when the user loosened them appr oximately one full
turn. Inspect the belt for damage.
STEP 3
While the treadmill is running, at 3 mph, notice the belt position. If it is moving to the
right, tighten, tur n clockwise, the right bolt 1/4 tur n and loosen the left bolt 1/4 tur n. If it
moving to the left, tighten, turn clockwise, the left bolt 1/4 turn and loosen the right bolt 1/4
turn. Repeat Step 3 until the belt r emains centered for several minutes.
STEP 4
Check the tension of the belt. The belt should be very snug. When a person walks or
runs on the belt it should not hesitate or slip. If this occurs tighten, turn clockwise, both bolts
1/4 turn. Repeat if necessary.
10
Содержание MX-T4
Страница 1: ...O W N E R S M A N U A L...
Страница 2: ...T R E A D M I L L...
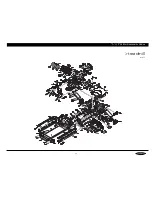
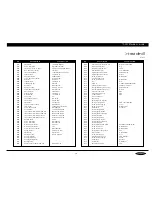
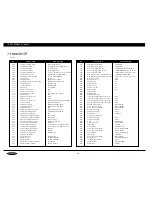
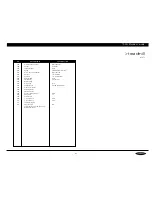
Страница 16: ...treadmill MX T5 7 Parts Assembly...
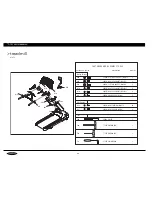
Страница 17: ...7 1 T5 Exploded View treadmill MX T5 17...
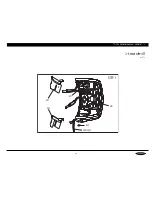
Страница 23: ...7 3 Assembly Step 1 STEP 1 AN1 AC1 AC2 AC1 N50 CABLE SET treadmill MX T5 23...
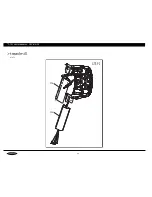
Страница 24: ...7 3 Assembly Step 2 STEP 2 C06 C08 treadmill MX T5 24...
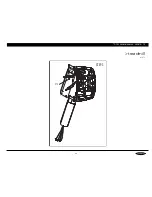
Страница 25: ...7 3 Assembly Step 3 STEP 3 C10 treadmill MX T5 25...
Страница 26: ...7 3 Assembly Step 4 C05 C09 STEP 4 C05 treadmill MX T5 26...
Страница 27: ...7 3 Assembly Step 5 G19 G19 STEP 5 treadmill MX T5 27...
Страница 28: ...7 3 Assembly Step 6 STEP 6 treadmill MX T5 28...


