background image

6

3.1 RECOMMENDED CLEANING TIPS

CHAPTER 3: PREVENTIVE MAINTENANCE

MAINTENANCE SCHEDULE

E

ACTION

FREQUENCY

Clean the indoor cycle using soft cloths or paper towels or other Matrix approved 

solution (cleaning agents should be alcohol and ammonia free). Disinfect the saddle 

and handlebars and wipe off all bodily residues.

AFTER EACH USE

Make sure that the indoor cycle is level and does not rock.

DAILY

Clean entire machine using water and a mild soap or other Matrix approved solution 

(cleaning agents should be alcohol and ammonia free).

Clean all exterior parts, the steel frame, front and rear stabilizers, seat and handlebars.

WEEKLY

Test the emergency brake to make sure it is functioning properly. To do this, press down 

the red emergency brake lever while pedalling. When functioning properly, it should 

immediatly slow down the flywheel until it comes to a complete stop.

BI-WEEKLY

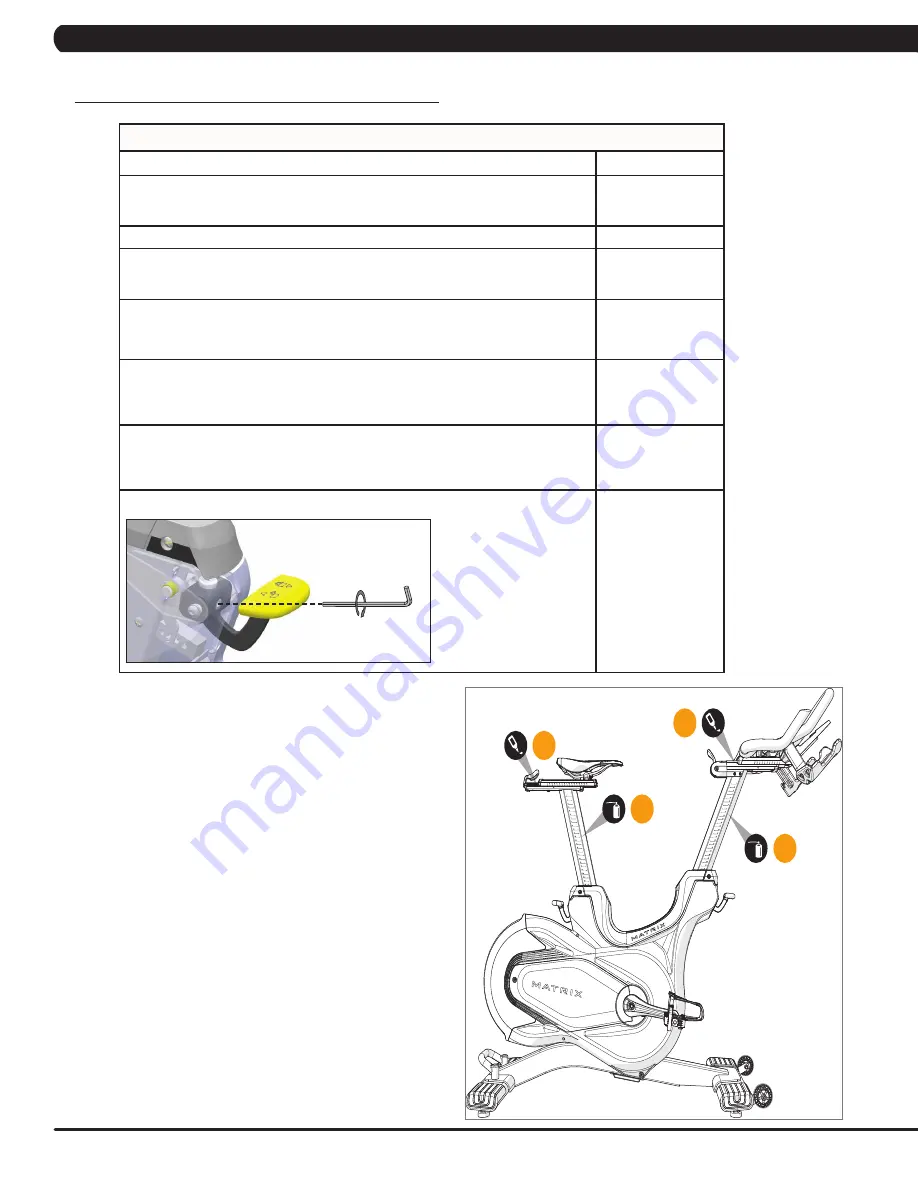
Lubricate the saddle post (A). To do this, raise the saddle post to the MAX position, 

spray with maintenance spray and rub down the entire exterior surfaces with a soft 

cloth. Clean the saddle slide (B) with a soft cloth and if necessary apply a small amount 

of lithium/silicone grease.

BI-WEEKLY

Lubricate the handlebar post (C). To do this, raise the handlebar post to the MAX 

position, spray with maintenance spray and rub down the entire exterior surfaces with a 

soft cloth. Clean the handlebar slide (D) with a soft cloth and if necessary apply a small 

amount of lithium/silicone grease.

BI-WEEKLY

Inspect all assembly bolts and pedals on the machine for proper tightness.

5 mm

MONTHLY

B

A

D

C

MAINTENANCE 

1.  Any and all part removal or replacement must be 

performed by a qualified service technician. 

2.  DO NOT use any equipment that is damaged and or 

has worn or broken parts. Use only replacement parts 

supplied by your country’s local MATRIX dealer. 

3.  MAINTAIN LABELS AND NAMEPLATES: Do not remove labels 

for any reason. They contain important information. If unreadable 

or missing, contact your MATRIX dealer for a replacement.

4.  MAINTAIN ALL EQUIPMENT: Preventative maintenance 

is the key to smooth operating equipment as well 

as keeping your liability to a minimum. Equipment 

needs to be inspected at regular intervals. 

5.  Ensure that any person(s) making adjustments or performing 

maintenance or repair of any kind is qualified to do so. 

MATRIX dealers will provide service and maintenance 

training at our corporate facility upon request.

Содержание CXC FC20

Страница 1: ...T R A I N I N G C Y C L E C X C F C 2 0 S E R V I C E M A N U A L...

Страница 2: ...Guides 11 CHAPTER 5 TROUBLESHOOTING 5 1 Seat Post or Handlebar slide down 12 5 2 How to Adjustment the ECB Set Level 1 Position 13 CHAPTER 6 PARTS REPLACEMENT GUIDE 6 1 ECB Brake Replacement 14 6 2 Se...

Страница 3: ...HEEL AND PEDAL SPEED MUST BE REDUCED IN A CONTROLLED MANNER WARNING KEEP CHILDREN UNDER THE AGE OF 14 AWAY FROM EXERCISE EQUIPMENT ALL WARNINGS AND INSTRUCTIONS SHOULD BE READ AND PROPER INSTRUCTION O...

Страница 4: ...edge unless they have been given supervision or instruction concerning use of the equipment by a person responsible for their safety Ensure that adjustment levers seat and handlebar fore and aft are p...

Страница 5: ...s extremely important that the levelers are correctly adjusted for proper operation Turn leveling foot clockwise to lower and counter clockwise to raise unit Adjust each side as needed until the equip...

Страница 6: ...ists Advanced cyclists could try different heights to get the arrangement most suitable for them A SADDLE HORIZONTAL POSITION Pull the adjustment lever down to slide the saddle forward or backward as...

Страница 7: ...components WARNING The indoor cycle does not have a free moving flywheel the pedals will continue to move together with the flywheel until the flywheel stops Reducing speed in a controlled manner is r...

Страница 8: ...cessary apply a small amount of lithium silicone grease BI WEEKLY Lubricate the handlebar post C To do this raise the handlebar post to the MAX position spray with maintenance spray and rub down the e...

Страница 9: ...Item SAP Number Object Description Q TY 1 1000404736 Console Set include 3 PCS AAA battery 1 2 1000405712 Magent Two SIDED 10X5T 3000GS INCLUDE F 1 3 1000404742 Sensor Set 1 4 1000409394 Sensor Fix P...

Страница 10: ...Triple data display Cadence Heart Rate and Training Data Automatic Scan function Advanced energy expenditure algorithm for personalized Kcals Calories Bright LED back light Dual mode ANT and heritage...

Страница 11: ...down keys a Heart Rate Pairing Press key for heart rate pairing you must put on the heart rete chest belt and move to within 12inches 30cm to the console for proximity pairing b Press key to set Age o...

Страница 12: ...WORKOUT DESCRIPTION 1 Please hold the key after put in the battery when the console will enter the pair screen Figure A B 2 Please hold the key to enter the console pair screen press the star the pai...

Страница 13: ...left service cover and remove service cover from left direction Figure A 2 Install the magnet at flywheel Figure B 3 Install the Sensor Fix Plate to the frame Figure C 4 Install the receive set to the...

Страница 14: ...1 SEAT POST OR HANDLEBAR SLIDE DOWN TROUBLESHOOTING 1 SYMPTOM Seat post or handlebar slides down 2 SOLUTION a Tighten the bolt by turning it clockwise 1 2 turn Figure A CHAPTER 5 TROUBLESHOOTING FIGU...

Страница 15: ...UTION a Remove the one screw holding left service cover and remove service cover from left direction Figure A b Adjust the Brake set to level 1 Figure B c Insert 4mm rod through the hole of ECB then a...

Страница 16: ...emove the spring Figure B 3 Remove the one screw holding right service cover and remove service cover from right direction Figure C 4 Remove the three screws holding the ECB bracket Figure D 5 Remove...

Страница 17: ...rew holding the seat pad Figure A 2 Remove the one screw holding the seat pad bracket Figure B 3 Remove the two screws holding end cover Figure C 4 Remove the seat pad adjustable set Figure D FIGURE C...

Страница 18: ...emove the 2 screws holding fly wheel cover Figure B 3 Remove the 9 screws holding left site cover and turn the crank at Figure C position to remove cover from frame 4 Remove the one screw holding righ...

Страница 19: ...Remove the 3 screws holding right site cover Figure E 6 Remove the 4 screws holding seat tube Figure F 7 Pull up the adjustable grip set then remove the seat post Figure G H FIGURE G FIGURE H CHAPTER...

Страница 20: ...the two disc washers in a concave to concave stack together into the seat adjustment knob Figure B 4 Assemble the bracket and put to concave hold then use the magnet fixing bracket Figure C D 5 Assemb...

Страница 21: ...SET REPLACEMENT 1 Remove the two screws holding end cover Figure A 2 Remove the one screw holding stopper block Figure B 3 Remove the handlebar set Figure C CHAPTER 6 PARTS REPLACEMENT GUIDE FIGURE A...

Страница 22: ...ove the side covers 2 Remove the 5 screws holding brake set Figure A 3 Remove the POLY V belt Figure B 4 Remove the 6 screws holding fly wheel Figure C 5 Remove the brake cable holding ECB set Figure...

Страница 23: ...ar post Figure F 8 Bring handlebar to its maximum vertical position and secure at Level 25 Fit brake cable though post outlet and around the paddle crank for a circle Figure G 9 Assemble the brake cab...

Страница 24: ...ulley set is fixed put the belt installation tool on the pulley turn the pulley until the belt is installed Figure L Note 13 1 The belt installation tool part number is 0000093768 13 2 Rotate the pull...

Страница 25: ...all Dimensions L x W x H 122 4 x 56 4 x 10² 8 cm 48 2 x 22 2 x 40 5 Ensure a minimum clearance width of 0 6 meters 24 for access to and passage around MATRIX equipment Please note 0 91 meters 36 is th...

Страница 26: ...EL FLYWHEEL TRANSPORT HANDLE REAR STABILIZER TUBE HANDLEBARS DEVICE HOLDER CXM has console WATER BOTTLE HOLDER HORIZONTAL HANDLEBAR ADJUSTMENT LEVER HANDLEBAR HEIGHT ADJUSTMENT LEVER CRANK PEDALS TRAN...

Страница 27: ...Hardware Pack Description Qty A B C Bolt M12x25L Flat Washer Bolt M12x70L 2 4 2 Torque Value A C 78 Nm 58 ft lb 78 Nm 58 ft lb 7 3 ASSEMBLY INSTRUCTIONS CONTINUED STEP 1 CHAPTER 7 SPECIFICATIONS AND...

Страница 28: ...ATIONS AND ASSEMBLY GUIDE E D F Black CX Yellow CXM Hardware Pack Description Qty D E F Stopper Screw M8x20L Screw M4x6L 1 1 2 Torque Value E 20 Nm 14 ft lb Slide handlebars onto frame before attachin...

Страница 29: ...27 Pre installed Hardware Description Qty G Bolt M6x50L 1 LEFT PEDAL 7 3 ASSEMBLY INSTRUCTIONS CONTINUED STEP 3 CHAPTER 7 SPECIFICATIONS AND ASSEMBLY GUIDE G Torque Value 100 Nm 74 ft lb...

Страница 30: ...28 CHAPTER 8 DOCUMENT UPDATE HISTORY Version Date Change Description 1 2018 2 8 Service manual released 8 1 DOCUMENT UPDATE HISTORY...

Страница 31: ...29 NOTES...

Страница 32: ...30 MATRIX FITNESS SYSTEMS CORP 1610 LANDMARK DRIVE COTTAGE GROVE WI 53527 USA TOLL FREE 866 693 4863 www matrixfitness com FAX 608 839 1717 REV 01 KO...

Отзывы: