background image

IMPOR

TANT INFORMA

TION

12

AIR

-

POWERED CLIPPED

-

HEAD FRAMING NAILER  058

-

8434

-

4

Air system

A

lways use clean, dry, regulated compressed air at 4 to 7 bar (60 to 100 PSI).

Do not exceed the maximum and minimum pressures. Operating the tool at the wrong 
pressure will cause excessive noise, fast wear or misfiring.

It is recommended that a filter

-

regulator

-

lubricator be used and be located as close to the tool 

as possible.

If a filter

-

regulator

-

lubricator is not installed, place up to 6 drops of compressor oil into the air 

inlet plug before each use.

If a filter

-

regulator

-

lubricator is installed, keep 

the air filter clean. A dirty filter will reduce the 

air pressure to the tool, which will cause a reduction in power, efficiency, and general 
performance.

For optimal performance, install a quick connector to the tool and a quick coupler on the 
hose, if applicable.

Verify that all of the connections in the air supply system are sealed in order to prevent air 
from leaking.

Note: 

Please note that the filter

-

regulator

-

lubricator and air hose are sold separately.

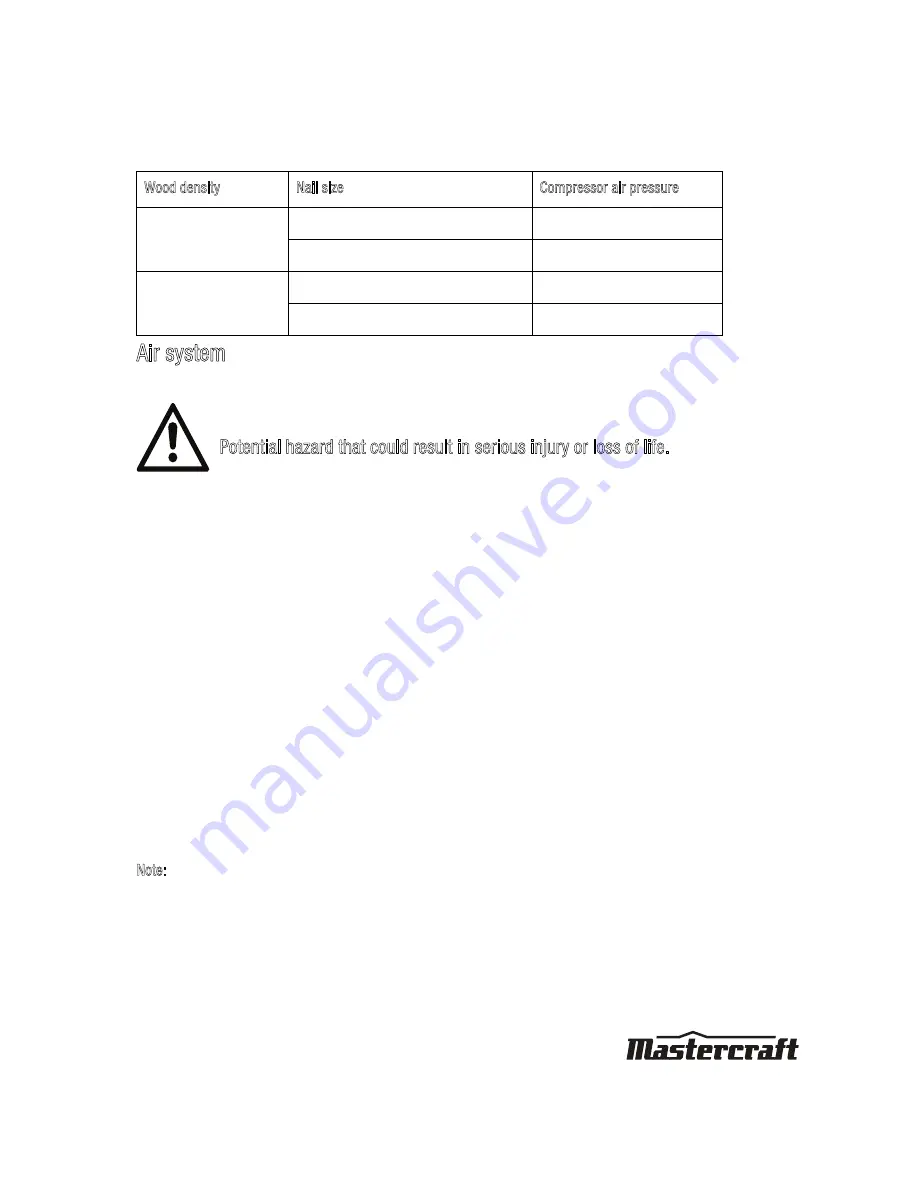
Wood density

Nail size

Compressor air pressure

!

0.6 g/cm

3


2.5" (63 mm)

100 psi

t

2.5" (63 mm)

110 psi

d

0.6 g/cm

3


2.5" (63 mm)

70 psi

t

2.5" (63 mm)

110 psi

WARNING!

Potential 

h

azard t

h

at could result in serious injury or loss o

f

 li

f

e.

Keep hands and other parts of the body away from the work areas when 
connecting the air supply. Failure to co

mply could lead to serious injury or 

loss of life.

Содержание 058-8434-4

Страница 1: ...INSTRUCTION MANUAL AIR POWERED CLIPPED HEAD FRAMING NAILER 058 8434 4...

Страница 2: ...8434 4 QUICK START GUIDE TECHNICAL SPECIFICATIONS 3 SAFETY GUIDELINES 4 9 KEY PARTS DIAGRAM 10 IMPORTANT INFORMATION 11 13 TYPES OF NAILS 14 15 OPERATING INSTRUCTIONS 16 22 MAINTENANCE 23 24 TROUBLES...

Страница 3: ......

Страница 4: ...re used to indicate this information Note The word Note is used to inform the reader of something he she needs to know about the tool PERSONAL SAFETY These precautions are intended for the personal sa...

Страница 5: ...tool Always ensure that the tool has stopped before putting it down after use in the interest of safety and to prevent possible damage to the tool user Keep proper footing at all times in order to ens...

Страница 6: ...e Risk of burns The pump and the manifold generate high temperatures In order to avoid burns or other injuries do not touch the pump the manifold or the transfer tube while the compressor is running A...

Страница 7: ...Locate the compressor in a well ventilated area for cooling at a minimum of 12 31 cm away from the nearest wall Protect the air hose and the power cord from damage and puncture Inspect them for weak o...

Страница 8: ...lubricated Daily lubrication is essential to avoid internal corrosion and possible failures Ensure the floor is not slippery and wear non slip shoes Floor should be kept clean and clear Always follow...

Страница 9: ...in use when it is being handed to another person and when it is left unattended Failure to comply may result in moderate injury or damage to equipment Use safety goggles and ear protection Wear safet...

Страница 10: ......

Страница 11: ...nails flush or countersunk into various materials which keeps projects moving additional trigger included to allow advanced bump fire use a rear loading magazine made of extruded aluminum for lighter...

Страница 12: ...A dirty filter will reduce the air pressure to the tool which will cause a reduction in power efficiency and general performance For optimal performance install a quick connector to the tool and a qui...

Страница 13: ...roper working order No Description No Description 1 Mastercraft Air powered Clipped head Framing Nailer 6 Regulator 0 to 8 5 bar 2 Quick connector 7 Filter 3 Quick coupler 8 Cut off valve 4 Air hose 9...

Страница 14: ...with a variety of shank types e g ring smooth spiral and a variety of coatings or nail compositions e g Electro mechanical hot dipped galvanized or stainless steel etc Length 2 3 1 2 50 to 90 mm Fig A...

Страница 15: ......

Страница 16: ...n the magazine and slide it back fig D DANGER Potential hazard that will result in serious injury or loss of life Disconnect the tool from the compressed air source before loading nails Do not point t...

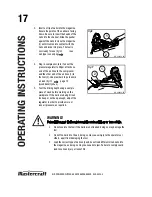
Страница 17: ...er s tape to avoid air leak fig F page 12 wood density chart 5 Test the driving depth using a sample piece of wood before working on the workpiece If the nails are being driven too deep or not deep en...

Страница 18: ......

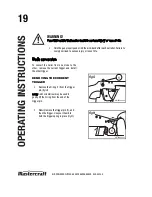
Страница 19: ...r pin fig G Note A slot screwdriver may be used to gently lift the O ring from the end of the trigger pin Slowly remove the trigger pin 1 and then the trigger Use your thumb to hold the trigger spring...

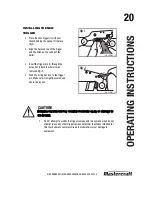
Страница 20: ...oles Put it back to where it was removed fig J Push the O ring back on to the trigger pin Make sure it is tightly secured and sits in the recess MC 588434 12 fig I 1 2 MC 588434 13 fig J 1 CAUTION Pot...

Страница 21: ......

Страница 22: ......

Страница 23: ...ED DESCRIPTION TOOLS OR MATERIALS REQUIRED MAXIMUM SERVICE INTERVAL Each Use or every 2 Hrs Monthly As Needed General inspection free movement Trigger spring safety mechanism None X In depth inspectio...

Страница 24: ...ews and caps frequently in order to help prevent personal injury Inspect the trigger spring and safety mechanism for free movement on a regular basis in order to ensure that the safety system is fully...

Страница 25: ...valve are damaged 2 The trigger valve heads are damaged 3 Trigger valve stem seal or O rings are damaged 1 Inspect and replace the O rings 2 Inspect and replace trigger valve heads 3 Inspect and repl...

Страница 26: ...ront plate 3 Nails cannot move freely in the magazine because of dirt or damage 4 The O ring on the piston is worn or dry or there is not enough lubrication 5 The cylinder cover seal Is leaking 1 Repl...

Страница 27: ...TROUBLESHOOTING 27 AIR POWERED CLIPPED HEAD FRAMING NAILER 058 8434 4...

Страница 28: ......

Страница 29: ...1 35 O ring 6 4 X 2 1 10 O ring 48 7 X 2 65 1 36 O ring 9 X 1 8 1 11 O ring 63 X 2 65 1 37 Switch spring 1 12 Head valve 1 38 Switch pipe 1 13 O ring 50 X 3 55 1 39 O ring 2 4 X 1 6 1 14 Main piston 1...

Страница 30: ......

Страница 31: ...ot limited to fuel lubricants vacuum bags blades belts sandpaper bits fluids tune ups or adjustments e This warranty will not apply where damage is caused by repairs made or attempted by others i e pe...

Страница 32: ...r company which shall be covered under the product manufacturer s warranty if any Additional limitations This warranty applies only to the original purchaser and may not be transferred Neither the ret...

Отзывы: