background image

33 


TABLE OF MAINTENANCE INTERVAL 


Interval: based on 
odometer  reading 
or 

number 

of 

months


km 

1000 

4000 

7000 

   10 000 

Number of 

months


12 


24 


36 


   Battery 

* Butterfly throttle, throttle cable 

* Spark plug 

* Clutch 

* Air Filter  

* Fuel filter 


* Fuel hoses 

Replace every 4 years 

* Engine oil and oil filter  

* Oil filter strainer 

 * Valve clearance 

 * Timing chain 

* Chassis bolt and nut 

*  Brake pads front and rear, linings 


* Brake fluid 

Replace every 2 years 

* Front fork 

*  Rear shock absorbers 

*  Wheesl and tyres 


   Driving chain 

Clean and lubricate every 1 000 kms 

   * Steering 

*  Cylinder head nut and exhaust pipe 
bolt 

Caption 

:    Inspection : 

I      

 Tightening : 

      Cleaning

 : 

       Replace : 


Note that the maintenance interval is 3000 km. 
Do not forget to certify them in the manual provided by your MASH dealer

Содержание Dirt Track 50CC

Страница 1: ...User manual ...

Страница 2: ......

Страница 3: ... are the happy new owner of a MASH which embodies a new spirit a new trend a motorcycle with a look and a philosophy Vintage synonymous of freedom Please read this manual thoroughly before using your MASH Have a nice road ...

Страница 4: ... running in method please refer to Running in of a new vehicle Please carefully read the manual and strictly observe all instructions or descriptions Special attention shall be paid to the contents emphasized with the terms of warning caution and note etc Warning It concerns with personal safety Ignoring it may result in accident Precaution It refers to operational methods that must be followed or...

Страница 5: ......

Страница 6: ...in appearance Motorcycle driving is one of the most exciting sports The motorcycle is an ideal means of transport It can give you infinite driving pleasure Before driving your motorcycle please be familiar with all stipulations and requirements mentioned in the instruction manual The instruction manual deals in the correct use maintenance and maintenance of the motorcycle Observing the following s...

Страница 7: ...rol Part 12 Chapter 4 Instructions on Fuel and Engine Oil 23 Chapter 5 Running in of New Motorcycle 25 Chapter 6 Inspection before Driving 27 Chapter 7 Essentials of Driving 28 Chapter 8 Inspection and Maintenance 32 Chapter 9 Measures to Reduce Pollution 56 Chapter 10 Troubleshooting 57 Chapter 11 Storage and Cleaning 61 ...

Страница 8: ...n Power max 2 1 Kw à 6800 trs min Torque max 3 1 N m à 5000 trs min Ignition CDI Speed max 45 km h Spark plug A7TC Battery 12v 8ah Front tire Fifty 90 90 18 Dirt Track 90 90 17 Rear tire Fifty 3 25 18 Dirt Track 100 90 17 Oil engine SAE10W 30 Oil engine quantity 830 ml Length Width Height 1980 830 1110 Wheelbase 1330mm Ground clearance 140mm Weight 100Kg Weight max 255kg Fuel tank capacity 11 litr...

Страница 9: ... comes from practice Understand the limit of your safe speed Driving speed depends on road surface conditions your skills and the weather Understanding the limit may prevent accident At any time accident may be prevented as long as driving in the range of your skill Wear well fitting dress Loose and fancy dress may make you uncomfortable and unsafe in your driving Riding on the cradle a well fitti...

Страница 10: ... order components or service to allow the distributor to provide you with better service Chassis number or VIN code is on the riser pipe of chassis Engine number is on the left side of crankcase Metal nameplate is on the riser pipe of chassis showing the main technical parameters manufacturer and date of production of the motorcycle Write the numbers in the spaces below for future reference Chassi...

Страница 11: ...t side Right side gear lever Carburetor Front wheel Rear wheel Air filter Fuel tank switch Battery and fuse box Front Footrests Drain plug Rear footrest Front brake grip Clutch grip Rearview mirror Speedometer Right handlebar switch Left handlebar switch Ignition switch Accelerator ...

Страница 12: ...tor When left turning signal lamp is ON the left turning signal indicator on the panel and turning signal lamp will flash When right turning signal lamp is ON the right turning signal indicator on the panel and turning signal lamp will flash Warning If one of front and rear turning lights is damaged the indicators on the instrument panel and the turning lights may be lit consistently or may flash ...

Страница 13: ...t comes on at the meter it is necessary to go to an authorized Mash dealer to make a diagnosis Ignition switch FIG 1 There are four types position as showed in following sketches OFF Position All circuits are disconnected and the key can be removed ON Position All igniting circuits are ON and the engine can be started The key cannot be removed in this position Lock the handlebar Position In order ...

Страница 14: ... to low beam position the low beam is lit 3 Turn signal switch When the switch is turned to left position the left turning signal lamp is lit and the indicator lamp on instrument panel flashes When the switch is turned to right position the right turning signal lamp is lit and the indicator lamp on instrument panel flashes Warning Before turn the key to position park the vehicle with its side stan...

Страница 15: ... is used to start the engine in cold condition in low temperatures it makes it easier to start and extend the heating time sufficiently The choke must be switched off while driving as this may increase fuel consumption Warning Whenever you are going to change lane or make a turning timely turn ON the turning signal lamp After lane change or turning timely turn the signal light OFF Warning When the...

Страница 16: ... pressed in position the starting circuit is completely cut off and the starter motor cannot be started Do not put the switch in this position during driving 2 Front brake grip To apply front wheel brake slowly press the brake grip on the right handlebar As the motorcycle adopts hydraulic braking do not press it abruptly or forcefully When the brake grip is pressed the brake light will be lit auto...

Страница 17: ...rol the engine speed To accelerate turn the grip towards yourself To decelerate turn the grip away from yourself Fuel tank cap To open fuel tank cap insert the key and turn it clockwise Then the fuel tank cap can be removed together with the key To replace the cap align the arrow on the cap and press the cap together with the key into the fuel tank cap hole until a click sound is heard Then remove...

Страница 18: ...ing to the ratchet mechanism it cannot move two or more gears up or down in one operation To shift from 2 speed gear to low gear or from low gear to 2 speed gear it passes the neutral position but not stays there To engage to neutral gear stop it in the middle of moving from low gear to 2 speed gear Precaution Do not fill the tank excessively Never splash fuel to hot engine No fuel shall be left o...

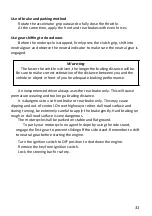
Страница 19: ...ar during high speed driving the engagement of clutch may make a sudden increase in engine speed Before engaging a low gear slow down the motorcycle to prevent unnecessary wear of components in transmission system Rear brake pedal Press down this pedal to apply rear wheel brake and the brake indicator light is lit Side stand The vehicle is equipped with a side stand 1 If you want to park vehicle w...

Страница 20: ...hicle on sloped ground please let it head higher direction to prevent it from sliding down For the sake of driving safety before setting out please make sure that stands are return to upper position and they don t loose and swag Fuel cock on carburetor Fuel cock under fuel tank Open position Open position Closed position Closed position ...

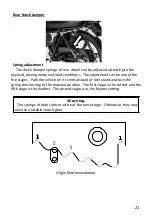
Страница 21: ... one of the five stages Park the vehicle on its central stand or side stand and turn the spring tension ring to the required position The first stage is the softest and the fifth stage is the hardest The second stage is as the factory setting Origin Recommendation Warning The springs of both sides must be at the same stage Otherwise they may cause an unstable steering bar ...

Страница 22: ...22 Tool kit The tools box is behind the right side cover ...

Страница 23: ...sed according to local air temperature There are three viscosity levels suitable for the engine namely SAE15W 40 SAE10W 30 and SAE5W 30 Refer to the figure below Warning Gasoline is inflammable and explosive When handling gasoline attention should be paid to prevent burnt or accident In places where gasoline is stored or handled shutdown the engine do not smoke and keep away from naked flame or sp...

Страница 24: ... 33 When driving in dusty area engine oil shall be replaced more frequently than the stipulations in the maintenance table Explanation During cold weather in northeast and northwest China it is advisable for user to use high quality low temperature lubricating oil SE 10W 30 or SF 5W 30 is recommended For temperature below 35 C the following use time API SG or higher class 5W 30 lubricant of notabl...

Страница 25: ... long time For a better break in properly increase and reduce the throttle opening Change engine speed from time to time to let various engine parts get bearing pressure When the pressure is unloaded the engine parts will cool down helping the fitting of different parts During break in period engine load may be properly increased Apply some load to engine parts to guarantee good fitting This is ve...

Страница 26: ... parts engaged Then all parts shall be adjusted all fasteners be tightened contaminated engine oil be replaced and filter element be replaced Timely making 1000 km maintenance can guarantee a long engine life and the best engine performance Precaution Warning 1000 km maintenance shall be carried out according to the Troubleshooting in the manual Pay special attention to the precaution and warning ...

Страница 27: ...djust clearance of rear brake pedal and front brake grip 2 No spongy feeling 3 No leakage Indicators Neutral gear gear position oil level indicators or turning signal indicators Accelerator 1 Proper free play in accelerator wire 2 Free fuel flow and reliable accelerator throttle valve returning to closed position Tires 1 Correct air pressure 2 Proper tread pattern depth 3 No injury or cut Horn Cor...

Страница 28: ...serve the traffic laws and speed limit Engine starting Make sure the fuel switch is in open position and the engine shutdown switch in position Insert the ignition key in ignition switch and turn it to ON position If the transmission is in neutral position the neutral indicator lamp is lit Press the electric starting button for ignition Never rotate the accelerator grip when pressing the starting ...

Страница 29: ... the accelerator closed and press the electric start button After the engine is started press the handle half way down plunger or push the lever half way in vacuum and wait for the engine is adequately warmed up before putting the handle or lever to the original position The colder it is the longer warm up time the engine takes Otherwise the acceleration may be poor Warm engine Rotate accelerator ...

Страница 30: ...This can prevent the engine from shutdown due to abnormal combustion Driving on a slope To shift from a high gear to a low gear control the speed in a safe speed range before gear shifting Otherwise abrupt deceleration sudden rise of engine speed may happen causing gear impacts sever parts wearing or overbalance of the vehicle it is dangerous Slope climbing When going up a steep slope the motorcyc...

Страница 31: ...ontrol On wet highway or other dull road surface and during turning be extremely careful to apply the brake gently Hard braking on rough or dull road surface is very dangerous The motorcycle shall be parked on stable and flat ground To park your motorcycle on a gentle slope by using the side stand engage the first gear to prevent sliding off the side stand Remember to shift to neutral gear before ...

Страница 32: ... light of safety it is advisable to the inspection and maintenance done by your distributor or qualified maintenance staff Be sure to make regular maintenance thoroughly according to the instructions in the manual Precaution In regular maintenance it may be necessary to replace one or more parts For part replacement it is advisable to use genuine parts or equivalent products No matter if you are e...

Страница 33: ...Oil filter strainer C C C C Valve clearance I I I I Timing chain I I I I Chassis bolt and nut T T T T Brake pads front and rear linings I I I I Brake fluid I I I I Replace every 2 years Front fork I I I Rear shock absorbers I I I Wheesl and tyres I I I I Driving chain I I I I Clean and lubricate every 1 000 kms Steering I I I I Cylinder head nut and exhaust pipe bolt T T T T Caption Inspection I T...

Страница 34: ...ar case and wheel bearing Grease 2 Brake pedal Grease or Engine oil 1 2 Grease or Engine oil 1 2 Steering gear Lubricate every two years or every 7 000 km Reference IPONE 1 Spray Cables 2 Multifonction grease 3 Spray chain Tools To help you for regular maintenance a set of tools is provided in the tool box on the rear left side of the vehicle Battery Battery is normally stored inside the guard boa...

Страница 35: ...l checked by your distributor by using an electrolyte hydrometer Safety 1 Electrolyte contains strong acid and shall be prevented from contacting the skin During operation wear safety helmet and safety clothing Warning Once the battery has been in use no diluted sulfuric acid shall be added If the fluid level drops below the lower limit fill distilled water to the upper limit Never use tap water P...

Страница 36: ...te remove battery from the vehicle Check if the electrolyte conforms to specification requirements Direction for use of maintenance free battery No electrolyte filling is necessary before and after battery using To prolong the service life fully recharge it before using Note No matter what type it is the battery may discharges and power may drop after a long store time After removing from the vehi...

Страница 37: ...hite or even glowing it means the spark plug was working in overheated conditions Replace it with a spark plug of higher caloric value Standard spark plug for the motorcycle is carefully selected and suitable for most operations If the color of spark plug is found different from standard spark plug it is advisable to contact your distributor before replacing with spark plug in a different heat res...

Страница 38: ...roughly drain old oil from the engine The method is as follows 1 Park the motorcycle by using the central stand 2 Remove oil filler cap Warning Engine oil ruler shows the oil level When oil level is low never start the engine Fill oil until the oil level is just below the upper limit of oil window Engine oil The longevity of the engine depends on the quality of the oil used the frequency of its re...

Страница 39: ...ck the oil level to make sure the oil quantity is correct 5 Start the engine and allow it running idle speed for several seconds 6 Stop the engine and wait about one minute before checking the fluid level with the oil dipstick The level must reach the upper mark maximum If the level is below this benchmark give the change Warning Please use the engine oil recommended in Instructions on fuel and en...

Страница 40: ... play of brake lever measured at lever bracket shall be 10 20mm Hydraulic brake system shall be checked every day as follows 1 Check for leakage in the front wheel brake system 2 Check for any leakage or crack in oil pressure pipe 3 The front brake lever shall have a certain back spring force 4 Check wearing conditions of front wheel brake lining 5 10 mm Warning Brake is related to personal safely...

Страница 41: ...enance schedule of the manual Warning It is harmful if brake fluid is drunk by mistake or contacts the eyes or skin If it is drunk by mistake spit it out by force If it contacts skin or eyes wash with plenty of clear water and go to hospital Precaution The vehicle uses ethanol series hydraulic oil It shall not be mixed with silicate or petroleum fluid Otherwise the brake system may be seriously da...

Страница 42: ...mark If wearing exceeds the mark the brake lining shall be replaced with a new one Warning Do not drive immediately after replacing a new wheel disk brake lining Press the braking grip for several times to allow the brake lining fully extended the grip spring force restored and the brake fluid is circulated smoothly ...

Страница 43: ... lamp is lit immediately when pressure is applied but before the grip is fully pressed Rear brake If the rear brake is drum brake to adjust the rear wheel brake pedal set the pedal to the most comfortable position for driving by rotating the pedal adjustment nut Then rotate the free play adjusting nut 2 to keep the free play 1 between 20 30mm Adjustement of rear wheel brake 1 20 30 mm 2 ...

Страница 44: ...cle is provided with brake lining wearing limit indicator in the rear brake To check the wearing of brake lining do as follows 1 Check for correct adjustment of the rear brake 2 Operate the brake and check if the limit extension line is in the allowed range as shown in Fig ...

Страница 45: ... switch Rear brake light switch is located at the right side of chassis Adjust rear brake light switch as follows Lift or lower the switch so that when the brake pedal is pressed the lamp is lit before feeling a pressure ...

Страница 46: ...rical system In case of any trouble to electrical system check the fuse first If the fuse is blown out replace it with the spare fuse 15A in the fuse box Precaution Always replace the blown fuse with a new one of the specified amperage Never use aluminum foil steel wire or other things as substitute for fuse If a new fuse is blown in a short time it means there is a major electric trouble Contact ...

Страница 47: ...electric system and premature bulb damage may be caused For turning signal light tail light and brake light when installing light shield do not excessively tighten the fixing screws to avoid damaging the light shield Precaution The head light is generally reflection lamp Do not touch the reflector during bulb replacement so as to prevent reduction of service life ...

Страница 48: ...also increase Therefore the air filter element shall be checked and cleaned every 3000 km as follows 1 Remove the left side guard board 2 Unscrew the air filter outer cover screw 1 and take out the air filter sleeve 2 Précaution If the motorcycle is working in dusty conditions the air filter shall be checked and cleaned more frequently before schedule ...

Страница 49: ...lution Never twist the filter element to avoid damaging 3 Soak the filter element in engine oil tank and squeeze oil out keeping it slightly wet Référence IPONE AIRFILTER CLEAN LIQUIDE FILTER OIL Precaution During cleaning the filter element check for any damage to the filter element and replace when necessary Never start the engine without the filter element installed or the engine wearing may be...

Страница 50: ...000 km thereafter as follows Warining Before and during cleaning pay attention to check the filter element for any contamination crack or damage Replace it with a new one when necessary Reinstall the filter in reverse order Make sure the filter element is firmly fixed in correct position and reliably sealed Never start the engine without the air filter installed The air filter element must be clea...

Страница 51: ...ting screw to keep the engine running at 1400 100 rpm Adjustment of accelerator wire 1 Locking nut 2 Adjuster 1 Loosen the locking nut 2 Rotate the adjuster to make the wire clearance between 0 5 1 0 mm 3 After clearance adjustment tighten the locking nut once again Warning Idle speed adjustment shall be carried out while the engine is fully warmed up ...

Страница 52: ...rance is found incorrect carry out adjustment as follows Loosen the nut 1 and adjust the tension by turning the tension ring of the lever 2 clockwise Once the adjustment has been made tighten the lock nut 1 then wrap them with the rubber sleeve 3 Warning After accelerator wire adjustment check the operation of accelerator grip Engine idle speed shall not increase due to the adjustment and the grip...

Страница 53: ...n rear wheel shaft nut 3 Loosen the locking nut 4 Rotate the adjusting bolt left and right to adjust the chain Note When a new chain is installed it is necessary to check both chain wheels Replace if necessary The tension of driving chain shall be adjusted every 1000 km to keep a removable distance of 20 30 mm in the midpoint of the two chain wheels ...

Страница 54: ...fter Besides regular check make it habit to check the tire air pressure from time to time to ensure maximal safety and long life Tire pressure A low tire pressure may intensify tire wearing and badly affect the driving stability causing difficulties in turning But a too high tire pressure may reduce the contact area between tires and road surface causing wheel slip and even out of control It is ne...

Страница 55: ...m or less it is advisable to replace the cover tire When the tread pattern of rear wheel is reduced to 2 mm or less replace the tire with a new one Warning Problems may happen if no standard tire is used You are sincerely recommended to use standard tire Correct tire inflation pressure is very important for normal vehicle performance and driving safety Check the tire wear and inflation pressure fr...

Страница 56: ...s to Reduce Pollution To reduce exhaust emission and noise pollution please follow the several points below Use special purpose lubricant Use unleaded gasoline 95 or 98 Do not use fuel E10 Observe any abnormal engine noise ...

Страница 57: ...is strictly prohibited during fuel system checking Carry out the work in a spacious place 1 Remove spark plug and connect it with the high voltage cable 2 Turn the ignition switch to ON position and the engine shutdown switch to position Place the spark plug near the engine and start the engine If the ignition system is in working order there shall be blue sparks jumping over the spark plug gap If...

Страница 58: ...oad operation of the engine Note Before any troubleshooting it is advisable to consult with your distributor in advance If the motorcycle is still in warranty period be sure to contact your distributor before making any attempt to repair by yourself Tampering with the vehicle in warranty period may invalidate the basis of warranty Refer to the warranty book provided by the authorized MASH dealer W...

Страница 59: ...park plug Oil stained spark plug Broken spark plug magnetic core or broken electrode Carbon deposit in spark plug electrode Incorrect spark plug gap Remove clean and dry it Replace spark plug Clean out carbon deposit Adjust the gap Normal sparking to spark plug poor cylinder compression Leaking cylinder head gasket Loose spark plug Seized piston ring Excessively worn piston or broken piston ring S...

Страница 60: ...ver rich or over thin gas mixture Clean the carburetor Clean or replace fuel pipe Replace sealing Tighten screw Adjust carburetor Overheat engine Low gear driving over a long time Over loaded driving or long time driving with heavy load Over rich or over thin gas mixture Unqualified engine oil or insufficient transmission oil Slipping clutch Too tight chain Unreleased brake Change gear position an...

Страница 61: ...orcycle empty the fuel tank Gasoline used in motorcycle is highly inflammable and even explosive under certain conditions Therefore never allow the motorcycle to get close to any fire Never park the vehicle in a place storing articles subject to spontaneous combustion such as grains coal cotton etc because fire hazard may happen when the fuel in the vehicle contacts naked flame Tires Make tire inf...

Страница 62: ...ours Note that storing a low battery for a long time may cause battery damage When a battery has whitened plate electrodes low power or low fluid level below the lower limit and cannot restore the performance after a long time storage even after recharging it means the service life has been terminated Steps of returning service 1 Clean the entire motorcycle 2 Remove spark plug kick the kickback st...

Страница 63: ...drive chain seals and wheel axles Rinsing residues and degreaser have to be done with clean water Cleaning Cleaners that are too acidic or aggressive are not recommended for washing the motorcycle Especially for the axes bearings levers pivots wheels and spokes If however it is necessary to use for stubborn stains respect the instructions and time of application of the product We recommend sprayin...

Страница 64: ...vehicle from corrosion by spraying an anti corrosion and lubrication product on all metal surfaces chrome plated or nickel plated After cleaning Dry the body parts with a soft absorbent paper After being dried with disposable cloth the drive chain should be lubricated with a specific lubricant to prevent it from rusting It is recommended to rub the chrome or stainless steel elements including the ...

Страница 65: ...e latest before publishing Owing to improvement or other changes the contents of the manual may differ from actual conditions our company reserves the right of modification at any time Product specifications and parameters are subject to change without notice Product configuration and spare parts supply may vary for different countries or regions For details please consult with your local distribu...

Страница 66: ...www mashmotors com Votre revendeur mash motors fr ...

Отзывы: