background image


29 

3)  And press TURN ON NOW button: 


Содержание Boxie

Страница 1: ...Marvelmind Boxie Operating manual v2022_06_23 www marvelmind com ...

Страница 2: ...Advanced configurations 17 3 4 Touch screen control 18 3 5 Control system 19 4 Robot s controls and basic operations description 20 4 1 Back control panel 20 4 2 Charging 21 4 3 Turning on the Boxie 23 4 3 1 Do not disturb mode 27 5 Setting up the autonomous robots 30 5 1 Software Pack 30 5 2 One time flash for SW version from 7 000 31 5 3 Flashing via USB 32 5 4 Test launch 34 5 5 Launching Boxie...

Страница 3: ...ection 5 3 Flashing via USB added Section 5 6 Robot detailed settings added Minor improvements V2022_06_10 Chapter 2 updated Chapter 5 updated Section 5 4 added V2022_05_11 Section 4 1 2 updated Section 4 3 added Section 4 4 added V2022_04_19 Section 1 updated Section 2 1 added Section 4 updated V2021_08_05 Multiple improvements V2021_02_04 Initial release ...

Страница 4: ...ute can be reconfigured by 1 button click in 1 second Charging time is less than 2h with Hi current Marvelmind charger Default charging time 6 hours with supplied charger by default Smart screen for status display and interactions Up to 125 robots per system Demo videos Autonomous delivery robot Boxie and its inner beauty Marvelmind Boxie autonomous driving Fully autonomous drive by 2 robots Marve...

Страница 5: ...ies with no payload Charging time 2h hours with optional charger Hi power Marvelmind charger 6h hours with supplied charger by default Sensors Marvelmind Indoor GPS for positioning The system has been delivered to hundreds of projects worldwide Location Direction based on Marvelmind precise indoor positioning system LIDARs Intel RealSense Several IMUs Odometer on each wheel 12 x 1D LIDARs Sonars C...

Страница 6: ...6 1 1 Legend Legend chapter contains small icons and signs to highlight some key points of the text Important For experienced users Demo or Help video Useful link ...

Страница 7: ...t Marvelmind charger RealSense and Starter Set Super MP 3D Also includes extended warranty Basic Standard Advanced Autonomous robot Yes Yes Yes Charger 1A Yes Yes Yes RealSence D435 T265 software Not included Yes Yes Dedicated Zoom training hours Not included 1 5 Super Beacon Modem HW v5 1 included pcs Not included Not included 5 1 Hi power charger 5A Not included Not included Yes Extended warrant...

Страница 8: ...8 2 1 Basic configuration Robot Boxie Basic Charger 1A ...

Страница 9: ...9 2 2 Standard configuration Robot Boxie Standard Charger 1A ...

Страница 10: ...10 2 3 Advanced configuration Robot Boxie Charger 1A Hi current Marvelmind charger 5A Extended warranty 5 x Super Beacon 1 x Modem HW v 5 1 ...

Страница 11: ... https youtu be 7jrrNrQTd3s 3 1 Marvelmind Boxie Marvelmind Boxie relies on Marvelmind Indoor GPS navigation system The robot is equipped with additional sensors for detecting and avoiding obstacles It has a long battery life and high payload capacity Fully autonomous driving unit from Marvelmind Robotics Can be flexible tuned for different cases and projects Solid housing Visual interfaces Audio ...

Страница 12: ...velmind team installed multiple 1D LIDAR s into the robot to provide obstacle detection and avoidance up to 4 meters away Adjustable detection distance 0 3 4m Emergency stop https youtu be efOc ItVvgg t 67 Rebuilding paths and alarming if stuck ...

Страница 13: ...13 Location of LIDARs ...

Страница 14: ...vanced configurations Odometer IMU for proper driving and positioning with 2cm precision If you want to know more about the navigation system please check the Operating Manual https marvelmind com pics marvelmind_navigation_system_manual pdf Omni microphones Intel RealSense Antennas Ultrasound sensor Omni microphones ...

Страница 15: ...ers Mobile beacon s location is calculated based on a propagation delay of an ultrasonic pulses Time Of Flight or TOF between stationary and mobile beacons using trilateration algorithm The system can build the map of stationary beacons automatically In simple cases no additional manual data input or any manual distance measurements are required This map formed once can be frozen and stored in mod...

Страница 16: ...ot s It is highly recommended for larger submaps 25m or when a particularly guaranteed and robust tracking of a forklift or similar mobile object on the largest possible distance See video below for more info about microphone diagrams The microphone is IP67 protected by special membranes and compound The microphone requires soldering There are easy to use pins on the board and connectivity is desc...

Страница 17: ...tional functionality of positioning and safety if somehow Marvelmind Indoor GPS isn t available in some scenarios What new abilities it gives Additional safety by Intel RealSense Addition option of positioning through Intel RealSense Other functions you may need contact info marvelmind com for details ...

Страница 18: ...t What new abilities it gives Displays information about current task Future stage Highlights goods code and delivery stage Future stage Displays statistics in real time Edit tasks and order Future stage Edit paths Future stage Displays whole map with robots and paths Future stage Other functions you may need contact info marvelmind com for details ...

Страница 19: ...ol system The control system for Marvelmind Boxie is the same as control system for any Marvelmind device Dashboard app included in the SW pack Visual Dashboard view Check the video with https youtu be xZ jnoRNDE0 ...

Страница 20: ...ntrols 4 1 Back control panel Function button 2 Fn2 Function button 1 Fn1 Hi Current charging port Using to charge a robot with Hi Current charging Charging port 6 USB ports Can be used to plug in a key board or computer mouse Also using for flashing via USB HDMI port Can be used to connect a screen Reset Power ...

Страница 21: ...xie 1 Charger 12V 1A Charging time 6 hours 2 Hi Current Marvelmind charger 5A Charging time 2 hours optional only in Advanced configuration Operating time at full battery is up to 8 hours No payload Use only Marvelmind supplied chargers Optional only in Advanced configuration Hi Current charger ...

Страница 22: ...22 When Boxie is turned off and is charging display battery and beacons don t charge Turn on Boxie to charge a display battery and beacons Hi power charging port Charging port ...

Страница 23: ...23 4 3 Turning on the Boxie To turn on the Boxie follow steps below 1 Press the robot display power button and turn on the display 2 You will see a home screen of display Display power button ...

Страница 24: ...24 3 Open Marvelmind Boxie app 4 The program is running now you can switch on the Boxie Marvelmind Boxie app ...

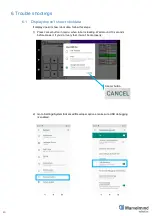
Страница 25: ...ot display and run the Mirvelmind Boxie app press power button on a Boxie 6 Press cancel button in menu when robot is loading Wait around 10 seconds before press it if you do it very fast it won t boot properly Power switcher Cancel button ...

Страница 26: ...26 7 After that app show all information about device Boxie inform you that Boot completed Robot is ready to work ...

Страница 27: ... mode To avoid any notifications switch on the Do not disturb mode There are two ways to do that First way easier 1 Swipe screen down from the top side and press this sign 2 Sign tern to green Do Not Disturb mode is activated ...

Страница 28: ...28 Second way 1 Go to Settings Apps notifications Notifications 2 Choose Do Not Disturb ...

Страница 29: ...29 3 And press TURN ON NOW button ...

Страница 30: ...to USB drive connect it to Robot and press Reset button After that Boxie will flash by itself Use HEX files to flash devices via Dashboard It s possible to flash via USB and radio Flash mobile beacons via radio don t try to remove it from robot and flash stationary beacons via USB or radio as you prefer Folder with Dashboard software Folder with USB flash for robot HEX File for right mobile beacon...

Страница 31: ...2 Remove the micro SD card from Raspberry board 3 To reflash the micro SD card you should download the latest Boxie software version from our site https marvelmind com download and write the image file to the micro SD card by appropriate software for example Win32 Disk Imager 4 After the image file written to micro SD put micro SD back to Raspberry and screw plastic cover back to robot 5 Now Boxie...

Страница 32: ...ind website https marvelmind com download 2 Copy all files from usb_flash folder to USB drive All copied files must be on the upper level of USB drive Make sure that there are no any wav mpeg and bin files on the up level of USB drive that using for flashing Othervise those files may be deleted from the USB drive 3 Insert USB drive to Robot Boxie and press reset button ...

Страница 33: ...ll inform that flashing of Ode board been started Updating of odometry board When odometry board updating in progress robot will beep and blink 6 In the end of flashing Boxie will inform Odometry board firmware updated successfully it means that flashing completed Robot Boxie will be reset by itself 7 Remove USB drive from the Boxie 8 Flashing completed ...

Страница 34: ...described on the picture below 2 Install and launch Marvelmind Dashboard 3 Connect Modem to your PC via USB and update it with the corresponding SW 4 Turn on the robot and wait for 1 minute until the robot is fully loaded Top view 5m 5m Robot s path Orange This is the initial testing path which is created to test the robot when it s a very first time to launch it Starting area Ø 2m Place robot int...

Страница 35: ...the beacons which are written on the bottom of the Boxie 7 Robot will appear on the map Wait till Robot setting reading will be finished 8 Left click to Indoor GPS button and choose Robots option Find your robot in devices list and Left click on the robot number icon Robot named as higher hadge number ...

Страница 36: ...anel for robot will open 10 Use Shift Left Click to draw a point of path And Shift Left Click on point to remove already existed point Draw the path as shown in the picture below 11 Press Run Robot will start a ride ...

Страница 37: ...Indoor GPS system It s detailed described in the Operating Manual 2 Turn on Boxie and wait for 1 minute 3 Configurate paths and points Use Shift Left mouse button click to create point click on point to remove 4 Press Run Robot will follow the path that you draw 5 If you put a tick on Run forever Robot will move till you press stop button in control panel or before obstacle detected ...

Страница 38: ... lot of parameters for advanced usage Choose Robot in robots list to see Robot detailed settings Firmware version of Odo board Firmware version of Raspberry Supply voltage Supply current Battery capacity of the robot in Robot speed TBD Settings of sound signals of robot TBD LIDAR s mode settings TBD TBD ...

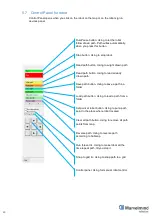
Страница 39: ...d path button Using to read already drawn path Save path button Using to save a path in a folder Load path button Using to load a path from a folder Set point at robot button Using to put a path point In the place where robot located Clear all path button Using to remove all path points from map Reverse path Using to reverse path according to Submap Run forever tic Using to make robot all the time...

Страница 40: ...sn t show robot data follow this steps 1 Press cancel button in menu when robot is loading Wait around 10 seconds before press it if you do it very fast it won t boot properly 2 Go to Settings System Advanced Developer options make sure USB debugging is enabled Cancel button ...

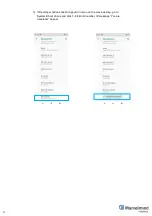
Страница 41: ...41 3 If Developer options doesn t appear in menu on the previous step go to System About phone and click 7 8 to Build number till message You are developer appear ...

Страница 42: ...o if display doesn t work If the Robot Display doesn t react on a swipe 1 Try to hold area around display with one hand and swipe again After that display should work properly 2 Wipe the display and try to swipe again ...

Страница 43: ...43 7 Contacts For additional support please send your questions to info marvelmind com ...

Отзывы: