Marshalltown SPIN SCREED Скачать руководство пользователя страница 19

 19 of 32 

104 S. 8th Ave. Marshalltown, IA Phone 800-888-0127 / 641-753-0127  •  Fax 800-477-6341 / 641-753-6341 www.MARSHALLTOWN.com
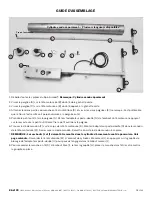
WS2569

OPERACIÓN DEL PRODUCTO

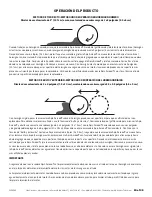
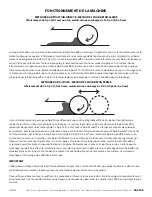
MÉTODO DE TIRO RECTO: MÉTODO UNO DE OPERACIÓN EN HORMIGÓN HÚMEDO 

Niveles de asentamiento de 5” (12.7 cm) o más, manteniendo una sobrecarga de 1 a 2 pulgadas (2.5 a 5 cm)


Cuando trabaje con hormigón húmedo, arranque la enrasadora Spin Screed® tirando del gatillo verde y jálela lentamente sobre el hormigón 
mientras los niveladores mantienen una sobrecarga de hormigón de aproximadamente 2 pulgadas (5 cm) enfrente de la enrasadora. 
Después de avanzar 6 a 8 pies (2 a 2.5 m), permita que la enrasadora giratoria Spin Screed® se mueva lentamente hacia atrás sobre el 
hormigón recién enrasado. Esta pasada lenta para atrás empuja hacia abajo el agregado que se quedó en la superficie al tiempo que eleva 
la pasta a la superficie. Después de retroceder sobre la sección vertida, apague la Spin Screed® y jale la enrasadora hacia atrás al área 
donde se ha colocado más hormigón. Comience a enrasar de nuevo. Con hormigón más húmedo que un asentamiento de 5 pulgadas  
(12.7 cm), pasar la enrasadora por la superficie del hormigón una segunda vez con el motor funcionando producirá una superficie más 
plana con suficiente pasta para pasar la aplanadora. Verifique las superficies preparadas por la Spin Screed® y ajuste su técnica a fin de 
producir la superficie deseada para pasar la aplanadora. 

MÉTODO DE BULTO Y EXTENSIÓN: MÉTODO DOS DE OPERACIÓN DEL HORMIGÓN RÍGIDO 

Niveles de asentamiento de 3 a 4 pulgadas (7.5 a 10 cm), manteniendo una sobrecarga de 2.5 a 3.5 pulgadas (6.5 a 9 cm)

Con hormigón rígido, pasar la enrasadora Spin Screed® sobre el hormigón produce una superficie áspera que es difícil de alisar con 
aplanadora. Para obtener mejores resultados, use la técnica de “bulto y extensión”. Comience jalando el gatillo verde para arrancar la Spin 
Screed® y abulte suavemente una sobrecarga de 2 a 3 pulgadas (5 a 7.5 cm) con la Spin Screed® haciendo que avance unas pulgadas 
y luego dejándola replegarse 4 a 6 pulgadas (10 a 15 cm). Mueva de nuevo la enrasadora Spin Screed® hacia adelante. Continúe con la 
técnica de “bulto y extensión” hasta que haya avanzado 6 a 8 pies (2 a 2.5 m), luego deje que la enrasadora Spin Screed® se mueva hacia 
atrás lentamente sobre el hormigón recién enrasado con la Spin Screed® aún funcionando. Esta pasada lenta para atrás empuja hacia 
abajo el agregado que se quedó en la superficie al tiempo que eleva la pasta a la superficie. Después de retroceder sobre la sección 
vertida, apague la Spin Screed® y jale la enrasadora hacia atrás al área donde se ha colocado más hormigón. Comience a enrasar de nuevo. 
La sección enrasada está lista para aplanarse, lo cual debe llevarse a cabo inmediatamente. Cuando se enrasa hormigón más rígido, jalar 
la Spin Screed® hacia adelante una segunda vez tiende a eliminar la capa de pasta que se ha trabajado en la superficie y hace que esta sea 
más difícil de aplanar y acabar. 

IMPORTANTE 

Asegúrese de que la enrasadora Spin Screed® se limpie inmediatamente después de usarse a fin de evitar que el hormigón se endurezca 
en el eje impulsor del motor, el alojamiento del motor, las juntas de los mangos o en el tubo. 

La limpieza del alojamiento del motor se debe llevar a cabo soplando aire comprimido y lavándolo manualmente, evitando que ingrese 
agua directamente al conjunto del motor. Se recomienda el uso de lavadoras a presión para limpiar el tubo, pero NO deben usarse para 
limpiar el alojamiento del motor. 

Spin Screed Techniques of Operation:

The Spin Screed power head has been designed with a reversing switch. The power head can be made to operate on 

either side of the pour moving in either direction.

As with any electric tool, proper operating voltage is essential. Always use heavy-duty properly grounded extension 

cords and follow the directions associated with the spin motor for maximum length and gauge of extension cords. 

The spin motor draws 10 amperes of current at 120 volts when fully loaded. A portable electric generator can easily 

provide this voltage and current requirement if a source of 120 volt AC is not otherwise available. GFI breakers are an 

OSHA requirement for tools used on the construction site. All extension cords and power cords should be inspected 

and tested for defects before being placed into operations. Defective cords not protected by GFI breakers could lead 

to death or severe injury.

The Spin Screed will handle stiff concrete having only a 3-inch slump or any larger slump that you choose to pour. We 

advise that when you first start using the Spin Screed, you pour with a slump level that is consistent with your past 

practices. As with any new tool you bring onto your job site, certain techniques of operation must be learned so the 

quality level of work you demand can be achieved.

With wet concrete, you will probably find that the spin motor can be energized and the Spin Screed slowly pulled over 

the concrete while muckers are maintaining about a two-inch surcharge of concrete in front of the screed. Once you 

have advanced for 6 to 8 feet or more, you will want to allow the Spin Screed to move backward slowly over the freshly 

screeded concrete while the Spin Screed is still spinning. This slow backward pass pushes any concrete aggregate 

that may be above the surface down into the surface while at the same time bringing paste to the surface. Once you 

have backed over the section just poured, you will want to turn off the spin motor and simply pull the screed back to 

the area where more concrete has been placed and begin the screeding operation again. With concrete wetter than a 

5 inch slump, you may find that pulling over the concrete surface a second time, while the spin motor is still running, 

will produce a flatter surface with sufficient paste for bull floating. The general rule is to examine the surface prepared 

by the Spin Screed and adjust your screeding technique to produce the most desirable surface for bull floating.

1-888-329-6039 • www.spinscreed.com

Wet Concrete

Operating Method No. 1:

Slump levels of 5 inches

or more. Maintain 1 to 2

inch surcharge.

Stiff Concrete

Operating Method

No. 2: 

Slump levels of 3 to

4 inches. Maintain

2.5 inch to 3.5 inch

surcharge.

STRAIGHT PULL

BUMP AND RUN

(OVER)

Содержание SPIN SCREED

Страница 1: ...SPIN SCREED CORDED UNIT Part SPNRSSAD EDI 28716 104 S 8th Ave Marshalltown IA Phone 800 888 0127 641 753 0127 Fax 800 477 6341 641 753 6341 www MARSHALLTOWN com WS2569 ...

Страница 2: ...2 of 32 104 S 8th Ave Marshalltown IA Phone 800 888 0127 641 753 0127 Fax 800 477 6341 641 753 6341 www MARSHALLTOWN com WS2569 ...

Страница 3: ... Dead End T Handle diameter 1 Live End length 5 Dead End cap length 4 Motor enclosure 43 4 X 41 2 X 18 End cap diameter 3 98 Motor 10 amp 300 RPM 120 RPM 120V AC Spin Screed Pipe is sold separately Specification of the 4 Schedule 40 seamless aluminum Spin Screed Pipe Diameter 41 2 Thickness 1 4 TABLE OF CONTENTS SAFETY PRECAUTIONS 4 WARRANTY 5 ASSEMBLY GUIDE 6 7 PRODUCT OPERATION 8 9 MAINTENANCE 1...

Страница 4: ...harm Read the operating instructions contained in this manual to familiarize yourself with the location and proper use of all the controls DO NOT operate this machine until you have read the operating and safety instructions ALWAYS operate the machine in accordance with the manufacturer s instructions ALWAYS inspect your Spin Screed upon arrival for damage or tampering that can rarely occur during...

Страница 5: ... expiration of such period Some states do not allow limitations on how long an implied warranty lasts or the exclusion or limitations of incidental or consequential damages so the above limitations or exclusions may not apply to you This warranty gives you specific legal rights and you may also have other rights which vary from state to state Exclusion from this warranty 1 All consequential damage...

Страница 6: ... the Handle A Remove the Impact Socket G from the Live End by depressing the spring with the Small Tool Return the Small Tool to the Handle 6 Locate the Chuck Key F on the body of the Power Head B Install the Impact Socket G in the Chuck of the Power Head M Tighten with the Chuck Key When done return the Chuck Key to its location 7 NOTE Ends J I must be installed in screed pipe before these steps ...

Страница 7: ...o or have a co worker hold the Pipe You will not be able to produce enough the torque necessary to tighten the Ends Step 4 Insert set screw and tighten using the 5 16 Allen Wrench Step 3 Use the Pipe Wrench to tighten the Live End J Note the Live End should be secured very tightly Make sure it is lined up with the set screw opening Step 2 Insert the Live End J into the Pipe make sure set screw is ...

Страница 8: ...tly Engage the power unit and begin to pull the Spin Screed over forms screed pipe or screed rail distributing the concrete aggregate to the desired level Make sure the Pipe is spinning away from you A reversing switch is located on the Power Head The Spin Screed is meant to run at a slow speed DO NOT open the Power Head and increase the drill speed Each operator must properly maintain control of ...

Страница 9: ...used to clean the motor enclosure et concrete you will probably find that the spin motor can be energized and the Spin Screed slowly pulled o ncrete while muckers are maintaining about a two inch surcharge of concrete in front of the screed Once y dvanced for 6 to 8 feet or more you will want to allow the Spin Screed to move backward slowly over the fres ed concrete while the Spin Screed is still ...

Страница 10: ... functioning properly refer to the following guide to diagnose and resolve your issue Check if the motor shank is tightly connected to the chuck If tightening is required use the included chuck key to fully tighten the chuck to the motor shank Check if the end plugs are fully tightened Tighten them if required Ensure the motor speed is set at the manufacturer default slow speed 300 RPM and that it...

Страница 11: ...41 753 0127 Fax 800 477 6341 641 753 6341 www MARSHALLTOWN com WS2569 ENRASADORA SPIN SCREED ALÁMBRICA N º de pieza SPNRSSAD N º EDI 28716 104 S 8th Ave Marshalltown IA Teléfono 800 888 0127 641 753 0127 Fax 800 477 6341 641 753 6341 www MARSHALLTOWN com WS2569 ...

Страница 12: ...12 of 32 104 S 8th Ave Marshalltown IA Phone 800 888 0127 641 753 0127 Fax 800 477 6341 641 753 6341 www MARSHALLTOWN com WS2569 ...

Страница 13: ...tubo del extremo cerrado 4 102 mm Alojamiento del motor 4 3 4 X 41 2 X 18 121 mm x 114 mm x 457 mm Diámetro del adaptador de tubo del extremo abierto 3 98 101 mm Motor 10 amperios 300 RPM 120 RPM 120V CA El tubo de la Spin Screed se vende por separado Especificación del tubo de la Spin Screed de aluminio de una sola pieza cédula 40 de 4 Diámetro 41 2 114 mm Espesor 1 4 6 4 mm CONTENIDO PRECAUCIONE...

Страница 14: ...a ubicación y el uso correcto de todos los controles NO opere esta máquina hasta que haya leído las instrucciones de operación y seguridad SIEMPRE opere la máquina de conformidad con las instrucciones del fabricante SIEMPRE inspeccione la enrasadora Spin Screed al recibirla a fin de buscar daños o alteraciones que pueden presentarse en raras ocasiones durante el envío Si se descubre algún daño pre...

Страница 15: ...eriodo Algunos estados no permiten limitaciones sobre la duración del periodo de una garantía implícita o la exclusión o limitaciones de daños indirectos o consecuentes por lo que las limitaciones o exclusiones mencionadas pueden no aplicar a su caso Esta garantía le otorga derechos legales específicos y es posible que usted tenga otros derechos que varían de estado a estado Exclusión de esta gara...

Страница 16: ...emo abierto presionando el resorte situado en la herramienta pequeña Regrese la herramienta pequeña al mango 6 Ubique la llave de mandril F en el cuerpo del motor B Coloque el casquillo de impacto G en el mandril del motor M Apriételo con la llave de mandril Cuando termine regrese la llave de mandril a su lugar 7 NOTA Los extremos J e I deben instalarse en el tubo de la enrasadora antes de efectua...

Страница 17: ...ida que lo haga a un compañero de trabajo No podrá producir la torsión necesaria para apretar los extremos Paso 4 inserte el tornillo de fijación y apriételo usando la llave Allen de 5 16 Paso 3 use la llave de tubo para apretar el extremo abierto J Nota El extremo abierto debe quedar muy apretado Asegúrese de que quede alineado con la abertura del tornillo de fijación Paso 2 inserte el extremo ab...

Страница 18: ... encofrados tubos de enrasado o rieles de enrasado distribuyendo el agregado de hormigón al nivel deseado Asegúrese de que el tubo esté girando al lado opuesto al suyo En el motor se encuentra un interruptor de reversa La enrasadora Spin Screed está diseñada para funcionar a baja velocidad NO abra el motor para aumentar la velocidad del taladro Cada operador debe mantener correctamente el control ...

Страница 19: ... motor el alojamiento del motor las juntas de los mangos o en el tubo La limpieza del alojamiento del motor se debe llevar a cabo soplando aire comprimido y lavándolo manualmente evitando que ingrese agua directamente al conjunto del motor Se recomienda el uso de lavadoras a presión para limpiar el tubo pero NO deben usarse para limpiar el alojamiento del motor et concrete you will probably find t...

Страница 20: ...e guía para diagnosticar y resolver su problema Verifique que el vástago del motor esté conectado firmemente al mandril Si se requiere apretarlo utilice la llave de mandril suministrada para apretar el mandril al vástago del motor Verifique que los tapones del extremo estén ajustados Apriételos de ser necesario Asegúrese de que la velocidad del motor esté ajustada a la velocidad baja predeterminad...

Страница 21: ...88 0127 641 753 0127 Fax 800 477 6341 641 753 6341 www MARSHALLTOWN com WS2569 SPIN SCREED À FIL Réf SPNRSSAD EDI 28716 104 S 8th Ave Marshalltown IA Téléphone 800 888 0127 641 753 0127 Télécopieur 800 477 6341 641 753 6341 www MARSHALLTOWN com WS2569 ...

Страница 22: ...22 of 32 104 S 8th Ave Marshalltown IA Phone 800 888 0127 641 753 0127 Fax 800 477 6341 641 753 6341 www MARSHALLTOWN com WS2569 ...

Страница 23: ...ur de cylindre côté libre 4 po 102 mm Bloc moteur 4 3 4 po x 41 2 po x 18 po 121 mm x 114 mm x 457 mm Diamètre adaptateur de cylindre côté moteur 3 98 po 101 mm Moteur 10 A 300 tr min 120 tr min 120 V c a Le cylindre Spin Screed est vendu séparément Caractéristique du cylindre Spin Screed de 4 po en aluminium de nomenclature 40 sans soudure Diamètre 4 1 2 po 114 mm Épaisseur 1 4 po 6 4 mm TABLE DE...

Страница 24: ...lacement et la bonne utilisation des commandes NE PAS utiliser cette machine avant d avoir lu les instructions d utilisation et de sécurité TOUJOURS utiliser la machine conformément aux instructions du fabricant TOUJOURS contrôler le Spin Screed à la réception pour vérifier l absence de rares dommages ou altérations susceptibles de se produire durant le transport Si des dommages sont constatés sou...

Страница 25: ...les limites de durée des garanties implicites ou l exclusion ou la limitation des dommages accessoires ou indirects par conséquent les limites ou exclusions ci dessous peuvent ne pas s appliquer à vous La présente garantie vous confère des droits juridiques particuliers et vous pouvez également avoir d autres droits susceptible de changer d une juridiction à l autre Exclusions de la présente garan...

Страница 26: ...té moteur en appuyant sur le ressort avec le petit outil Remettre le petit outil dans la poignée 6 Trouver la clé de mandrin F sur le corps de la tête motorisée B Monter l adaptateur porte douille G dans le mandrin de la tête motorisée M Serrer avec la clé de mandrin Remettre ensuite la clé de mandrin à sa place 7 REMARQUE Les embouts J et I doivent être montés dans le cylindre d arasement avant d...

Страница 27: ... le cylindre à la main cela ne permet pas d obtenir le couple nécessaire pour serrer les embouts Étape 4 Insérer la vis de calage et la serrer à l aide de la clé Allen de 5 16 po Étape 3 Serrer l embout moteur J à l aide de la clé à tuyau remarque l embout moteur doit être serré très fermement S assurer qu il est aligné sur l orifice de la vis de calage Étape 2 Insérer l embout moteur J dans le cy...

Страница 28: ...Mettre le moteur en marche et tirer le Spin Screed sur le coffrage les tuyaux guides ou les rails guides de façon à étaler le béton frais au niveau souhaité S assurer que le cylindre tourne dans le sens de l éloignement La tête motorisée comporte un commutateur d inversion Le Spin Screed est conçu pour avancer à vitesse lente NE PAS ouvrir la tête motorisée pour augmenter la vitesse de la perceuse...

Страница 29: ... faire couler de l eau directement dans le moteur Il est conseillé d utiliser un nettoyeur à haute pression pour laver le cylindre mais PAS pour nettoyer le bloc moteur et concrete you will probably find that the spin motor can be energized and the Spin Screed slowly pulled o ncrete while muckers are maintaining about a two inch surcharge of concrete in front of the screed Once y dvanced for 6 to ...

Страница 30: ...pour diagnostiquer et résoudre le problème Vérifier que l arbre du moteur est fermement raccordée au mandrin Si un resserrage est nécessaire utiliser la clé de mandrin fournie pour serrer le mandrin à fond sur l arbre du moteur Vérifier que les embouts de cylindre sont complètement serrés Les resserrer s il y a lieu Vérifier que le moteur est réglé sur la vitesse basse par défaut du fabricant 300 ...

Страница 31: ...31 of 32 104 S 8th Ave Marshalltown IA Phone 800 888 0127 641 753 0127 Fax 800 477 6341 641 753 6341 www MARSHALLTOWN com WS2569 ...

Страница 32: ...104 S 8th Ave Marshalltown IA Phone 800 888 0127 641 753 0127 Fax 800 477 6341 64 1 753 6341 www MARSHALLTOWN com WS2569 ...

Отзывы: