Marshall Electronics Orchid OR-2410 Скачать руководство пользователя страница 37

Page 37 of 39 

Maintenance / Color Calibration / Upgrade Procedure 

 Screen Cleaning  

Periodically clean the screen surface using ammonia-free cleaning wipes (Marshall Part No. V-HWP-
K).  A  clean  micro-fiber  cloth  can  also  be  used  using  only  non-abrasive  and  ammonia-free  cleaning 
agents. Do not use paper towels. Paper  towel fibers  are coarse  and may scratch the surface of the 
polycarbonate  faceplate  or  leave  streaks  on  the  surface.  Antistatic  and  fingerprint  resistant  cleaning 
agents are recommended. Do not apply excessive pressure to the screen to avoid damaging the LCD.  

 Faceplate Dusting  

Dust  the  unit  with  a  soft,  damp  cloth  or  chamois.  Dry  or  abrasive  cloths  may  cause  electrostatic 
charge  on  the  surface,  attracting  dust  particles.  Neutralize  static  electricity  effects  by  using  the 
recommended cleaning and polishing practice. 

 Color Calibration 

An optional OR-SM Service Module is required for this procedure. 

Allow  the  unit  you  want  to  calibrate  and  the  Minolta®  CA-310  to  warm  up  for  a  minimum  of  20 
minutes. 

• Attach the CA-310 color probe to the update dongle. 
• With the unit still turned on, insert the update dongle into the service port at the rear of the screen 
you wish to calibrate. 
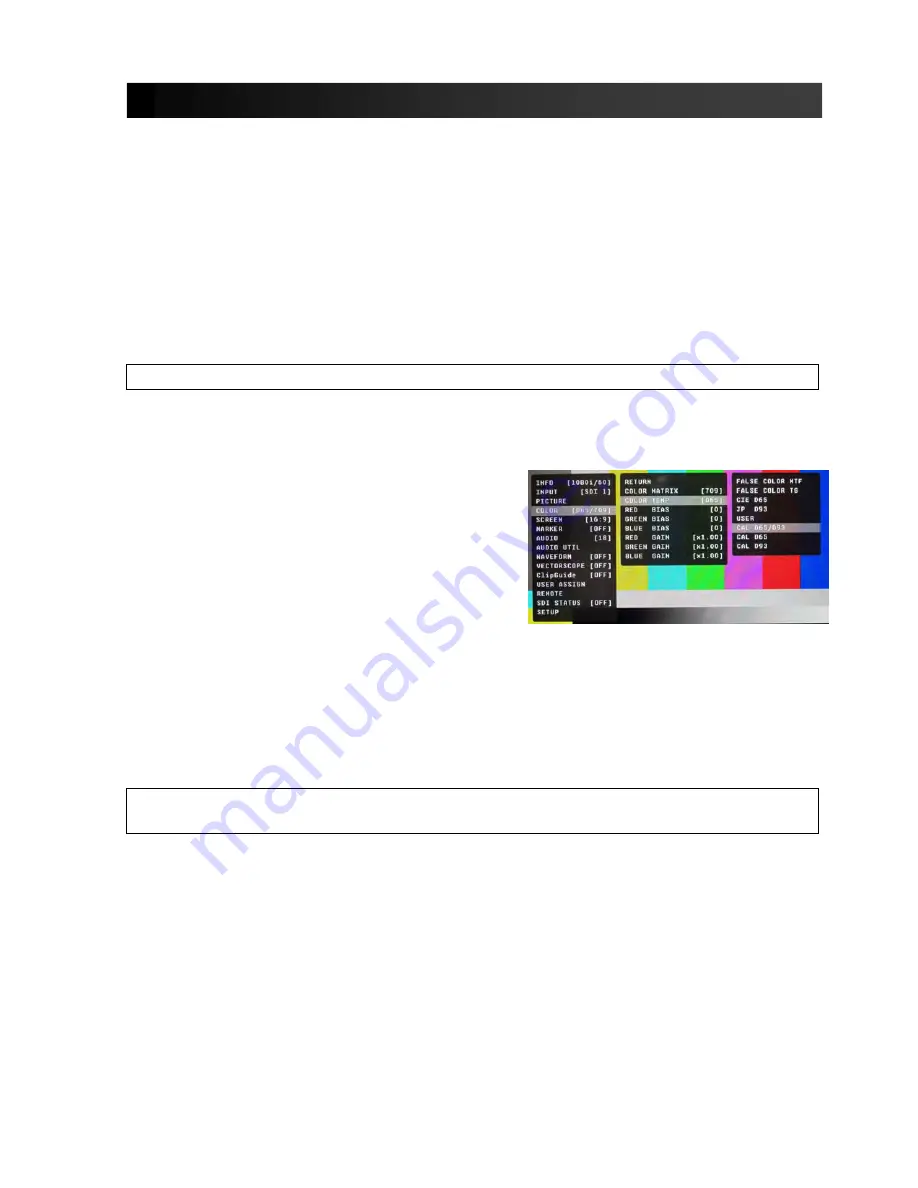
• Use the menu navigation Rotary encoder and go to: 

 - Color Menu 
 - Color Temp 

• Cal D65/D93 to calibrate both 
• Cal D65 to calibrate only D65 
• Cal D93 to calibrate only D93 

 
Press the Rotary encoder to select and again to confirm. 

• Follow the on-screen instructions 

 
Notes:  
1. If there is no color probe attached or you make a mistake and try to calibrate the incorrect screen, 
you will get an error message and the screen will default to previous settings. 
2.  If  the  calibration  process  is  interrupted  while  in  progress,  the  current  screen  settings  will  be 
corrupted and the calibration process will have to be repeated. 

 
Firmware Update 

An optional OR-SM Service Module and connection to the internet is required for this 
procedure. 

1. Download the Orchid updater software package from the Marshall web site  
2. Unzip the included files from the zip folder to a known location on your computer 
3.  Double-click  the  un-zipped  Orchid  updater  program  and  the  firmware  package  to  install  on  your 
computer  
4. Turn on the Orchid unit to be upgraded 
5. Connect the OR-SM module to your computer 
6. Insert the OR-SM module into the service port 
7. Run the Orchid update program 
8. Click Update 

• The Updater will check for available software 
• Compare it to the current version 
• Perform the update. 

Notes:  

• The update process will take approximately 8 minutes. 

Содержание Orchid OR-2410

Страница 1: ...Marshall Electronics OR 2410 Fully Featured 24 Table Top Monitor Directors Camera Assist and Production Monitor Operating Instructions...

Страница 2: ...Page 2 of 39...

Страница 3: ...Power On 8 Front Panel Features 9 Standby Button with Indicator 9 Front Panel Speaker Controls 9 Headphone Jack 9 User Assignable Function Keys 9 Roto Menu Controls 9 Rotary Encoders 10 Front Panel S...

Страница 4: ...h 25 Marker Mat 25 Line Thickness 25 Line Type 25 AUDIO CONFIGURATION SUBMENU 26 AUDIO UTILITY SUBMENU 26 WAVEFORM SUBMENU 27 VECTORSCOPE SUBMENU 28 LAYOUTS 29 LAYOUT QUAD 29 LAYOUT DECK 29 CLIPGUIDE...

Страница 5: ...lage The OR 2410 is equipped with two 3G HD SD SDI inputs with switched outputs as well as analog Composite CVBS Component Y Pb Pr S Video Y C and DVI I and HD VGA inputs Diagnostic tools include our...

Страница 6: ...or YUV in parade format It can also warn the user for out of range conditions such as overexposure or blacker than black errors with fully user adjustable upper and lower limits Real Time Color Vecto...

Страница 7: ...io Level Meters provide numerical indicators and headroom levels as well as peak hold function Audio Channel Loss Warning prevents errors during monitoring Precision White Balance with Color Temperatu...

Страница 8: ...e both the front panel headphone connector and rear panel speaker connector simultaneously with individual volume controls The Aux audio input may be selected as a source when the video input is set t...

Страница 9: ...un mute the internal speakers The led illuminates RED when muted and Green when Un Muted The rotary controls are for Volume and Balance Headphone Jack 3 5mm stereo headphone jack Left and Right sourc...

Страница 10: ...button will return the screen to its previous state Rotary Encoders When not in the MENU mode these four encoders control BRIGHTNESS CONTRAST CHROMA SHARPNESS Front Panel Speakers Tri Color Tally Ligh...

Страница 11: ...f the DC input is correct Pin 1 GND Pin 2 N C Pin 3 N C Pin 4 24VDC Main Power Switch This switch is the Main power switch When using the internal supply or an external DC supply this switch will cont...

Страница 12: ...gnals 11 Analog Video Input Connectors Analog BNC video inputs These three connectors can be used to connect Composite CVBS S Video Y C or Component Y PB PR Analog video signals DVI I Input VGA HD15 V...

Страница 13: ...59 94 50 1080PsF 30 29 97 25 24 23 98 720p 60 59 94 50p 30 29 97 25 24 23 98 SMPTE 274M YCBCR 4 2 2 10bit 1080i 60 59 94 50 1080p 30 29 97 25 24 23 98 1080PsF 30 29 97 25 24 23 98 SMPTE 296M YCBCR 4...

Страница 14: ...ting CHROMA 0 100 50 is Calibrated setting SHARPNESS 0 100 50 is Calibrated setting GAMMA 1 0 to 3 0 in 0 1 steps 2 2 is Calibrated Setting PICTURE RESET TO DEFAULT CANCEL RESET NOW RETURN AUTO RGB BT...

Страница 15: ...is Calibrated Setting Down OFF LEFT EYE RIGHT EYE BLENDING LUMINANCE DIFF 3D REVIEW CHROMA DIFF OFF COLOR HALF COLOR OPTIMIZED SCREEN ANAGLYPH GRAY RETURN MARKER ON OFF CENTER ON OFF OFF 4 3 16 9 1 8...

Страница 16: ...UND ON OFF DECAY FAST MEDIUM SLOW DISPLAY CHANNELS 1 16 DISPLAY FILTER ACTIVE ALL COLUMNS DUAL QUAD VERTICAL DISP TYPE OVERLAP OVERLAY AUDIO PEAK LOG ON OFF 4S 8S 20S 60S 120S LOG SPEED 300S SIZE LARG...

Страница 17: ...BOT RETURN NORMAL DECK QUAD LAYOUT VectorScope ON OFF SIZE SMALL MEDIUM LARGE LEFT TOP LEFT BOT RIGHT TOP POSITION RIGHT BOT TYPE OVERLAY OVERLAP VECTORSCOPE GAIN X1 00 to X1 91 in 01 steps RETURN Cl...

Страница 18: ...R AUDIO SPECTRUM AUDIO PRESET 1 AUDIO PRESET 2 AUDIO PRESET 3 AUDIO PRESET 4 AUDIO PRESET 5 AUDIO PRESET 6 AUDIO PRESET 7 AUDIO PRESET 8 AUDIO MUTE LAYOUT DECK LAYOUT QUAD WAVEFORM MON VECTORSCOPE CLI...

Страница 19: ...TEBALANCE D93 MONO SCAN ASPECT ZOOM HV DELAY RED ONLY BLUE ONLY GREEN ONLY MARKER USER MARKER AUDIO METER AUDIO PEAK LOG AUDIO PHASE MON AUDIO SPECTRUM AUDIO PRESET 1 AUDIO PRESET 2 AUDIO PRESET 3 AUD...

Страница 20: ...OGRAM FALSE COLOR TG FALSE COLOR MTF 3D LEFT EYE 3D RIGHT EYE 3D BLENDING 3D LUMA DIFF 3D CHROMA DIFF GLYPH COLOR GLYPH 1 2 COLOR GLYPH OPTIMIZED GLYPH GRAY HIDE ALL UTIL R TALLY G TALLY B TALLY LEFT...

Страница 21: ...N OFF OFF LTC VITC 1 TIMECODE VITC 2 USERBIT ON OFF ALWAYS ON 2 MIN 5 MIN 10 MIN 30 MIN 1 HOUR POWER SAVE 2 HOUR KEY LOCK LOCK UNLOCK PICTURE DELAY NORMAL FAST FASTEST BACKLIGHT MIN 25 TO 100 RESET TO...

Страница 22: ...ilable sources PICTURE SUBMENU The Picture submenu allows the user to make adjustments to Brightness Contrast Saturation Sharpness and Gamma Brightness o Varies between 0 and 100 50 is standard o 50 i...

Страница 23: ...AL D65 o Used to activate the built in Automatic Color Calibration Program for D65 only CAL D93 o Used to activate the built in Automatic Color Calibration Program for D93 only NOTE When using the bui...

Страница 24: ...y Mono displays as monochrome Red Channel displays red channel only Green Channel displays green channel only Blue Channel displays blue channel only H V Delay Use this setting to enable H V Delay In...

Страница 25: ...play the User Marker a You will see prompts in the upper left corner of the screen b If no action is taken within 5 seconds the prompt will disappear and no modifications can be made 2 The prompts wil...

Страница 26: ...ft output and CH 2 to the Right output or the user can assign CH 1 to both Left and Right for a mono feed Load CH Preset From Use this menu to recall one of the 8 possible memory locations where the u...

Страница 27: ...y mode the waveform will be semi transparent and the user will be able to see the source video through the waveform In the Overlap mode the waveform will be Opaque and will block the source video Y Ov...

Страница 28: ...e display to occupy on the screen when in the Normal mode Choices are Left Top Left Bottom Right Top and Right Bottom Display Type Use this menu to choose how to display the Vectorscope The choices ar...

Страница 29: ...Page 29 of 39 LAYOUTS LAYOUT QUAD LAYOUT DECK...

Страница 30: ...mode Red is the indication for Luma and Yellow is the indication for Chroma Y and C LIMITS These values are shared with WFM settings Y Limits Set luminance upper and lower limits to be monitored Limit...

Страница 31: ...e o When it is enabled the indicator of the key will illuminate o Pressing again will have no effect FOR EXAMPLE Selecting an Input Selecting Audio Preset Selecting White Balance Two Way Functions Pre...

Страница 32: ...e a pin has been pulled down to ground to activate the command such as turning on a tally and then releasing ground open circuit to turn off Priority o The lower pin numbers have higher priorities ove...

Страница 33: ...s displayed is 9999 For example assume that there is a problem with a source and it is outputting a SDI signal with invalid CRC for each line The Orchid Error counter will result in a count of 9999 wi...

Страница 34: ...r to select the processing delay time Normal Typically 3 frame delay with best picture quality Fast Typically 1 5 frame delay at good picture quality Fastest Typically 0 5 frame delay with some pictur...

Страница 35: ...the status of the cooling fan from three options OFF Turns fan off for quiet operation while shooting a scene AUTO The fan will operate only when the internal temperature requires cooling MAX The fan...

Страница 36: ...Page 36 of 39 Specifications...

Страница 37: ...he screen you wish to calibrate Use the menu navigation Rotary encoder and go to Color Menu Color Temp Cal D65 D93 to calibrate both Cal D65 to calibrate only D65 Cal D93 to calibrate only D93 Press t...

Страница 38: ...update program does not automatically detect your Orchid model you will be asked to choose the appropriate model from a drop down list then click update again Clicking on details allows you to monito...

Страница 39: ...rations or modifications in design or construction void this warranty It is considered normal for a minimal amount of pixels not to exceed three to fail on the periphery of the display active viewing...

Отзывы: